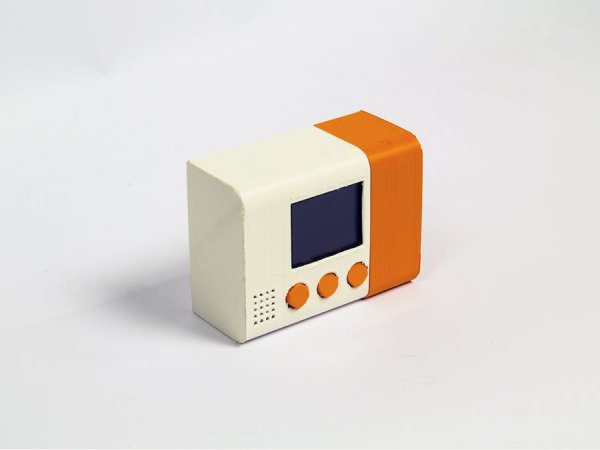
Connect your home heater to Internet and chat with it via Telegram!
Things used in this project
Story
Connect to this smart thermostat by simply texting it, no need of extra dashboards or platforms.
Understanding Telegram Bots
Telegram offers a super useful set of API you can use in your projects.
You can host a bot on you Arduino board and chat with it using a simple library called Telegram Bot. You can install this library via the Library Manager within the Arduino desktop IDE, or by importing the .Zip file on the Arduino Web Editor.
You can learn everything on how to manage a Telegram Bot on the MKR1000 here. In this tutorial we will skip this step, but you will see how to implement a Telegram bot in the final code.
Time management
This thermostat allows you to program a whole week and loop it.
To do that, the thermostat makes an UDP call and uses the data received to set the Real Time Clock (RTC).
Install the RTCZero and the WiFi101 libraries and upload this sketch to test this feature.
#include <SPI.h>
#include <WiFi101.h>
#include <WiFiUdp.h>
#include <RTCZero.h>

RTCZero rtc;
WiFiUDP Udp; // A UDP instance to let us send and receive packets over UDP

// Initialize Wifi connection to the router
char ssid[] = "xxxx";             // your network SSID (name)
char pass[] = "yyyy";           // your network key

WiFiSSLClient client;
unsigned long epoch;
unsigned int localPort = 2390;      // local port to listen for UDP packets
IPAddress timeServer(129, 6, 15, 28); // time.nist.gov NTP server
const int NTP_PACKET_SIZE = 48; // NTP time stamp is in the first 48 bytes of the message
byte packetBuffer[ NTP_PACKET_SIZE]; //buffer to hold incoming and outgoing packets

void setup() {

  Serial.begin(115200);

  // attempt to connect to Wifi network:
  Serial.print("Connecting Wifi: ");
  Serial.println(ssid);
  while (WiFi.begin(ssid, pass) != WL_CONNECTED) {
    Serial.print(".");
    delay(500);
  }
  Serial.println("");
  Serial.println("WiFi connected");

  rtc.begin();
  GetCurrentTime();
}

void loop() {
  Serial.print("Unix time = ");
  Serial.println(rtc.getEpoch());

  // Print date...
  Serial.print(rtc.getDay());
  Serial.print("/");
  Serial.print(rtc.getMonth());
  Serial.print("/");
  Serial.print(rtc.getYear());
  Serial.print("\t");

  // ...and time
  print2digits(rtc.getHours());
  Serial.print(":");
  print2digits(rtc.getMinutes());
  Serial.print(":");
  print2digits(rtc.getSeconds());
  Serial.println();

  delay(1000);
}

void print2digits(int number) {
  if (number < 10) {
    Serial.print("0");
  }
  Serial.print(number);
}

void GetCurrentTime() {

  int numberOfTries = 0, maxTries = 6;
  do {
    epoch = readLinuxEpochUsingNTP();
    numberOfTries++;
  }
  while ((epoch == 0) || (numberOfTries > maxTries));

  if (numberOfTries > maxTries) {
    Serial.print("NTP unreachable!!");
    while (1);
  }
  else {
    Serial.print("Epoch received: ");
    Serial.println(epoch);
    rtc.setEpoch(epoch);
    Serial.println();
  }

}

unsigned long readLinuxEpochUsingNTP()
{
  Udp.begin(localPort);
  sendNTPpacket(timeServer); // send an NTP packet to a time server
  // wait to see if a reply is available
  delay(1000);

  if ( Udp.parsePacket() ) {
    Serial.println("NTP time received");
    // We've received a packet, read the data from it
    Udp.read(packetBuffer, NTP_PACKET_SIZE); // read the packet into the buffer
    //the timestamp starts at byte 40 of the received packet and is four bytes,
    // or two words, long. First, esxtract the two words:

    unsigned long highWord = word(packetBuffer[40], packetBuffer[41]);
    unsigned long lowWord = word(packetBuffer[42], packetBuffer[43]);
    // combine the four bytes (two words) into a long integer
    // this is NTP time (seconds since Jan 1 1900):
    unsigned long secsSince1900 = highWord << 16 | lowWord;
    // now convert NTP time into everyday time:
    // Unix time starts on Jan 1 1970. In seconds, that's 2208988800:
    const unsigned long seventyYears = 2208988800UL;
    // subtract seventy years:
    Udp.stop();
    return (secsSince1900 - seventyYears);
  }
  else {
    Udp.stop();
    return 0;
  }
}
// send an NTP request to the time server at the given address
unsigned long sendNTPpacket(IPAddress & address)
{
  // set all bytes in the buffer to 0
  memset(packetBuffer, 0, NTP_PACKET_SIZE);
  // Initialize values needed to form NTP request
  // (see URL above for details on the packets)

  packetBuffer[0] = 0b11100011;   // LI, Version, Mode
  packetBuffer[1] = 0;     // Stratum, or type of clock
  packetBuffer[2] = 6;     // Polling Interval
  packetBuffer[3] = 0xEC;  // Peer Clock Precision
  // 8 bytes of zero for Root Delay & Root Dispersion
  packetBuffer[12]  = 49;
  packetBuffer[13]  = 0x4E;
  packetBuffer[14]  = 49;
  packetBuffer[15]  = 52;

  // all NTP fields have been given values, now
  // you can send a packet requesting a timestamp:
  Udp.beginPacket(address, 123); //NTP requests are to port 123
  Udp.write(packetBuffer, NTP_PACKET_SIZE);
  Udp.endPacket();
}
Saving settings
Of course you don’t want your thermostat to forget its settings every time it turns off 🙂
To avoid this issue you can store data in the flash memory of your board by using the FlashStorage library.
In this particular case we use this feature to store a struct of 7 days and 7*24 hours, and the value of the desired temperature.
Upload this example to test this feature.
Upload this example to test this feature.
/*
  Store and retrieve an integer value in Flash memory.
  The value is increased each time the board is restarted.
  This example code is in the public domain.
  Written 30 Apr 2015 by Cristian Maglie
*/

#include <FlashStorage.h>

// Reserve a portion of flash memory to store an "int" variable
// and call it "my_flash_store".
FlashStorage(my_flash_store, int);

// Note: the area of flash memory reserved for the variable is
// lost every time the sketch is uploaded on the board.

void setup() {
  SERIAL_PORT_MONITOR.begin(9600);

  int number;

  // Read the content of "my_flash_store" and assign it to "number"
  number = my_flash_store.read();

  // Print the current number on the serial monitor
  SERIAL_PORT_MONITOR.println(number);

  // Save into "my_flash_store" the number increased by 1 for the
  // next run of the sketch
  my_flash_store.write(number + 1);
}

void loop() {
  // Do nothing...
}
Reading values from the sensors
In this project we are using a DHT sensor that can detect humidity and temperature. This sensor has its own library, you can download it here.
Since the sketch implements a lot of functionalities we organized it in different tabs, these following snippets of code refer to the sensors.
In the Config tab we declare the sensor’s class:
//#define USE_fahrenheit true  // Uncomment this to use Fahrenheit insted of Celsius

class Sensor {
  public:
      Sensor(void);
      void begin();
      bool ReadSensors();
      float GetTemp();
      float GetHumidity();
  private:
      float t;
      float f;
      float h;
};
extern Sensor DHTSensor;
In another tab we define the sensor class:
#include "DHT.h"
#include "config.h"

DHT dht(DHTPIN, DHTTYPE);

Sensor::Sensor(void) {
}

bool  Sensor::ReadSensors() {
  h = dht.readHumidity();
  t = dht.readTemperature(); // Read temperature as Celsius (the default)
  f = dht.readTemperature(true);  // Read temperature as Fahrenheit (isFahrenheit = true)
  if (isnan(h) || isnan(t) || isnan(f)) {             // Check if any reads failed and exit early (to try again).
    Serial.println("Failed to read from DHT sensor!");
    return false;
  }

  return true;
}

void Sensor::begin() {
  dht.begin();
}

float  Sensor::GetTemp() {
#ifdef USE_fahrenheit
  return f;
#else
  return t;
#endif
}

float Sensor::GetHumidity() {
  return h;
}
Hardware components and libraries
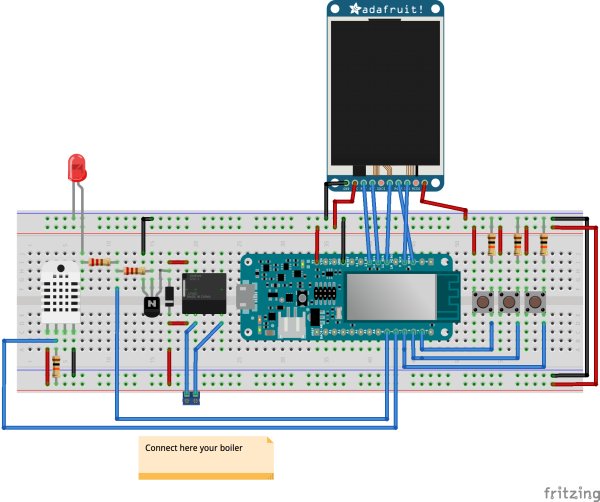
Now you can start wiring up your thermostat. Consider that the LCD display requires the GFX and the ST7735 libraries, while the DHT sensor needs the DHT-sensor-library.
Custom parts and enclosures
Schematics
Code
Source : Smart Thermostat


