
Summary of Servo Control Using 4Duino
This project demonstrates controlling a DC Servo Motor's angular position using a 4Duino resistive touch display and PWM signals. The system utilizes a graphical interface on the 4Duino to manage motor movement via a touch knob, leveraging Workshop 4 software for programming and Arduino IDE for compilation.
Parts used in Servo Control Using 4Duino:
- 4Duino
- DC Servo Motor
- Jumper cables
- Micro USB cable
- µSD card
In this project, we will control the angular position of the DC Servo Motor via an I/O port (with PWM output capability) and touch knob. The 4Duino resistive touch display is used as a means for a graphical interface to control the angular position of the Servo.
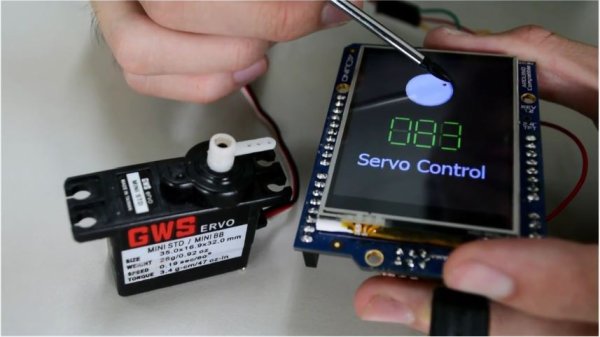
Servo motor is a very useful device for hobbyists and robot enthusiasts as it allows your project to have moving parts. Servo motors are unique, as they operate through a position control using a PWM signal (i.e. pulse width modulated signal). This signal controls the angle to which the motor’s gear is rotated.
How It Works
Components
- 4Duino
- DC Servo Motor
- Jumper cables
- Micro USB cable
- µSD card
Implementation
Step 1: Build
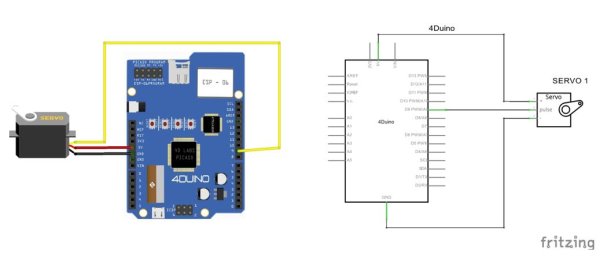
Build the circuit as shown in the following diagram and schematic.
Step 2: Program
Workshop 4 – 4Duino Extended Graphics environment is used to program this project.
This project requires the Arduino IDE to be installed as Workshop calls the Arduino IDE for compiling the Arduino sketches. The Arduino IDE however is not required to be opened or modified to program the 4Duino.
Open this file using Workshop 4.
Note: Download the project here.
Step 3: Comms Port
Connect the 4Duino to the PC using µUSB cable.
Then navigate to the Comms tab and select the Comms port to which the 4Duino connected.
Step 4: Compile and Upload
Finally, go back to “Home” tab and now click on the “Comp’nLoad” button.
The Workshop 4 IDE will prompt you to insert a micro SD card to the PC in order to save the widget images. Insert micro SD card, select the appropriate drive and press button “OK”.
Read more: Servo Control Using 4Duino
-
How does a servo motor operate?
Servo motors operate through position control using a PWM signal which controls the angle to which the motor's gear is rotated. -
What device is used as the graphical interface?
The 4Duino resistive touch display is used as a means for a graphical interface to control the angular position of the Servo. -
Which software environment is used to program this project?
Workshop 4 – 4Duino Extended Graphics environment is used to program this project. -
Is the Arduino IDE required to be opened during programming?
No, the Arduino IDE is not required to be opened or modified to program the 4Duino, though it is called by Workshop for compiling sketches. -
How do you connect the 4Duino to the PC?
You connect the 4Duino to the PC using a µUSB cable. -
When must the micro SD card be inserted into the PC?
The micro SD card must be inserted when prompted by the Workshop 4 IDE to save the widget images after clicking Comp'nLoad. -
What signal controls the motor's gear rotation angle?
A pulse width modulated (PWM) signal controls the angle to which the motor's gear is rotated.
