Summary of Rubik’s Cube Solver using arduino
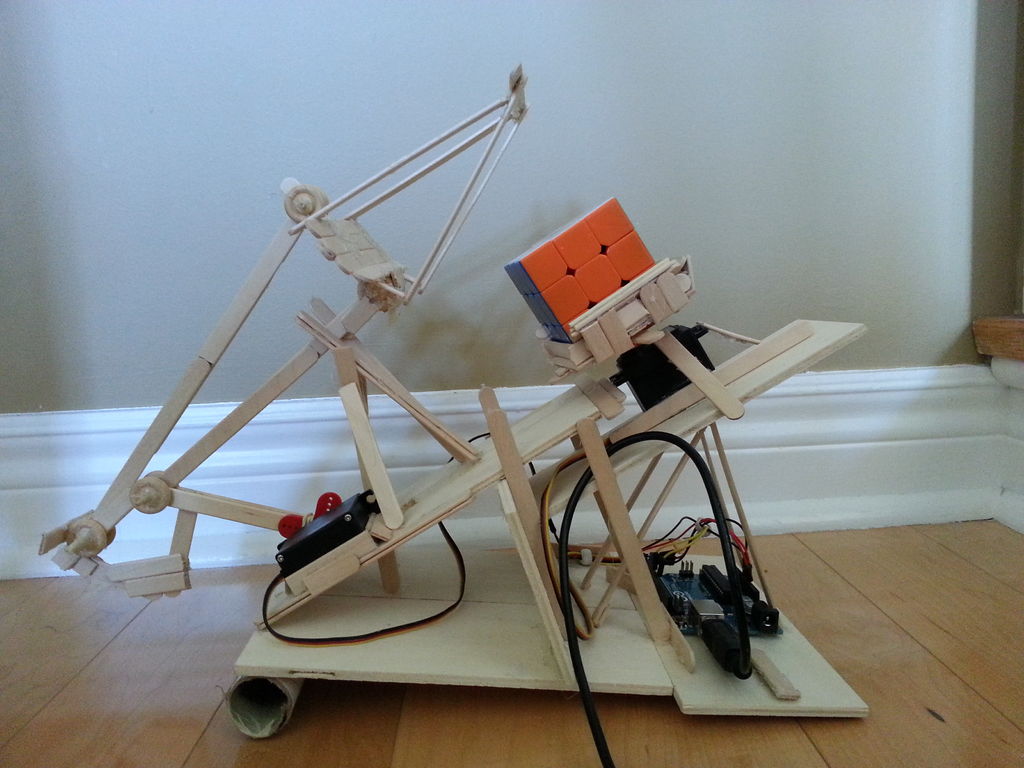
This project builds a Tilted Twister–style Rubik's Cube solving robot using an Arduino, two servos, popsicle-stick mechanics, and a Python Tkinter GUI. The Arduino sketch simulates cube state with arrays, applies layer-by-layer algorithms, and commands servos to push and rotate the cube. The Python GUI lets the user enter cube colors and sends the state over serial to the Arduino for solving. The physical build uses simple wooden parts, hot glue, and a rotating platform driven by one servo while an arm manipulates the cube.
Parts used in the Rubik's Cube Solver:
- Arduino UNO R3
- 2 servos (Hitec HS-311 used)
- Wires
- USB cable
- Popsicle sticks
- Wooden skewers
- Thin plywood
- Wooden wheel (with hole for skewer)
- Hot glue
- Paper towel roll
- Capacitors (optional, for smoothing servo jitter)
- Arduino IDE (software)
- Python 2.7+ and Tkinter (GUI)
- Pyserial (serial communication)
This robot that can solve a Rubik’s cube using Arduino.
I learned how to solve a Rubiks cube last year, and I was also into Arduino, so eventually I ended up with an idea to make my own Rubik’s cube solver.
Like many people searching for “Rubik’s Cube Solver” on Google, one of the first robots I found was the Tilted Twister design by Hans Andersson:
I looked around at some other Rubik’s cube solvers, but I liked that design because of it’s (relative) simplicity, so I built a similar version of it with popsicle sticks, an Arduino and 2 servos.
In the end, my robot takes about 20 minutes to enter the cube state and solve.
Step 1: Materials
– Arduino UNO R3
– 2 servos (I used Hitec HS-311’s)
– wires
– USB cable
You can get all of these parts from any robotics store. I got them from canadarobotix.com
Hardware:
– popsicle sticks
– wooden skewers
– thin plywood
– wooden wheel (skewer must fit inside the hole)
– hot glue
– paper towel roll
Software:
– Arduino IDE – (Algorithms in C++)
– Python 2.7+ and Tkinter – (GUI)
– Pyserial
Step 2: Electronics
1. Connect the yellow (signal) wires from the push and rotation servos to pin 6 and 9, respectively.
2. Connect the positive and negative wires to the 5v power source and ground. Sometimes the servos had jitters, so I think a few capacitors could have smoothed out the current.
Step 3: Mechanical Design
I looked at a few designs but settled on the Tilted Twister because it only required 2 servos to operate, which wasn’t as complex mechanically as other robots such as the Cubestormer.
So here’s how the mechanism basically works:
1. A platform holds and rotates the cube.
2. The arm pushes and holds the cube.
When I first tried to build the solver, I tried to follow building instructions here:
But I was pretty lazy and didn’t follow the instructions, so I made a wooden replica with a few tweaks.
I haven’t documented every step of the build process, but I think you can reproduce the tilted twister design with a few tweaks:
1. Slanted sticks to prevent the cube from snagging.
2. To build the arm joints,
– I drilled a hole into ends of the popsicle sticks.
– I cut out 2 cm of a wooden skewer.
– I inserted the skewer into the sticks
– Glued wooden wheels that act as washers on each end.
Honestly building the physical solver was a lot harder and complex than I expected, so if you have any questions on how I built the solver, just ask.
Step 4: Arduino Sketch – Cube Solving Algorithm
So basically the code I wrote uses combinations of pushes, holds and platform rotations to apply algorithms to the cube.
There are 3 main parts of my code: the algortihm, GUI (enter cube state) and the serial communications
Let’s start with the Arduino sketch. It basically uses algorithms to manipulate the cube colours:
1. There are 6 char arrays represent each face of the cube.
2. Using a basic layer by layer method of solving the Rubik’s cube, I made a function, cube_decide(), that goes through each stage or the cube solving process.
3. Within each stage, such as cube_decide_cross() (solving the cross), the program would check for specific locations of colours in the cube, and if an algorithm was matched with the condition, cube notation like ‘U’ (Up) or entire algorithms, like fix_cross_instance_1() would be run.
4. The cube notation and algorithms control the servo functions, such as push_cube() or rotate_one().

Here’s a basic overview of the code structure (layers of abstraction):
Cube Decide functions < Cube Algorithms < Cube Move functions < Servo functions < Move Function
One major breakthrough I had was that I actually simulated the cube’s movements in the program. The program reassigns the values in the arrays to simulate and cube rotation. This way, the program can simulate the cube move before it physically executes it.
Step 5: Python GUI
I needed a better way of entering the cube state than directly typing them into the Arduino sketch, so I got the idea of creating a GUI from this robot: [Play Video]
Because I’m new to making Tkinter GUI’s (Graphical user interface) and didn’t want to make one from scratch, I found a tic tac toe GUI here.
Then I turned the 3×3 array of buttons into something resembling a cube and added a few buttons. I also added buttons that would change colour each time they were clicked. Finally I made 5 more windows that would pop up one after the other, and transfer the colours entered into a local array in the script.
However, I really slapped the code together in a mess, since I simply copy and pasted 6 separate windows, with almost identical functions. Any suggestions on how I could clean up the code are welcome!
For more detail: Rubik’s Cube Solver using arduino
- What components are required to build this Rubik's Cube solver?
The article lists an Arduino UNO R3, 2 servos, wires, USB cable, popsicle sticks, wooden skewers, thin plywood, a wooden wheel, hot glue, a paper towel roll, and software: Arduino IDE, Python 2.7+ with Tkinter, and Pyserial. - How many servos does the design use?
The design uses 2 servos: one for rotation and one for pushing/holding the cube. - Does the Arduino code simulate cube movements before executing them?
Yes, the program reassigns values in arrays to simulate cube moves before physically executing them. - What solving method does the Arduino sketch implement?
It uses a basic layer-by-layer method with functions for stages like solving the cross and matching algorithms to cube conditions. - How is the cube state entered into the system?
Cube colors are entered via a Python Tkinter GUI which sends the state to the Arduino over serial. - Can the servo jitter be reduced and how?
The article suggests that adding a few capacitors could smooth out servo current and reduce jitter. - What mechanical design inspired this build?
The Tilted Twister design by Hans Andersson inspired the build because it requires only 2 servos. - How long does the robot take to enter the cube state and solve?
The article states it takes about 20 minutes to enter the cube state and solve. - What are the main parts of the Arduino code structure?
The code structure is: Cube Decide functions < Cube Algorithms < Cube Move functions < Servo functions < Move Function. - Were detailed mechanical build steps fully documented?
No, the author did not document every step and notes the physical build was harder than expected.