
Summary of RFM12B – Part 1 – Hardware Overview
The RFM12B is a low-cost Hope RF transceiver offering up to 300m range and 115Kbps speed across ISM bands (433, 868, 915 MHz). It supports SPI interfaces, operates at 2.2-3.8V with ultra-low power consumption, and allows networks of up to 30 nodes. The article details hardware identification via capacitors, specific antenna length calculations for different frequencies, and software integration using Arduino libraries from JeeLabs and OpenEnergyMonitor.
Parts used in the RFM12B Wireless Project:
- RFM12B wireless transceiver module
- SPI interface microcontroller (e.g., Atmega328 or ATmega32U4)
- Capacitor (for frequency identification)
- Antenna (cut to specific wavelengths)
- Arduino Leonardo board (optional alternative)
- RFM12 Arduino library (JeeLib)
- OpenEnergyMonitor code example
To see how RFM12B wireless compares to other similar wireless options (e.g Xbee, XRF etc..) check out this well compiled comparison overview by Stuart Poulton: http://blog.homelabs.org.uk/wireless-connectivity/.
Overview
Made by Hope RF, re-branded by RFsolutions in the UK. Sometimes called ‘Alpha RF’
Low cost RF transceiver (from Rapid, Farnell, or RS in the UK)
Up to 300m transmission
Up to 115Kbps
Up to 30 nodes per network*
Up to 250 different network groups
3 different ISM band frequencies: 433MHz (worldwide), 868MHz (Europe), 915MHz (USA & Australia only) . Note: frequency of a module is set in software, for best performance the frequency set should match the intended hardware frequency of the module.
*node ID’s can be 0-31 with 1-30 used for normal use.
ID 31 is special as it can communicate with nodes on any network and ID 0 is reserved for OOK use
Hardware
SPI interface
2.2-3.8V supply voltage
Low power – 0.3µA standby current
Datasheet: http://www.hoperf.com/pro/rf/cob/RFM12B.htm
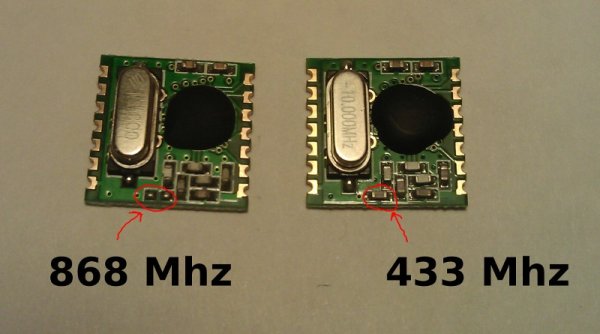
Identifying the frequency of your module
Includes additional capacitor = 433 MHz
Missing capactior = 868 MHz
Antenna
433 1/4 wave = 164.7mm
433 1/2 wave = 329.4mm
433 full wave = 692.7mm
868 1/4 wave = 82.2mm
868 1/2 wave = 164.3mm
868 full wave = 345.5mm
915 1/4 wave = 77.9mm
915 1/2 wave = 155.9mm
915 full wave = 327.8mm
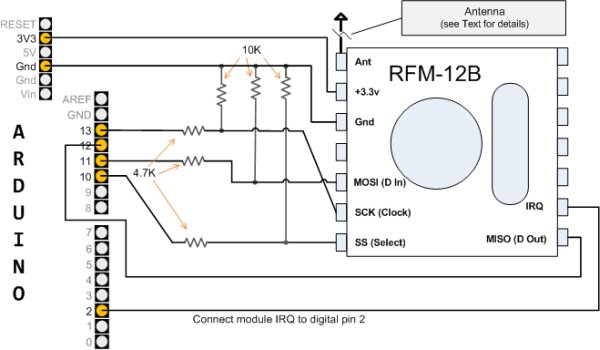
Credit to Michael Margolis from Arduino Cookbook for Arduino connection diagram.
Alternative connection diagram (only for when Atmega328 is running at 3.3V):
Update: Arduino Leonardo (ATmega32U4) requires different connections. See this blog post for details.
Software
Code example: https://github.com/openenergymonitor/RFM12B_Simple
RFM12 Arduino library from JeeLabs: https://github.com/jcw/jeelib – credit to JCW for this great work
See this post by JCW describing the Nodes, Addresses and operation of the JeeLib RFM12 Arduino Library: http://jeelabs.org/2011/01/14/nodes-addresses-and-interference/
JeeLib library reference: http://jeelabs.net/pub/docs/jeelib/RF12_8cpp.html
For more detail: RFM12B – Part 1 – Hardware Overview
- What are the available frequency bands for the RFM12B?
The module supports three ISM band frequencies: 433MHz worldwide, 868MHz in Europe, and 915MHz in USA and Australia. - How can I identify the frequency of my RFM12B module?
An additional capacitor indicates a 433 MHz module, while a missing capacitor indicates an 868 MHz module. - What is the maximum transmission distance of the RFM12B?
The module offers up to 300 meters of transmission range. - Can the RFM12B support multiple network groups?
Yes, it supports up to 250 different network groups with up to 30 nodes per network. - Does the RFM12B require a specific voltage supply?
The hardware requires a supply voltage between 2.2V and 3.8V. - Which library is recommended for Arduino integration?
The article recommends the RFM12 Arduino library from JeeLabs and provides examples from OpenEnergyMonitor. - Are there different connection requirements for the Arduino Leonardo?
Yes, the Arduino Leonardo requires different connections compared to the standard Atmega328 setup. - What is the standby current consumption of the device?
The module features low power consumption with a standby current of 0.3µA.
