Summary of Programming ATtiny85 with Arduino Uno
This article outlines a cost-effective method to read multiple sensor data using ATtiny85 microcontrollers instead of expensive Arduino Unos. It details configuring an Arduino Uno as an In-System Programmer (ISP) and installing necessary board support in the Arduino IDE. A 10uF capacitor is added to prevent auto-reset during programming.
Parts used in the ATtiny85 Sensor Project:
- ATtiny85 microcontroller
- Arduino Uno development board
- PC with Arduino IDE
- 10uF capacitor
- Connecting wires
Story
I am working on a project which requires reading multiple sensor data on different locations. These require only few PWM pins so using multiple Arduino Uno would be expensive and unnecessary. So I decided to use ATtiny85 microcontroller in place of Arduino Uno development boards. ATtiny85 is a cheap and powerful alternate when u don’t need too many PWM pins. Since ATtiny85 is just a microcontroller we need a Arduino Uno to program it. In this project I will explain how to do it. Below is the pin configuration of ATtiny85 and the datasheet can be found here http://www.atmel.com/images/atmel-2586-avr-8-bit-microcontroller-attiny25-attiny45-attiny85_datasheet.pdf.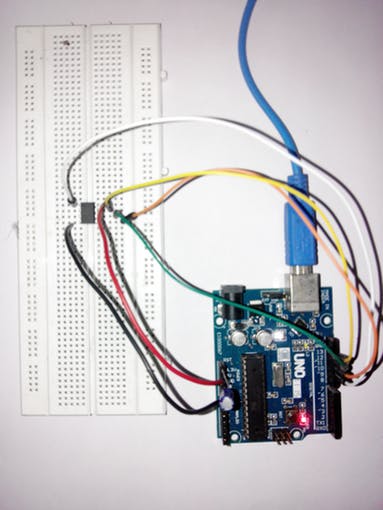
Configuring Arduino Uno as a ISP (In-System Programming)
To program the ATtiny85 we need to first set Arduino Uno in ISP mode. Connect your Arduino Uno to the PC. Open Arduino IDE and open the ArduinoISP example file (File -> Examples -> ArduinoISP) and upload it.
Adding ATtiny85 Support to Arduino IDE
By default Arduino IDE doesn’t support ATtiny85 so we should add ATtiny boards to Arduino IDE. Open File -> Preferences and in the Additional Boards Manager URLs give this url https://raw.githubusercontent.com/damellis/attiny/ide-1.6.x-boards-manager/package_damellis_attiny_index.json.
After opening Board Manager scroll down the list where it says “attiny by Davis A. Mellis”. Click on that and install it.
After installing now you would be able to see a new entry in the Board menu
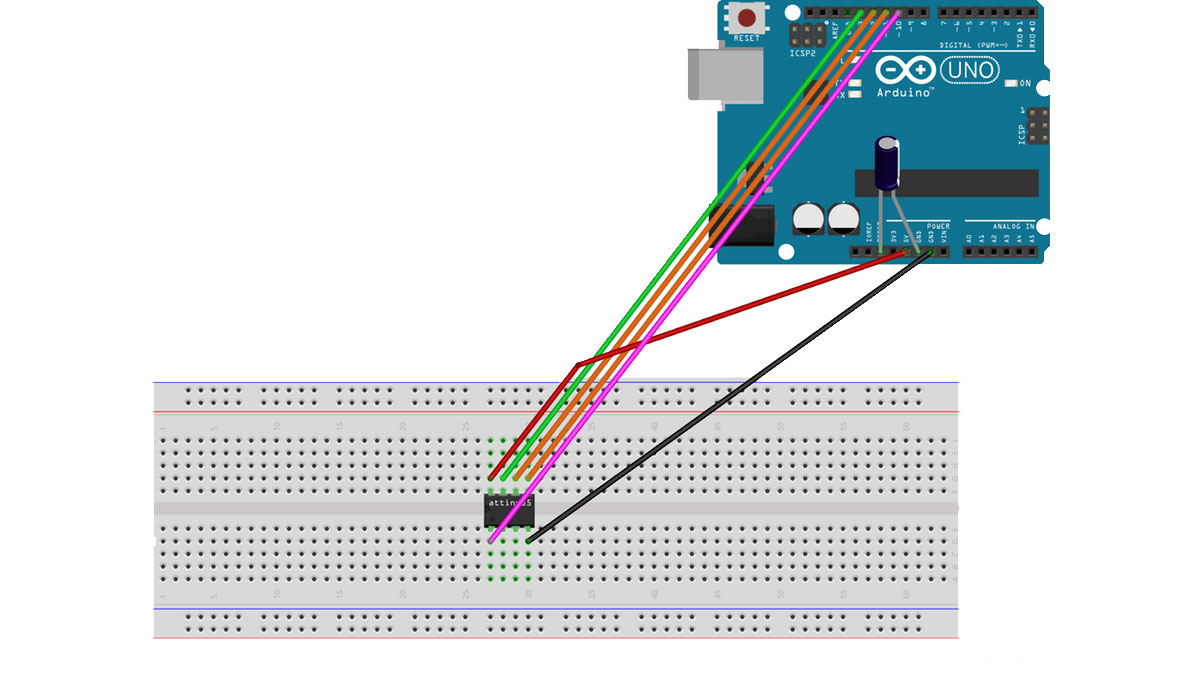
Add a 10uF capacitor between RESET and GND in arduino. This is to avoid arduino from being auto reset when we upload the program to attiny85. If you are using a electrolytic capacitor make sure the anode goes in GND of uno.
For more detail: Programming ATtiny85 with Arduino Uno
- Why choose ATtiny85 over Arduino Uno?
ATtiny85 is a cheaper and powerful alternative when few PWM pins are needed. - Can I program ATtiny85 directly without an Arduino Uno?
No, you need an Arduino Uno to program the ATtiny85 since it is just a microcontroller. - How do I configure Arduino Uno for ISP mode?
Open the ArduinoISP example file in Arduino IDE and upload it to the Uno. - Does Arduino IDE support ATtiny85 by default?
No, you must add ATtiny boards via the Boards Manager URL. - What URL is required to add ATtiny support?
Use https://raw.githubusercontent.com/damellis/attiny/ide-1.6.x-boards-manager/package_damellis_attiny_index.json. - Where should I install the ATtiny board package?
Install it under "attiny by Davis A. Mellis" in the Board Manager. - Why add a 10uF capacitor between RESET and GND?
To avoid the Arduino from being auto-reset when uploading programs to the ATtiny85. - Which pin does the anode of the electrolytic capacitor connect to?
The anode goes into the GND of the Uno.