Summary of Popsicle Stick Robotic Arm
This article outlines a DIY project to build a simple robotic arm with a gripper using popsicle sticks, an Arduino Uno, and four micro servos. The guide details the necessary supplies, tools, and step-by-step assembly instructions, including servo calibration, horn attachment, and gluing popsicle sticks to create the arm's structure.
Parts used in the Popsicle Stick Robotic Arm:
- 14 Popsicle Sticks
- 4 Micro Servos (with horns and screws)
- 4 Rotary Potentiometers
- 1 Half Size Breadboard
- 1 Arduino Uno
- 1 6-Volt Battery Pack
- 26 Jumper Cables
- Hot Glue Gun + Hot Glue Sticks
- Precision screwdriver
- Arduino IDE
- USB to Arduino Cable
- 3 Horns that extend in 2 directions
- 1 Horn that extends in 1 direction
Here’s how to build a simple robotic arm with a gripper using popsicle sticks, an Arduino, and a few servos.
Supplies:
Feel free to use similar materials or whatever you already have. (e.g. cardboard instead of popsicle sticks)
Materials:
- 14 Popsicle Sticks
- 4 Micro Servos (with their horns and screws)
- 4 Rotary Potentiometers
- 1 Half Size Breadboard
- 1 Arduino Uno
- 1 6-Volt Battery Pack
- 26 Jumper Cables
Tools:
- Hot Glue Gun + Hot Glue Sticks
- Precision screwdriver or other small screwdriver
- Arduino IDE
- USB to Arduino Cable
Step 1: Choose Horns for Your Servos
Materials for This Step:
- 4 Micro Servos
- 3 Horns that extend in 2 directions
- 1 Horn that extends in 1 direction
Instructions:
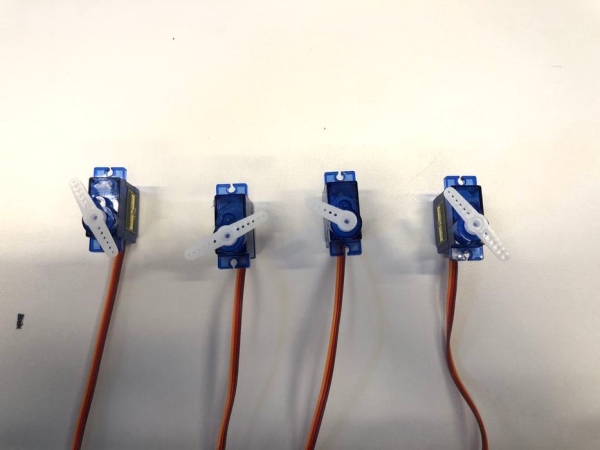
Attach the horns (white wing attachments) to the servos. Three of the servos need the horn that extends in two directions while one servo will need the horn that extends in just one direction. Simply pop the horns onto the top of the servos.
Step 2: Calibrate the Servos

Materials for This Step:
- 4 Micro Servos
Instructions:
Turn the horn counter-clockwise as far as possible. Then, pop the horn off and back on at the calibrated position.
One of the servos with the double-direction horns needs to be calibrated parallel to the servo while the other three need to be calibrated perpendicular to the servos.
Above is a picture of the calibrated servos turned fully counterclockwise. These are the calibrated positions.
Why calibrate the servos? Servos only move 180 degrees so it’s important that we calibrate the servos so that the servo turns between the angles we want therm to.
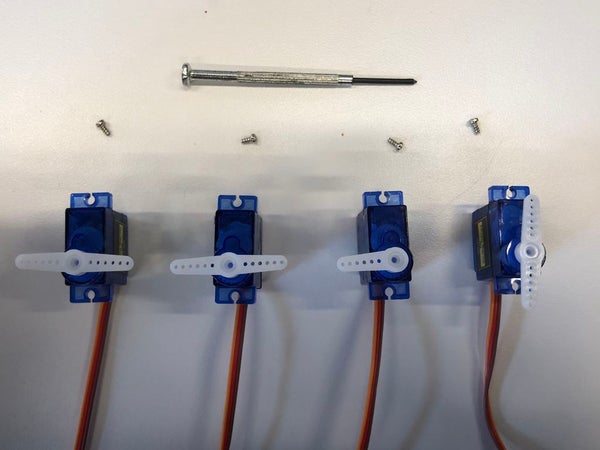
Step 3: Screw in the Servos
Materials for This Step:
- 4 Micro Servos
- 4 Small Screws
- Precision screwdriver or other small screwdriver
Instructions:
Screw the horns in using a small screw and the appropriate screwdriver.
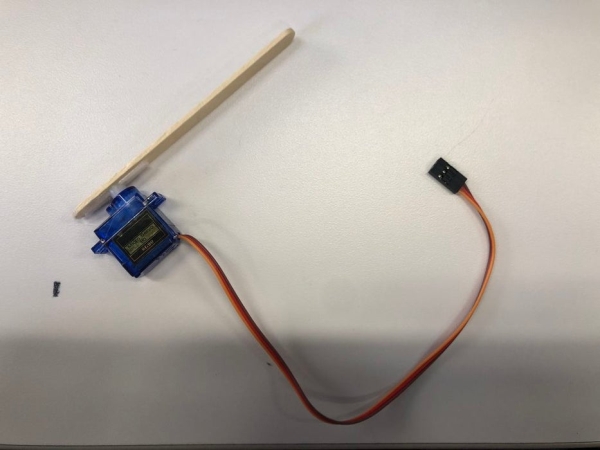
Step 4: Attach Popsicle Sticks to Servos (pt 1/4)
Materials for This Step:
- The one servo that was calibrated so the horn is parallel to the servo
- 1 Popsicle Stick
- Hot Glue Gun
Instructions:
For the servo that was calibrated so the horn is parallel to the servo, hot glue one end of the popsicle stick to the flat side of the horn.
Above is a picture of this servo turned completely counterclockwise.
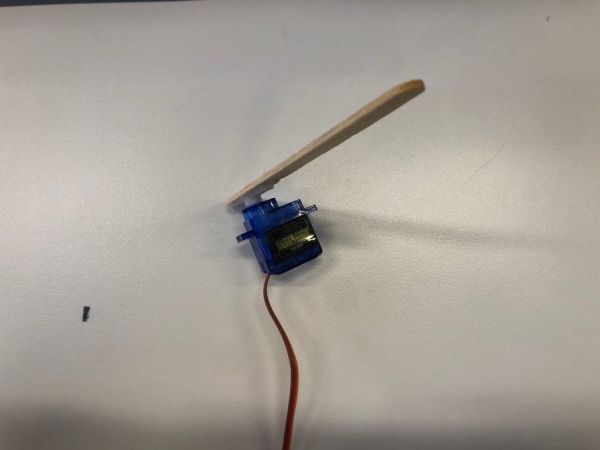
Step 5: Attach Popsicle Sticks to Servos (pt 2/4)
Materials for This Step:
- One of the other two servos that have double-direction horns
- 1 Popsicle Stick
- Hot Glue Gun
Instructions:
Glue one end of the popsicle stick to the flat side of the servo’s horn.
Above is a picture of this servo turned completely counterclockwise.
Read more: Popsicle Stick Robotic Arm
- What materials are needed for this project?
You need 14 popsicle sticks, 4 micro servos, 4 rotary potentiometers, 1 half-size breadboard, 1 Arduino Uno, 1 6-volt battery pack, 26 jumper cables, a hot glue gun, and a precision screwdriver. - How many servos require double-direction horns?
Three of the servos need the horn that extends in two directions while one servo needs the horn that extends in just one direction. - Why is it important to calibrate the servos?
Servos only move 180 degrees so it is important to calibrate them so that the servo turns between the angles you want them to. - How should the calibrated servos be positioned relative to each other?
One of the servos with double-direction horns needs to be calibrated parallel to the servo while the other three need to be calibrated perpendicular to the servos. - Can I use cardboard instead of popsicle sticks?
Yes, you are free to use similar materials or whatever you already have, such as cardboard instead of popsicle sticks. - What is the first step after choosing the horns?
The next step is to attach the horns to the servos by popping them onto the top of the servos. - How do you physically attach the servos to the structure?
You screw the horns in using a small screw and the appropriate screwdriver.