Summary of Pan & Tilt Servo bracket controlled by Arduino
This article guides users through constructing a sturdy, low-cost pan and tilt turret for RC or Arduino projects. The build utilizes common materials like an aluminum plate and a camera tripod, requiring only basic tools such as a jigsaw and drill. The project emphasizes customization, particularly regarding servo mounting dimensions, and includes example code to control the servos via an Arduino Uno.
Parts used in the Pan & Tilt Servo Bracket:
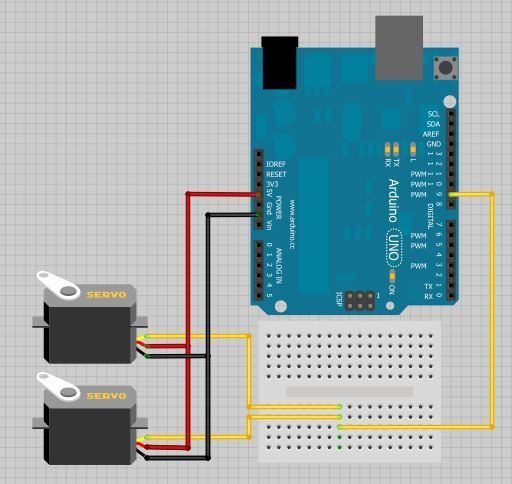
- Arduino Uno (or other)
- Example code
- 7 wires
- Breadboard
- Camera tripod
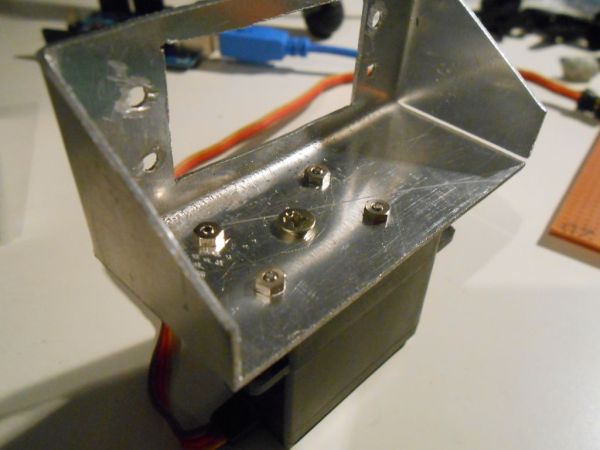
- Aluminum plate (1mm thick)
- 4 miniature nuts and screws
- 8 (3x10mm) allen screws and 8 nuts
- 1 servo horn (at least with 4 holes)
- 1 big nut for the tripod
Hi, in this instructable i am showing you how to build a very nice and very sturdy pan & tilt turret for your rc / arduino projects.
(Please don`t judge my english grammer etc. i`m from holland)
The things that you need for this project are not expansive or hard to find so it should be easy to build.
You don`t need expansive tools or anything to build this, just use your imagination and some handy hands 😀
Step 1: Materials
The materials and tools that you’re going to need.
Materials:
– Arduino Uno (or other)
– example code (included)
– 7 wires
– breadboard
– camera tripod (i used a small one)
– aluminum plate (1mm thick)
– 4 miniture nuts and screws
– 8 (3x10mm) allen screws and 8 nuts
– 1 servo horn at least with 4 holes
– 1 big nut for the tripod (i got this from an old camera)
Tools:
– miniature jigsaw
– ruler
– pencil
– the design of your brackets (included)
– sandpaper
– drill
– screwdriver
– vice (for bending)
Step 2: Design
First you need to draw the disign on the aluminum.
Step 3: Jigsaw
Now you need to saw the design out of the aluminum very carefully with the jigsaw.
try to make the saw lines as smooth as possible so when it’s done it looks really nice.
WARNING !!!
Mension that in the second picture there are no holes for the screws to mount the servo, i’ve done this because the dimensions of every servo are slighly different !
So you must figuer that part out by yourself !
– example code (included)
– 7 wires
– breadboard
– camera tripod (i used a small one)
– aluminum plate (1mm thick)
– 4 miniture nuts and screws
– 8 (3x10mm) allen screws and 8 nuts
– 1 servo horn at least with 4 holes
– 1 big nut for the tripod (i got this from an old camera)
For more detail: Pan & Tilt Servo bracket controlled by Arduino
- What materials are required for this project?
The project requires an Arduino Uno, 7 wires, a breadboard, a camera tripod, a 1mm aluminum plate, miniature nuts and screws, allen screws and nuts, a servo horn, and a big nut from an old camera. - Can I use a different board than the Arduino Uno?
Yes, the instructions state you can use the Arduino Uno or another compatible board. - How do I cut the design on the aluminum plate?
You must saw the design out of the aluminum very carefully using a miniature jigsaw to ensure smooth lines. - Why are there no pre-drilled holes for the servo in the design?
Holes were omitted because the dimensions of every servo are slightly different, so you must figure that part out yourself. - What tools are needed to bend the metal parts?
A vice is listed as the tool specifically for bending the metal components. - Is expensive equipment necessary to build this turret?
No, the author states that the materials are not expansive and you do not need expensive tools to build it. - Where can I find the design for the brackets?
The design of the brackets is included with the project instructions. - Does the project come with example code?
Yes, example code is included with the project materials.