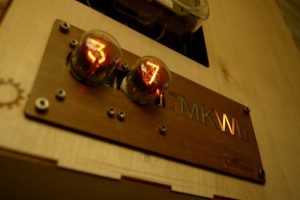
Having recently bought a house, project time has been a bit thin on the ground. As a standard terrace house, the consumer unit and electricity meter were in the entrance hallway, exposed and looking a bit naff. I liked the look of the meter so I quickly created a box that allowed the meter to poke through and leave access to the fuses.
The box covering did the job but felt a bit cumbersome with all that spare space; it needed something else to give it more purpose. An energy meter was the obvious thing but I didn’t want a garish LCD or 7 segment display, it need to match the blown glass electricity meter… …nixie tubes!
Design
I’ve wanted to use nixie tubes in a project for a long time – almost tempted by the bog-standard clock – so once I had the vision on this one I set about it in zero time! I’m afraid I didn’t design the driving circuit myself, instead I went for this very tidy Nixie Module. Working off 5V and SPI it is nice and quick to get a project off the ground. It is expensive but the build quality and time saved designing something else made it a worthy investment. An Arduino would be the microcontroller but I wanted the meter to provide some form of data stream for a web based energy history. To make it an IoT, I a paired ESP8266 with it. I used both together because the Arduino ADC has a better resolution and has been tried and tested.
Display
Considering the expense of the Nixie module and the irony of a high energy impact energy meter not lost on me (the tubes draw around 300mA each), I opted to use only two tubes; I was going to require SI notification anyway for full scale display. Handily, the tubes have colon points on the right-hand side (for clock use), which I designed as indicators for x10 and x1. With both SI units and x10 x1 decimals, one can display from 0 to 100MW – albeit with only 2 significant figures (considering the accuracy of a current transformer system like this, that isn’t a problem).
Read more: Nixie Tube Energy Meter

