Summary of Music Reactive Infinite Mirror
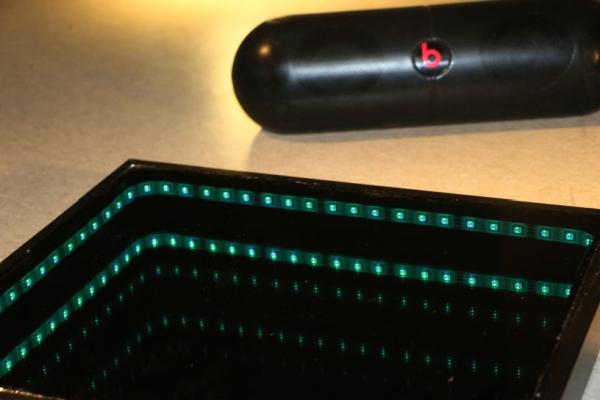
This project creates a music-reactive infinite mirror using an Arduino Uno to control an RGB LED strip. The system detects sound via a microphone sensor, adjusting LED intensity in real-time. Constructed with a photo frame, regular mirror, and tinted glass, the device serves as both home decor and an entertainment visualizer for events like parties or concerts.
Parts used in the Music Reactive Infinite Mirror:
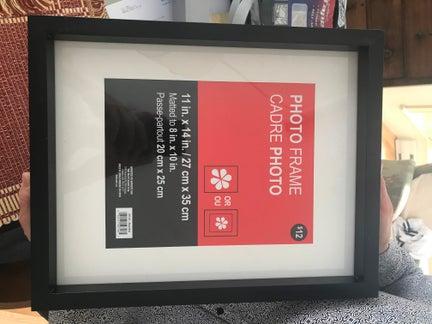
- Black photo frame (11in. x 14in.)
- Regular mirror (11in. x 14in.)
- Midnight black scratch-resistant window tint
- Clear silicone sealant
- Duck tape or small nails
- Resilient isolating tape
- Waterproof RGB LED strip
- Breadboard
- Arduino Uno with USB cable
- Jumper wires (male-to-male and female-to-female)
- PN222A Transistors
- Resistors (100 ohms, 200 ohms, 560 ohms)
- Microphone sensor (5V compatible)
- 12V power supply or battery holder with AA batteries
Hi fellow makers! This is a project I’ve been working on for my Makerspace class at Collégial international Sainte-Anne. I truly hope you will like it!
*I’m sorry about the focus being bad. It was almost impossible to obtain a great focus since the LEDs were constantly flashing.*
The topic to which this project is related:
Since I am a musician myself, music always had been part of my life. I thought it would be really cool to have something of a decoration that reacts with music. I thought, how cool would that be if you could just stick an LED strip in your room that reacts with music. After looking forward to this, I realized this project has already been done. I then thought, what if we put this system in an infinite mirror. Thus, I created an infinite mirror that interacts with music.
Description of the project
The main idea behind this project is a rbg LED strip that is activated by sounds. The LEDs were programmed to vary in intensity depending on the different sounds that are picked up by a small microphone linked to the system. The LED strip was then cut and put in an infinite mirror, made with a regular mirror, a tinted glass and a photo frame.
How to use the final result of this project
To use this object, you need first two source of electrical power. You need a 5V supply, that can be provided by the USB port of your computer. You also need a 12V supply that be provided by a battery of a power supply. After, the LED strip embed in the infinite mirror needs to be connected to the breadboard where the connection of the circuit has been previously made. Then, the Arduino needs to be connected in the computer, and the system will be instantaneously activated, reacting to any sounds.
The purpose of this new object and some applications fields
This object could be only as a decoration for various places. It could be hang in the living room or in a bedroom. It could also be used in the entertainment field. To artistic exposition events to party, this object could be very interesting to use. The technology behind this project could be developed and used in musical events such as in festival or music shows to improve the visual effects and create a symbiosis with both sound and sight.
Step 1: Tools, Materials and Files
List of tools needed for this project
– Scissors
– Caulking silicone gun
– Microfiber linen (to clean both glass and mirror)
– Scotch tape
– Electrician’s pliers (to cut and fold resistors)
– Glass polisher
– Vaporizer filled with soapy water
– Small carton box (preferable smaller than 11in. x 14in.)
– Small flat screwdriver
– Small wood saw
– An old wooden Chinese stick or a wooden pop-sicle stick
– Ruler
– Angle iron
– Dish gloves
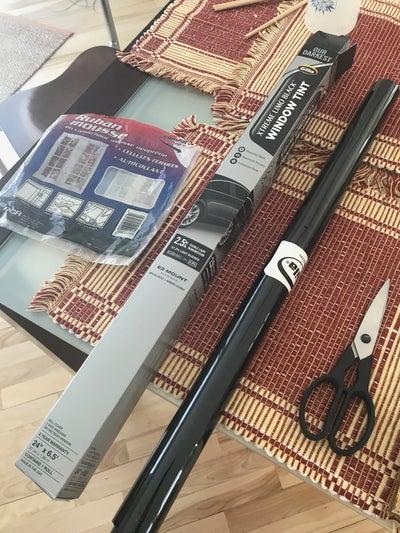
List of material needed for this project
Mirror
– Black photo frame with embed glass 11in. x 14in. or 28 cm x 36 cm
https://www.walmart.ca/fr/ip/cadre-macintyre-28-x-…
– A 11in. x 14in. regular mirror (mine was recuperated)
– A roll of scratch resistant window tint, midnight black
http://www.canadiantire.ca/en/pdp/gila-scratch-res…
– Clear silicone sealant for windows
https://www.amazon.ca/08641-Corning-Silicone-Seala…
– Duck tape or small nails (about 15)
https://www.amazon.ca/Duck-394468-All-Purpose-Silv…
or
https://www.amazon.ca/Hillman-Group-591520-Assortm…
– Resilient isolating tape (10 mm of thickness)
https://www.amazon.ca/Advanced-Acoustics-EPDM-Resi…
LEDs activated by music
– Rbg LED strip (waterproof)
https://www.amazon.ca/RioRand-Waterproof-300LEDs-F…
– Breadboard
https://www.amazon.ca/Elenco-Breadboard-Prototype-…
– Arduino Uno (with its USB cable)
https://www.amazon.ca/Arduino-Uno-R3-Microcontroll…
– 15 Jumper wires (Male to male)
https://www.amazon.ca/Aukru-Flexible-Jumpers-Ardui…
– 3 Jumper wires (Female to female)
https://www.amazon.ca/Aukru-20cm-Cable-Arduino-Ras…
– (3) PN2222A Transistors
https://www.ebay.com/itm/PN2222A-x4-NPN-Signal-Tra…
– (1) 100 ohms Resistor
https://www.sparkfun.com/products/13761
– (1) 200 ohms Resistor
https://www.ebay.com/itm/200-Ohm-1-4-Watt-1-Metal-…
– (1) 560 ohms Resistor
https://www.amazon.com/Electronics-Salon-100PCS-Ax…
– Microphone sensor 5V compatible with Arduino
https://www.amazon.ca/Microphone-Controller-Detect…
– Power supply of 12V or battery holder with 8 AA battery
https://www.amazon.com/Regulated-Independent-Outpu…
or
https://www.amazon.com/CynKen-Battery-Holder-Stack…
with
https://www.amazon.ca/AmazonBasics-Rechargeable-Ba…
Files needed for the realization of this project
The only file needed to complete this project is the code programmed on Arduino. It can be found in the embed file tab of this step. A photo of the code and the code itself can also be found in its appropriate step.
References to other projects that inspired me
Infinite mirror
Softwares needed
Arduino IDE (1.8.5)
Available free of charge
https://www.arduino.cc/en/Main/Software
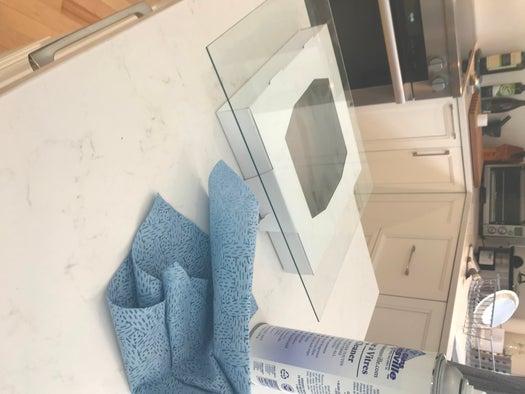
Step 2: Removal and Cleaning of the Glass and Mirror
1- Remove the glass from the frame like shown in the video below.
2- Clean both side of the glass the soapy water
3- Do the same with the mirror.
Note that in my case the mirror was recuperated. I needed to tear the paper behind the mirror frame. I then took out the mirror by removing the small nails that was holding it. I then cleaned it the same way as the glass.
Step 3: Applying the Tinted Film to the Glass
1- Take the small carton box and clean (you want to make sure that no granule or residue are on it). Clean as well the surface you will be working on.
2- Take out the glass and clean it using the glass polisher and the microfibre linen.
3- Then, lift the glass carefully holding it by its the corner and drop it on a small box cleaned before. Leave the box and the clean glass aside.
4- Take out the roll of tinted film and cut a slightly bigger piece than the glass.
5- Then, detach the four corners of the film and stick 4 scotch tape piece (one on each corner) between the tinted film and the small plastic protecter.
6- After, remove slowly the plastic protecter by constantly applying soapy water with the vaporizer. Make sure that the tinted film is fully covered of soapy water (they should not be dry spots).
7- Take the clean glass and leave it on the clean surface. Apply a sufficient amount of soapy water on it to be completely covered.
8- Take the tinted film with soapy water and drop it carefully on the glass with soapy water. It is very important for the soapy side on the tinted film to be applied on the soapy part of the glass.
9- With a gift card or an old credit card, take out all the air bubble remaining between the tinted film and the glass.
10- Let rest and dry the glass for couple of hours (at least 2 according to the instructions)
Source: Music Reactive Infinite Mirror
- How is the infinite mirror constructed?
It is made by placing a regular mirror and a tinted glass inside a photo frame. - What powers the LED strip?
The LED strip requires a 12V supply provided by a battery pack or power supply. - Can this project be used at parties?
Yes, it can be used in the entertainment field for artistic exhibitions or parties. - What software is required for coding?
Arduino IDE version 1.8.5 is needed to program the microcontroller. - How does the LED strip react to sound?
The LEDs vary in intensity based on sounds picked up by the connected microphone sensor. - What tools are needed to clean the glass?
You need a glass polisher and microfiber linen to clean the surfaces before assembly. - Is the LED strip waterproof?
Yes, the project uses a waterproof RGB LED strip. - How do you attach the tinted film to the glass?
You apply soapy water to both the glass and the film side, then use a card to remove air bubbles. - Where can the code for this project be found?
The code is located in the embed file tab of the project step section. - What type of transistors are used in the circuit?
The project utilizes three PN2222A NPN signal transistors.