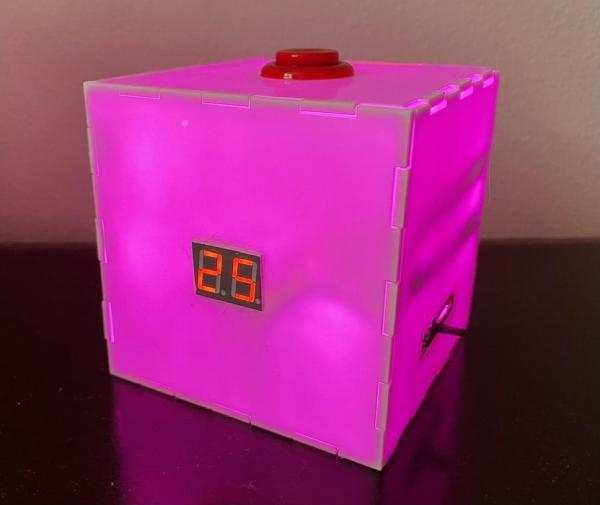
For this project, I wanted to make something that would aid me while studying, so I made a custom timer to use for the Pomodoro Technique. This study technique involves allocating 25 minutes of uninterrupted focus to work/study, followed by a 5-minute break. I wanted a way to make my own experience with this technique more appealing by making the timer itself more interesting, which I accomplished by lighting it up with colorful LEDs.
Features of the Light-Up Timer include:
- Using a dual 7-segment display as a countdown timer
- Lighting up sequences of LEDs on an LED strip
- Using a slider to change the hue of the LED lights
- Using a switch and small lithium ion battery to supply power to a device and power it on/off
This was my final project for the physical computing class, ATLS 3300, at the CU Boulder Atlas Institute.
Supplies
- Arduino Nano 33 IoT or microcontroller of choice
- Dual 7-segment Display x1
- Adafruit NeoPixel LED strip x2
- Adafruit Perma-Proto Half-sized Breadboard x1
- Lipo Battery Charger x1
- Lithium Ion Battery x1
- Button x1
- Slider x1
- Piezo Buzzer x1
- 330 Ohm resistor x2
- 10k Ohm resistor x1
- Solid wires as needed for soldering
- Translucent Acrylic Sheets (12″ x 12″ x 1/8″) x2
Step 1: 7-segment Display
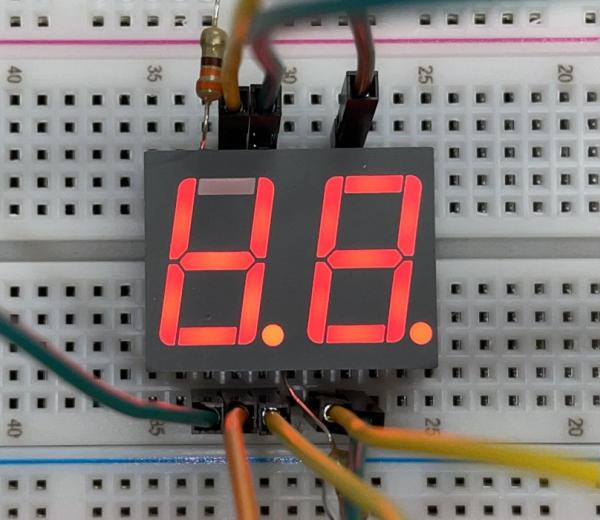
I followed the circuit diagram in the given datasheet for my dual 7-segment display and wired it so that the digits would glow red. I found a useful library called SevSeg from this tutorial that can handle the changing of the digits. The red digit display required 10 pins on the Arduino – eight digital anode pins for segments A-DP and two digital cathode pins for each of the 7-segment digits, since this particular dual 7-segment display was a common cathode display.
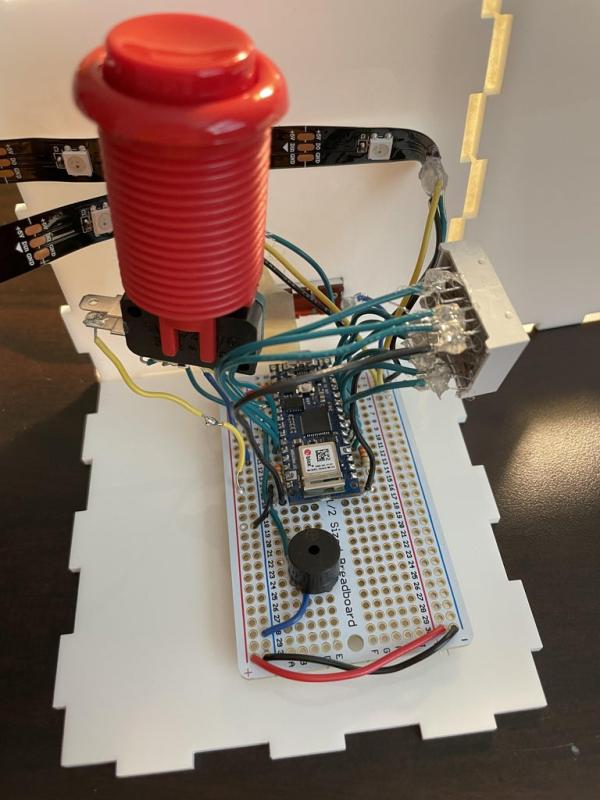
Step 2: Soldering Parts

I soldered solid wires to each of the parts with the intention of soldering them to the Adafruit perma-proto breadboard so that each part could be secured.
Slider: Solder a power and analog pin wire to the end of the slider with two prongs and solder a ground wire to the other end with one prong.
Button: I used a Baolian concave red button and soldered a power wire to the N0 prong and a digital pin wire and a 10k Ohm resistor with a ground wire to the COM prong.
LED strip: Solder the power, pin, and ground wires according to the corresponding printings on the strip.
Piezo buzzer: Solder a digital pin wire to the anode side of the buzzer and a ground wire to the cathode side.
7-segment display: Solder digital pin wires to prongs 14, 13, 12, 9, 6, 5, 4, 3, 2, and 1 for the red LED digit display.
Switch and Lipo charger: Solder a power wire and a ground wire to the holes labeled ‘+’ and ‘-‘ on the Lipo charger, respectively. Solder the power wire to one of the prongs on the switch, and solder another wire to a prong directly next to the power wire.
Step 3: Schematic
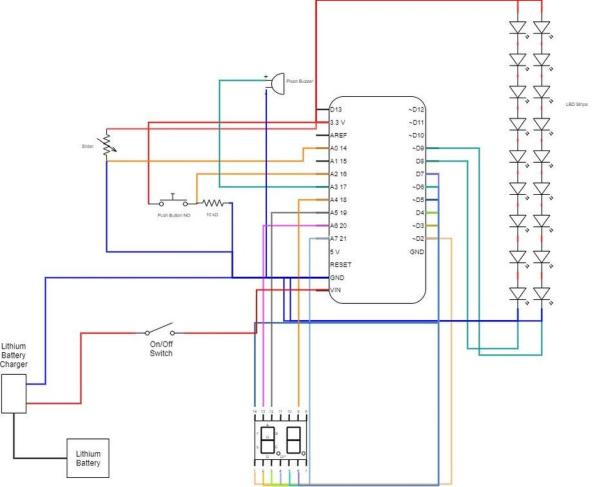
This is how I laid out all the parts for a total of 15 pins used:
- Slider -> Pin A0
- Button -> Pin 16
- Buzzer -> Pin 17
- LED Strip 1 -> Pin 8
- LED Strip 2 -> Pin 9
- Timer segment A -> Pin 20
- Timer segment B -> Pin 19
- Timer segment C -> Pin 18
- Timer segment D -> Pin 3
- Timer segment E -> Pin 2
- Timer segment F -> Pin 6
- Timer segment G -> Pin 7
- Timer segment DP -> Pin 4
- Timer left digit -> Pin 5
- Timer right digit -> Pin 21
- Switch -> VIN
Solder the wires to their corresponding pins on the breadboard.
Step 4: Lighting the LEDs and Changing Hue
I programmed the LEDs to change hue based on the current position of the slider. I mapped the slider to values between 0 and 1530 (255 x 6) and incremented/decremented the RGB values by 0-255. I used the Adafruit Neopixel library and for-loops to light up segments of the LED strips.
void changeLEDs(int color){
      hue(color);
      for(uint16_t i=0; i<strip1.numPixels(); i++){
        strip1.setPixelColor(i, colorArray[0], colorArray[1], colorArray[2]); //set to purple, takes RGB vals 0-255
        strip1.show();
        strip2.setPixelColor(i, colorArray[0], colorArray[1], colorArray[2]); //set to purple, takes RGB vals 0-255
        strip2.show();
      }
}
void hue(int sliderPos){
    if (sliderPos <= 255){
      colorArray[0] = 255;
      colorArray[1] = 0;
      colorArray[2] = 0;
    }
    //Increment Blue until 255
    if (sliderPos > 255 && sliderPos < 510){
      colorArray[0] = 255;
      colorArray[1] = 0;
      colorArray[2] = sliderPos%255;
    }
    //Decrement Red until 0
    if(sliderPos >= 510 && sliderPos < 765){
      colorArray[0] = 255 - (sliderPos%255);
      colorArray[1] = 0;
      colorArray[2] = 255;
    }
    //Increment Green until 255
    if(sliderPos >= 765 && sliderPos < 1020){
      colorArray[0] = 0;
      colorArray[1] = sliderPos%255;
      colorArray[2] = 255;
    }
    //Decrement Blue until 0
    if(sliderPos >= 1020 && sliderPos < 1275){
      colorArray[0] = 0;
      colorArray[1] = 255;
      colorArray[2] = 255 - (sliderPos%255);
    }
    //Increment Red until 255
    if(sliderPos >= 1275 && sliderPos < 1530){
      colorArray[0] = sliderPos%255;
      colorArray[1] = 255;
      colorArray[2] = 0;
    }
}<br>
Step 5: Playing Melody on Buzzer
Courtesy of this source for the code and note pitches.
When the timer finishes, I programmed the buzzer to play “Shave and a Haricut – Two Bits” since it was a short and positive melody, and lit up the LEDs with multiple flashing colors. I also set up a few notes to play upon pressing the button before the timer started. I used the tone() function and the pitches.h note definitions to play the melody.
int red[] = {255,0,0};
int orange[] = {255,150,0};
int yellow[] = {255,255,0};
int green[] = {0,255,0};
int blue[] = {0,0,255};
int purple[] = {127,0,255};

int doneMelody[] = {
  NOTE_C5, NOTE_G4, NOTE_G4, NOTE_A4, NOTE_G4, 0, NOTE_B4, NOTE_C5
};
int doneNoteDurations[] = {
  4, 8, 8, 4, 4, 4, 4, 4
};
int currLight = 1;
void flashLights(){
  for (int note = 0; note < 8; note++) {
    int noteDuration = 1000 / (doneNoteDurations[note]);
    tone(buzzer, doneMelody[note], noteDuration);//Play one note at a time in the melody
    float pauseBetweenNotes = noteDuration * 1.30;
    if(currLight == 1){//Light up LEDs with colors in a sequence
      for(uint16_t i=0; i<3; i++){
        strip1.setPixelColor(i,red[0],red[1],red[2]);
        strip1.show();
      }
      delay(pauseBetweenNotes/2);
      for(uint16_t i=0; i<3; i++){
        strip1.setPixelColor(i,0,0,0);
        strip1.show();
      }
      delay(pauseBetweenNotes/2);
      currLight = 2;
      noTone(buzzer);
    }
    else if(currLight == 2){
      for(uint16_t i=0; i<3; i++){
        strip2.setPixelColor(i,green[0],green[1],green[2]);
        strip2.show();
      }
      delay(pauseBetweenNotes/2);
      for(uint16_t i=0; i<3; i++){
        strip2.setPixelColor(i,0,0,0);
        strip2.show();
      }
      delay(pauseBetweenNotes/2);
      currLight = 3;
      noTone(buzzer);
    }
    else if(currLight == 3){
      for(uint16_t i=3; i<6; i++){
        strip1.setPixelColor(i,blue[0],blue[1],blue[2]);
        strip1.show();
      }
      delay(pauseBetweenNotes/2);
      for(uint16_t i=3; i<6; i++){
        strip1.setPixelColor(i,0,0,0);
        strip1.show();
      }
      delay(pauseBetweenNotes/2);
      currLight = 4;
      noTone(buzzer);
    }
    else if(currLight == 4){
      for(uint16_t i=3; i<6; i++){
        strip2.setPixelColor(i,orange[0],orange[1],orange[2]);
        strip2.show();
      }
      delay(pauseBetweenNotes/2);
      for(uint16_t i=3; i<6; i++){
        strip2.setPixelColor(i,0,0,0);
        strip2.show();
      }
      delay(pauseBetweenNotes/2);
      currLight = 5;
      noTone(buzzer);
    }
    else if(currLight == 5){
      for(uint16_t i=6; i<9; i++){
        strip1.setPixelColor(i,yellow[0],yellow[1],yellow[2]);
        strip1.show();
      }
      delay(pauseBetweenNotes/2);
      for(uint16_t i=6; i<9; i++){
        strip1.setPixelColor(i,0,0,0);
        strip1.show();
      }
      delay(pauseBetweenNotes/2);
      currLight = 6;
      noTone(buzzer);
    }
    else{
      for(uint16_t i=6; i<9; i++){
        strip2.setPixelColor(i,purple[0],purple[1],purple[2]);
        strip2.show();
      }
      delay(pauseBetweenNotes/2);
      for(uint16_t i=6; i<9; i++){
        strip2.setPixelColor(i,0,0,0);
        strip2.show();
      }
      delay(pauseBetweenNotes/2);
      currLight = 1;
      noTone(buzzer);
    }
  }
}<br>
Step 6: Box Assembly
I laser cut translucent acrylic to make a box from a starter file on MakerCase. I used Adobe Illustrator to draw slots for the slider, button, timer, switch, and lipo charger according to the sides of the box where I wanted each of them to appear. I used the files below for laser cutting on two 12″ x 12″ x 1/8″ translucent acrylic sheets. To hold the sides of the box together, I used hot glue on the inside as well as some tape on the bottom so that I could open it and change the battery if needed.
I positioned the parts and their pins according to where I wanted them to be on the box so that I did not need to make the wires too long.
Step 7: Interaction
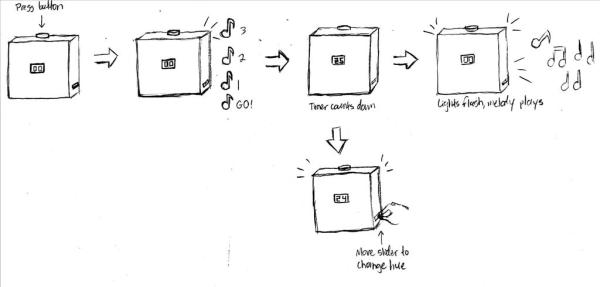
With the box assembled, there are a few interactions available to the user:
- Start the timer with the button.
- Change the hue of the lights with the slider.
- Watch the timer countdown 25 minutes and then 5 minutes for the break.
The timer will run for 25 minutes according to the Pomodoro technique, then run for 5 minutes to time the 5-minute break. The color of the lights can be changed at any time with the slider. When the timer finishes, the lights will flash different colors in sync with the melody, and will also flash red, yellow, and green to signal the start of the 25 minutes after pressing the button.
Full Arduino code on GitHub Gist
Source: Multicolored Light-Up Countdown Timer for Studying