In this project, we will go over how to build a carbon monoxide sensor circuit with an Arduino.
The sensor we will utilize is the MQ-7 sensor for detecting carbon monoxide. This sensor is responsive to the impacts of CO.
Carbon monoxide (CO) is a highly hazardous gas that lacks odor, color, and taste, making it undetectable by the senses. A person may not realize they are inhaling CO until they start feeling unwell. Headache, nausea, vomiting, dizziness, fatigue, and weakness are the typical signs of CO poisoning. Potential neurological symptoms consist of confusion, disorientation, visual impairment, fainting, and seizures.
Carbon monoxide is generated during the incomplete oxidation of compounds containing carbon; it emerges when there is insufficient oxygen to create carbon dioxide (CO) as seen in scenarios like using a stove or running an internal combustion engine indoors. When oxygen is present, such as in the atmosphere, carbon monoxide combusts with a blue flame and creates carbon dioxide. Therefore, enclosed spaces with partial carbon product oxidation are where the risk of carbon monoxide production in homes or businesses is most prevalent.
Carbon monoxide poisoning is the primary cause of fatal air poisoning in numerous countries. Due to its lack of color, smell, and flavor, it is extremely difficult to detect yet extremely poisonous. The body takes in carbon monoxide through inhalation, and it is then transferred into the bloodstream during the exchange of gases in the lungs. CO binds with hemoglobin to form carboxyhemoglobin, replacing the oxygen-carrying space in hemoglobin, but is unable to effectively transport oxygen to the body’s tissues. This results in a lack of oxygen, which has the potential to be fatal.
The measurement of CO is in units of parts per million (ppm). To provide some context, the natural environment contains 0.1 parts per million. The typical concentration in households ranges from 0.5 to 5 parts per million. The concentration of gas near correctly adjusted gas stoves in households and from emissions of modern vehicles ranges from 5 to 15 parts per million (ppm). The emission levels of vehicles in the central area of Mexico City range from 100 to 200 parts per million. 5000 parts per million of carbon monoxide can be produced from the smoke of a wood fire in a household. Levels of only 667ppm can lead to as much as half of the body’s hemoglobin being transformed into carboxyhemoglobin. A 50% carboxyhemoglobin level could lead to seizures, unconsciousness, and death.
OSHA in the US restricts workplace exposure levels exceeding 50ppm for long-term duration.
The Florida Department of Health states that more than 500 people in the US lose their lives each year because of accidental carbon monoxide exposure, while thousands require urgent medical care for non-lethal CO poisoning. These objects include defective fuel-burning appliances such as furnaces, stoves, water heaters, gas and kerosene space heaters, fireplaces, and indoor charcoal burners. Additional individuals die from carbon monoxide exposure due to objects like cars running in a closed garage, which are not commonly seen in residential settings. Every year, the Centers for Disease Control and Prevention estimate that thousands of people go to hospital emergency rooms.
Carbon monoxide levels can be detected through blood samples taken in a laboratory, either from an artery or vein, or with a CO-oximeter analysis.
Having this information about carbon monoxide provides insight into its origins and the significant risks it presents. Being able to detect and measure the level of CO present in the environment at any time highlights its importance.
With this knowledge in mind, let’s proceed to construct our carbon monoxide sensor circuit.
Components Needed
- MQ-7 Carbon Monoxide Sensor
- Arduino
- LED
The MQ-7 can be obtained very cheaply, just a few bucks. A good place to look for it is on ebay, which always has auctions on them for the $2-$3 range.

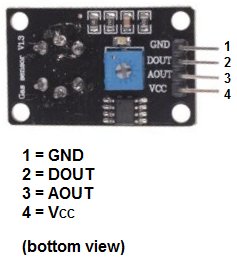
It is important that you avoid getting just the sensor and instead opt for the complete MQ-7 board. This happens because purchasing the sensor separately requires completing the entire schematic assembly prior to linking it to the arduino. It is advisable to purchase the entire MQ-7 sensor circuit to make integration with the Arduino easier and less time-consuming. Below, you can see this.
When purchasing the full board, there are 4 leads that must be linked together.
The four leads are +5V, AOUT, DOUT, and GND.
The connection wires for +5V and GND provide power to the alcohol sensor.
The additional two connections are AOUT (analog output) and DOUT (digital output). The way the sensor operates is by providing an analog voltage output through terminal AOUT that is directly related to the level of carbon monoxide detected by the sensor. It will output a higher analog voltage as it detects more CO. On the other hand, if it detects lesser CO, it will produce lower analog voltage. When the analog voltage hits a specific level, the digital pin DOUT will be set to high. When the DOUT pin is activated, the Arduino will recognize it and activate the LED to indicate that the CO level has exceeded the limit. You can adjust the potentiometer to raise or lower the level in order to change this threshold level.
MQ-7 Carbon Monoxide Sensor Circuit Schematic
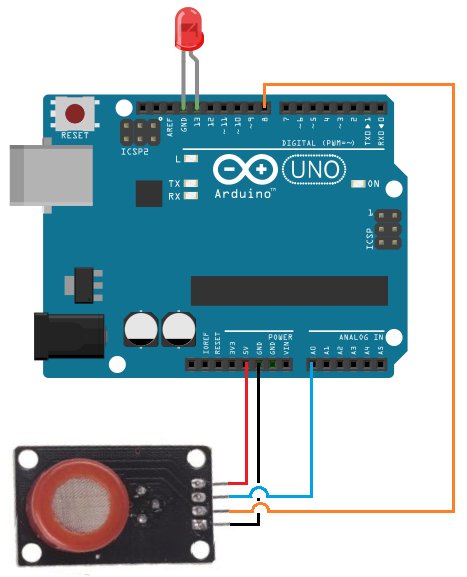
Below is the diagram of the circuit for the carbon monoxide sensor using an MQ-7 sensor connected to an arduino that we will construct.
The links are quite simple.
There are four leads to connect the sensor. 2 of them are designated for powering up. The sensor’s +5V terminal should be connected to the arduino board’s 5V terminal. The sensor’s GND terminal is connected to the arduino’s GND terminal. This gives the sensor authority.
The remaining 2 links are the sensor’s analog and digital output. These two are connected to analog pin A0 and digital pin D8, in that order.
Code
The code which we need to upload to the arduino so that it can measure carbon monoxide levels is shown below.
/* MQ-7 Carbon Monoxide Sensor Circuit with Arduino */
const int AOUTpin=0;//the AOUT pin of the CO sensor goes into analog pin A0 of the arduino
const int DOUTpin=8;//the DOUT pin of the CO sensor goes into digital pin D8 of the arduino
const int ledPin=13;//the anode of the LED connects to digital pin D13 of the arduino
int limit;
int value;
void setup() {
Serial.begin(115200);//sets the baud rate
pinMode(DOUTpin, INPUT);//sets the pin as an input to the arduino
pinMode(ledPin, OUTPUT);//sets the pin as an output of the arduino
}
void loop()
{
value= analogRead(AOUTpin);//reads the analaog value from the CO sensor’s AOUT pin
limit= digitalRead(DOUTpin);//reads the digital value from the CO sensor’s DOUT pin
Serial.print(“CO value: “);
Serial.println(value);//prints the CO value
Serial.print(“Limit: “);
Serial.print(limit);//prints the limit reached as either LOW or HIGH (above or underneath)
delay(100);
if (limit == HIGH){
digitalWrite(ledPin, HIGH);//if limit has been reached, LED turns on as status indicator
}
else{
digitalWrite(ledPin, LOW);//if threshold not reached, LED remains off
}
}
The initial code block sets up the pin connections for both the sensor and the LED. The reason why the AOUT pin is set to 0 is because it is connected to the analog pin A0. The DOUTpin is set to 8 because it is connected to digital pin D8. The LED is initialized to 13 because it is connected to digital pin D13. Additionally, two variables called limit and value are defined. The purpose of these is to save the analog pin AOUT and digital pin DOUT values.
The following code block establishes the baud rate and defines DOUTpin as input and ledPin as output. This is due to the fact that the sensor serves as an input for the arduino to read and analyze the sensor data. The LED functions as an output to show if alcohol has been detected by the sensor.
The subsequent code block reads the AOUT sensor pin and saves the value in an integer variable. It additionally checks the sensor pin DOUT and saves the result in the integer variable limit. Next, we display the alcohol level, which is a numerical value between 0 (indicating no alcohol present) and 1023 (showing the highest measurable carbon monoxide level). We will also display the boundary, which will be either HIGH or LOW. If the level of detected CO is below the specified threshold, the limit value returned will be minimal. If the concentration of CO surpasses the threshold, the returned limit value will be HIGH.
If the LED is turned on, it means the value is HIGH. When the value is not high, the LED will not turn on.
Source: MQ-7 Carbon Monoxide Sensor Circuit Built with an Arduino
