Summary of Moving Ferris Wheel
This article details a DIY moving Ferris wheel project designed for educational fun, featuring clear acrylic and external gears to reveal internal mechanics. The build combines laser-cut plywood components with an Arduino Uno and servo motor for automated motion. Users are guided through material selection, digital design using Adobe Illustrator, sanding, assembly of passenger cars, and final wheel construction.
Parts used in the Moving Ferris Wheel:
- 1/8" x 15" x 30" Plywood
- 1/4" x 15" x 30" Plywood
- 1/16'' x 16'' x 32'' Clear Acrylic
- 1/4'' x 16'' x 32'' Clear Acrylic
- Wooden 1/4'' Dowel
- Wooden 0.6'' Dowel
- Wood Glue
- Hot Glue Gun
- Arduino Uno - R3 Board
- Servo Motor
- Jumper wire pack (black, yellow, red)
- USB cord
- Rubber Mallet
- Heat Gun
- Laser Cutter
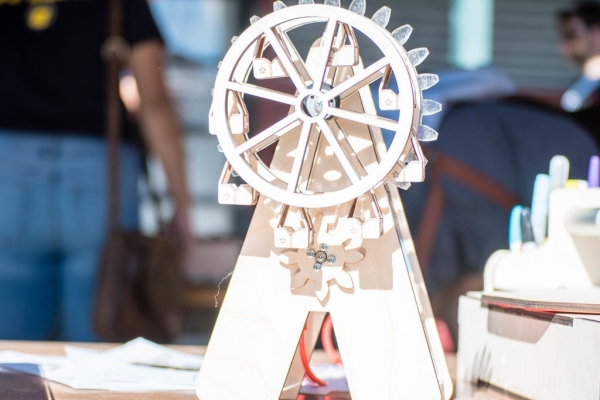
This is a simple moving ferris wheel I designed that could be a fun learning experience for children and adults! Growing up, I was always curious about what moving toys looked like on the inside. Therefore, I intentionally used clear acrylic so that users can see what goes on inside of the toy ferris wheel. Additionally, its gears are located on the outside so users may also see how the wheel turns. If you like this instructable, please vote for this instructable in the Toy’s Competition!
I hope you enjoyed my project and thank you for reading my instructable!
Step 1: Materials
1. Plywood:
1/8″ x 15″ x 30″ Plywood: 1 sheet of 1/8” plywood for all parts of the ferris wheel except for the base.
1/4″ x 15″ x 30″ Plywood: 1 sheet of plywood for the ferris wheel’s triangular base.
2. Clear Acrylic:
1/16” x 16” x 32” Clear Acrylic: 1 sheet of acrylic for the ferris wheel’s base. This acrylic must be thin enough to be easily bent with a heat gun.
1/4” x 16” x 32” Clear Acrylic: 1 sheet of Acrylic for the largest back gear.
3. Wooden 1/4” Dowel: To make the small bars the passenger cars/cabins are mounted on.
4. Wooden 0.6” Dowel: To hold the large, circular wheel and its gear.
5. Wood Glue
6. Hot Glue Gun
7. 1 Arduino Uno – R3 Board
8. 1 Servo Motor
9. Jumper wire pack: Will need black, yellow, and red wires
10. USB cord
11. Rubber Mallet
12. Heat Gun
13. Laser Cutter
Step 2: Design, Draw, Print!
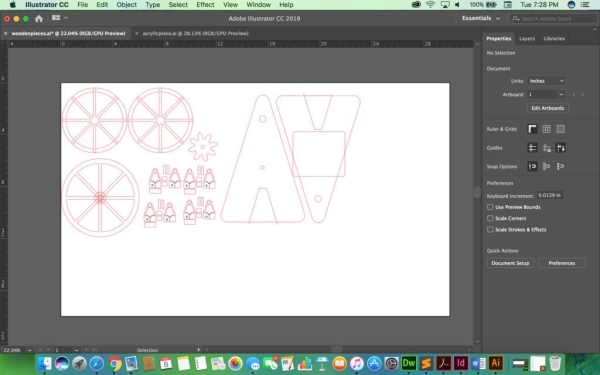
I drew all my pieces on Adobe Illustrator, however, you may use different software if you prefer. After you finish drawing or gathering all your files, you are then ready to cut!
1. Gears: Drawing the gears can be tricky. But luckily, there are many helpful resources on the internet! Gear Generator was really helpful in creating the gears I needed. If you decide to draw your own gears, it is really important that the gears fit and work together.
2. Wooden wheels, passenger cars/cabins, wooden base: I have attached the file I drew here . Feel free to use what I have, modify it, or create your own! I used a laser cutter that required that I use 0.001 pt and RGB red as its stroke color for cutting.
3. Large Acrylic gear: You can access my file here.
Step 3: Sand the Wood
After laser cutting your pieces, your wooden pieces may be rough with burn marks on them. Sanding the wood with sandpaper with your choice of fine grits will make your toy feel smooth and be clean of burn marks. You do not need to sand your acrylic pieces unless you want your acrylic pieces to have more scratch marks and be less transparent.
Step 4: Building the Miniature Passenger Cars/carriers
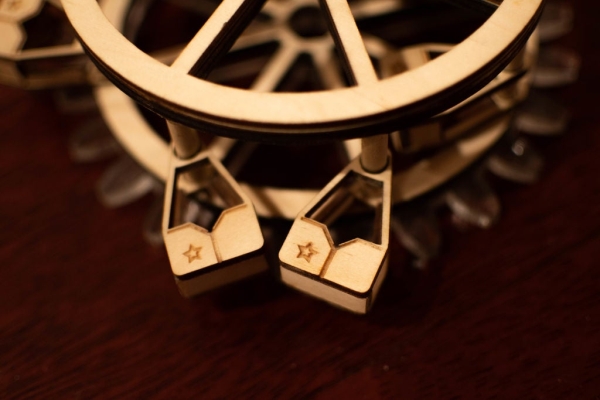
Use wood glue to piece together the miniature passenger cars/carriers. However be careful! The pieces are small and need time to dry.
Step 5: Put the Wheel Together
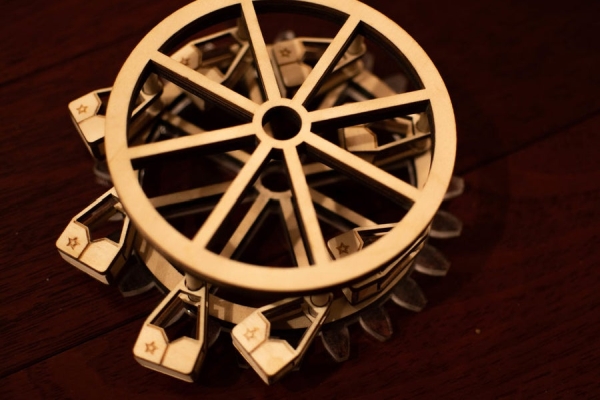
For the large wheel, attach a 1/8” wooden piece with 1/4” holes in them to the 1/4” clear acrylic piece with hot glue. Then cut your 1/4” dowel into pieces of 1.5 inch length and glue them into the 1/4” holes. Before you attach the other side of the wheel, string the passenger cars/carriers along the 1.5 inch dowels then close the wheel with the remaining 1/8” wooden piece with 1/4” holes in them. Lastly, glue the 1/8” circular wooden piece (without holes) on top of the most recent wooden piece that is on the opposite side of the clear acrylic piece.
Source: Moving Ferris Wheel
- Why was clear acrylic used in the design?
Clear acrylic was intentionally used so users can see what goes on inside the toy ferris wheel. - How are the gears positioned in this project?
The gears are located on the outside so users may also see how the wheel turns. - What software is recommended for designing the pieces?
The author drew all pieces on Adobe Illustrator, though different software may be used. - How should wooden pieces be treated after laser cutting?
Wooden pieces should be sanded with fine grit sandpaper to remove burn marks and make them smooth. - What tool is needed to bend the base acrylic?
A heat gun must be used because the 1/16'' acrylic base needs to be thin enough to be easily bent. - How are the passenger cars mounted to the wheel?
Passenger cars are mounted on small bars made from cut 1/4'' dowels glued into holes in the wooden wheel pieces. - What resource helped create the gear designs?
The Gear Generator website was helpful in creating the necessary gears that fit and work together. - Which electronic components power the movement?
The project uses one Arduino Uno - R3 Board and one Servo Motor connected via jumper wires.