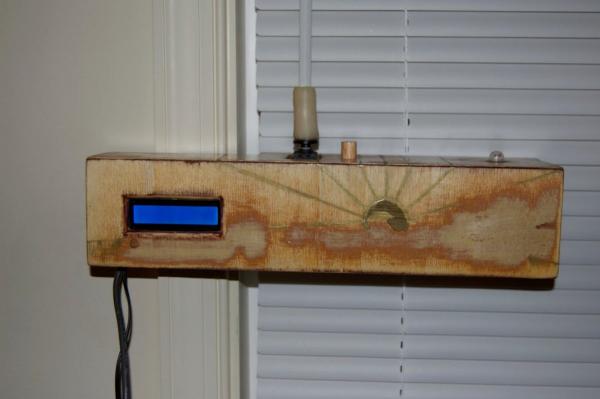
For this project you will be creating a device that is capable of opening and closing window blinds, both automatically and manually (via a push button), based upon a time schedule and sensor data from a light dependent resistor. In addition, this device will be able to display messages to the user.
I personally embarked on this project to keep my plants happy and healthy!
Step 1: What You’ll Need: Part I
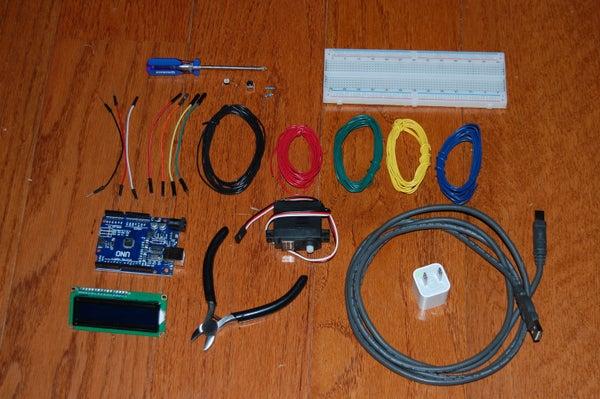
Materials:
For the hardware
- Solderless Breadboard (x1)
- Light Dependent Resistor (x1)
- Push Button (x1)
- 16 x 2 LCD Display (x1)
- Servo Motor (x1)
- Motor Attachments My servo came with a little set of attachments.
- Arduino Uno (x1)
- Micro-USB to USB Cable (x1)
- 5v USB Wall Adapter (x2)
- Dupont Connector (x8) I used two each of red, orange, yellow, and green
- Assorted Colors of Electrical Wire I used red, black, white, yellow, green, and blue
- Electrical Tape
For the hardware’s housing
- 2 Pieces of 14″ x 3 5/8″ Birch Plywood for the Top and Bottom *all of your wood should be a 1/2″ thick*
- 1 Piece of 14″ x 3 1/4″ Birch Plywood for the Front Face *I used all scrap wood for this project*
- 1 Piece of 5 5/16″ x 3 1/4″ Birch Plywood for Back Face I
- 1 Piece of 3 1/4″ x 1 3/4″ Birch Plywood for Back Face II
- 1 Piece of 9 3/16″ x 3 1/4″ Birch Plywood for Back Face III
- 1 Piece of 3 1/4″ x 2 1/2″ Birch Plywood for Side I
- 1 Piece of 3 1/4″ x 3 5/8″ Birch Plywood for Side II
- 1 Piece of 2″ x 3/4″ x 3/8″ Birch Plywood for Breadboard Support
- 1 Piece of 3/8″ x 3/4″ x 1/2″ Birch Plywood for Breadboard Support
- 1/4″ Gage Wooden Dowel (x1)
- 1/2″ Gage Wooden Dowel (x1)
- 1/8″ thick Plexiglas
- 5/8″ Gage Rubber Stopper (x1)
- 15/32″ Gage Test Tube I used a glass test tube but would recommend using a plastic one
- Brad Nails
- Wood Glue
- Two-Part Epoxy
- Tung Oil Not necessary but gives the wood a nice finish
- Twist Ties Also not necessary, but are useful for tidying wires
- Sculpey – Oven Bake Polymer Clay
Step 2: What You’ll Need: Part II
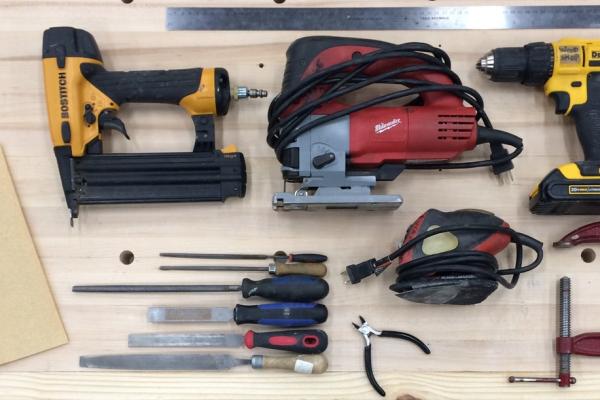
Tools:
Here, I’m going to list the tools I used for this project. I am lucky enough to have access to a well equipped woodshop and some of the tools I used are likely unavailable to the average-joe, so I will try to provide alternatives throughout the rest of this instructable.
- Ruler
- Pencil
- Multi-meter
- Wire Cutters
- Soldering Iron
- X-acto Knife
- Drill
- Drill Bits – 5/8″, 1/2″, 1/4″
- Miter Gauge
- Jig Saw
- Band Saw
- Table Saw
- Mouse Palm Sander
- Various Wood/Metal Files
- Sand Paper
- C-clamps
- Strap Clamps
- Vice Clamp
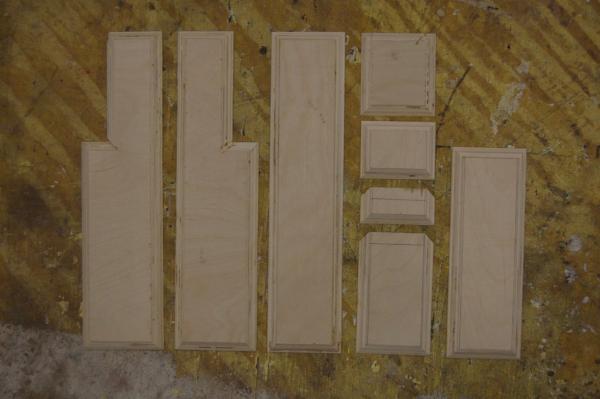
Step 3: Cut Your Plywood and Plexiglass
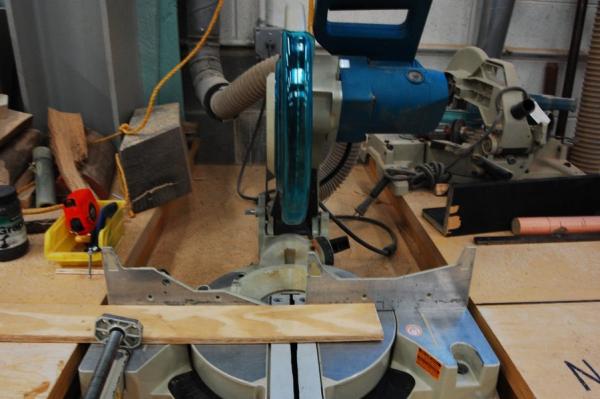
I used the table saw to cut the longer pieces of wood and a miter saw to cut the rest. However, you could probably get by using a hacksaw to makes these cuts. I also used the band saw with a miter gauge to cut the indent into the top and bottom pieces.
The top and bottom of your hardware’s housing should 14″ long and 3 5/8″ wide. You’ll need to cut a rectangle out of the side of your top and bottom pieces, that is 4 13/16″ long and 1 1/18″ wide (this is the “indent”, that I referred to previously).
The front face should be 14″ long and 3 1/4″ wide. You’re going to need 3 back faces due to that indent cut into the top and bottom pieces earlier. Your 3 back faces should be cut as such:
- Back Face I – 5 5/16″ x 3 1/4″
- Back Face II – 1 3/4″ x 3 1/4″
- Back Face III – 9 3/16″ x 3 1/4″
Your first side piece will need to be 3 1/4″ long and 2 1/2″ wide and your second side piece should be 3 1/4″ long and 3 5/8″ wide.
You’ll need two supports for your breadboard, one should be 2″ long, 3/4″ wide, and a 3/8″ thick and the other should be 3/8″ long, 3/4″ wide, and a 1/2″ thick.
You’ll later be using your dowels to create a sort of wooden button or push/pull knob but we may as well go ahead and cut them now. All of these cuts were done on the miter saw. From the 1/2″ gage dowel, you’ll cut two pieces. One should be 5/8″ long and the other 3/32″ From the 1/4″ gage dowel, you should cut a single piece that is roughly an 1/8″ long. I suggest cutting your 1/4″ gage dowel and shorter 1/2″ gage dowel longer than you need and sanding them down to size.
The plexiglas is for a sort of lid mechanism and will be attached to the top piece. I cut my plexiglas using the band saw, with a fence attached. You could also use a Plexiglas cutter, which are cheap and easy to use. You’ll need to cut six strips of plexiglas, all at different lengths:
Each piece should be an 1/8″ thick and 5/16″ wide.
- 1 piece of plexiglas 4 1/2″ long
- 1 piece of plexiglas 1 5/8″ long
- 1 piece of plexiglas 1″ long
- 1 piece of plexiglas 8 1/4″ long
- 1 piece of plexiglas 3″ long
- 1 piece of plexiglas 13″ long
To make sure your fence is positioned correctly, measure from the edge of the band saw’s table to the saw blade and add 5/16″. Measure from one side of band saw and clamp that side down, then do the same to the other.
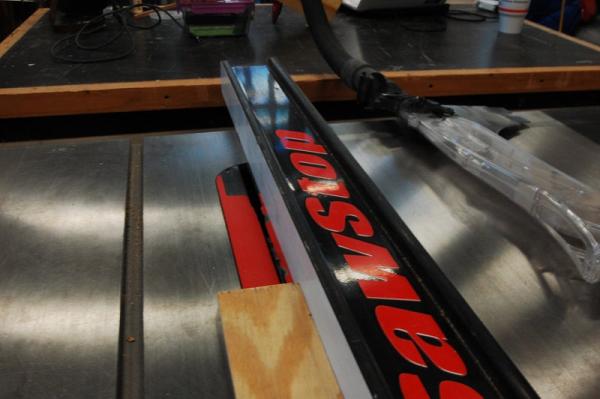
Step 4: Miter All of Your Edges
I mitered all of my edges using the table saw. If you’re using a table saw, you’ll need to remove the guard and hose that rest atop the blade and tilt the blade to a 45°. If you don’t have access to a table saw, you could try to miter the edges using a hacksaw but it might be easier to just make butt joints instead.
On all of the pieces, except for back face’s I and II, you should miter all of the edges on the same face of each piece of wood. This means that as you miter the edges of a piece, it should lay flat on the table and at no point should you need to lift it off the table – you should only need to rotate it to change which edge you are mitering.
For the top and bottom pieces, be sure to miter on opposite faces so that the pieces are mirrors of each other rather than exact duplicates.
For back face’s I and II, you’ll have to miter one of the 3 1/4″ edges on the opposite face of all the other edges.
Refer to the image, if you’re still unclear on where to miter.
Step 5: Cut Grooves for Lid and Internal Supports
This simple lid will allow you to freely insert or remove the hardware from your housing. To create this, you’ll need to cut grooves into the meeting edges of both sides, all 4 faces, and the top of your housing.
To cut all of my grooves, I used the table saw. You could do these cuts with a hacksaw, but it might be kind of a hassle. If you do intend on using a hacksaw, I highly recommend clamping your wood down with two other pieces of wood atop it in such a fashion that they create a guide channel.
If you’re using a table saw, in order for your wood to pass over the blade, you’ll have to remove the hose and guard that rests behind and atop it, just as you did for the mitered edges.
- For the top the grooves should all be 13/32″ deep and should be 5/16″ in from the edge, you should run the top over the blade on its inner face (the face that will be on the inside of the housing). You’re going to miter every edge on the top piece.
For all the other pieces, the grooves should be 27/32″ deep and 5/16″ in from the edge but into the sides of the wood rather than its face. You only need to put a groove on a single edge on each piece.
For the supports, you’re going to want to create sort of a lip on them, so you’ll pass them over the blade multiple times so that you’re left with a small ledge protruding along one side. This ledge should be 3/16″ thick and about 5/32″ in height for the first support for you breadboard. The lip on the second support for your breadboard should be a little thinner, at 3/32″ thick.
Source: Motorized Window Blinds Controller