Summary of MAKE YOUR OWN MIDI CONTROLLER WITH AN ARDUINO
Engineers combine firmware, mechanical, and electronic skills to build a custom MIDI controller. [Mega Das] designed a device using an Arduino Nano breakout board connected to arcade buttons, slide pots, rotary pots, and screw terminals. The project features a laser-cut enclosure engraved with graphics to house the components, demonstrating the power of DIY hardware creation by integrating off-the-shelf parts into a personalized instrument.
Parts used in the Custom MIDI Controller:
- Arduino Nano
- Printed circuit board (breakout board)
- Arcade push buttons
- Slide pots
- Rotary pots
- Screw terminals
- Laser-cut box enclosure
Engineers create something out of nothing, and no where is this more apparent than in the creation of customized computer hardware. To make a simple MIDI controller, you need knowledge of firmware design and computer architecture, you need knowledge of mechanical design, and you need to know electronic design. And then you need the actual working knowledge and experience to wield a tool, be it a hammer, laser cutter, or an IDE. [Mega Das] brought together all of these skill to build a MIDI controller. Sure, it’s for bleeps and bloops coming out of a speaker, but take a step back and realize just how awesome it is that any one person could imagine, then implement such a device.
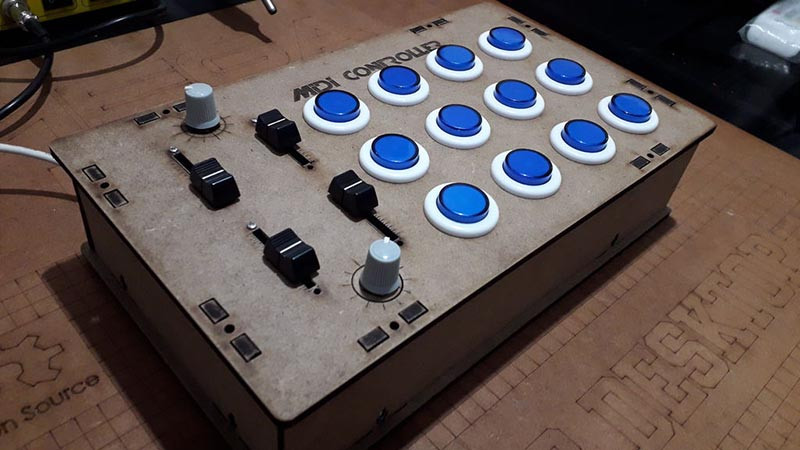
The electronics for this build include a printed circuit board that serves to break out the connections on an Arduino nano to a dozen arcade push buttons, four slide pots, two rotary pots, and a handful of screw terminals to connect everything together. Mechanically, this is a laser-cut box engraved with some fancy graphics and sized perfectly to put everything inside.
Yes, we’ve seen a lot of MIDI controllers built around the Arduino over the years, but this one is in a class by itself. This is taking off-the-shelf parts and customizing them to exactly what you want, and a prodigious example of what is possible with DIY hardware creation. You can check out the build video below.
Source: MAKE YOUR OWN MIDI CONTROLLER WITH AN ARDUINO
- What skills are required to build this MIDI controller?
You need knowledge of firmware design, computer architecture, mechanical design, and electronic design. - How does the electronics system connect the components?
A printed circuit board breaks out connections from an Arduino Nano to the buttons and pots. - What input devices are included in the build?
The controller includes a dozen arcade push buttons, four slide pots, and two rotary pots. - How is the enclosure constructed?
The box is laser-cut and engraved with fancy graphics to perfectly size everything inside. - Can you connect external devices to this controller?
Yes, it uses a handful of screw terminals to connect everything together. - What makes this project unique compared to others?
It takes off-the-shelf parts and customizes them exactly to what the builder wants. - Who built this specific MIDI controller?
[Mega Das] brought all the necessary skills together to build this device. - What tools might be needed for this type of project?
Tools like a hammer, laser cutter, or IDE may be required for implementation.