Summary of How to make a robotic dart shooting sentry
This article details the construction of a robotic dart-shooting sentry using an Arduino. The project involves building a crossbow from tongue depressors and a clothespin, then integrating digital controls via servos, an IR sensor, and a momentary switch to automate firing upon detecting movement.
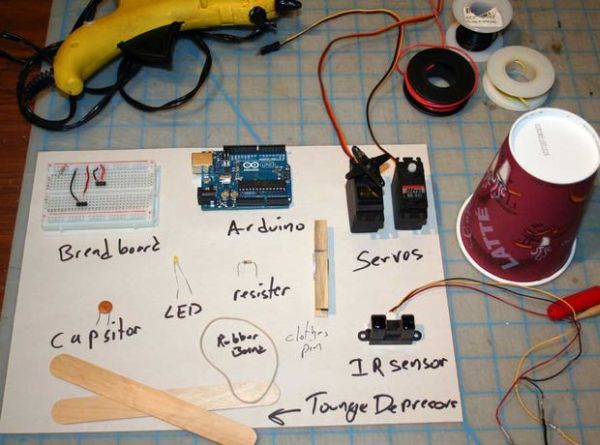
Parts used in the Robotic Dart Shooting Sentry:
- 2 tongue depressors
- 1 clothespin
- 1 rubber-band
- 1 dart
- 1 cup (paper or plastic)
- 1 arduino
- 1 breadboard
- 1 led
- 1 momentary button switch
- 1 22k ohm resister
- 1 0.1uf capacitor
- 1 10k ohm resister
- 1 infra red sensor
- Servos (two required)
Tools:
Hot Glue Gun
Laptop with Arduino software
22 awg hookup wire (black, red, yellow)
wire strippers
usb cable
drill
1/16th drillbit
exacto knife
Parts:
2 tongue depressors
1 clothespin
1 rubber-band
1 dart
1 cup (paper or plastic)
1 arduino
1 breadboard
1 led
1 momentary button switch
1 22k ohm resister
1 0.1uf capacitor
1 10k ohm resister
1 infra red sensor
Step 1: Assemble the crossbow
1) hot glue the two tongue depressors together in a T shape.
2) notch the top piece in two places near each edge
3) break a rubberband and tie it in two knots at each of the notches
4) hotglue a clothespin to the back of the T
5) test your crossbow
Step 2: Prepare crossbow for digital control

1) drill a small hole through the back of the clothespin
2) strip a 2 inch piece of hookup wire
3) attach the wire to the clothespin
4) rubberband or hotglue a servo to the bottom of the clothespin
5) attach the wire from the clothespin to the arm of a servo
6) hookup the servo to the breadboard (redwire to power, blackwire to ground)
7) hookup the servo to the arduino (yellow wire to pin 10)
8) power the breadboard from the arduino (5v and ground)
9) hookup a monentary switch from ground on the breadboard to pin 2 on the arduino
10) program the aruduino with the following code
— for more on how to program arduinos; check out this video series http://www.youtube.com/watch?v=fCxzA9_kg6s
11) test the digital dart gun, by pressing the button
/////////////////////////////////////////////////////////////////////////////
//TRIGGER TEST by mdwilson 5/1/2013
#include <Servo.h>
Servo trigger; // create servo object to control a servo
const int buttonPin = 2; // the number of the pushbutton pin
const int ledPin = 13; // the number of the LED pin
int buttonState = 0; // variable for reading the pushbutton status
void setup()
{
pinMode(ledPin, OUTPUT); // initialize the LED pin as an output:
pinMode(buttonPin, INPUT); // initialize the pushbutton pin as an input:
digitalWrite(buttonPin,HIGH);
trigger.attach(10); // attaches the servo on pin 9 to the servo object
trigger.write(0);// set up initial trigger position
}
void loop()
{
// read the state of the pushbutton value:
buttonState = digitalRead(buttonPin);
// if the button is pressed than shoot
if (buttonState == LOW) {
trigger.write(45);//send the trigger servo to 45 degrees
digitalWrite(ledPin, HIGH);// turn on the led
delay(1000); //wait 1 second
trigger.write(0); //send the trigger servo back to 0
digitalWrite(ledPin, LOW); //turn off the led
}
}
Step 3: Electronics
1) attach another servo (sentry) to bottom of crossbow
2) attach servo (sentry) to breadboard and pin 9 of the arduino
3) attach IR sensor to front of the crossbow
4) attach IR sensor to breadboard (power and ground) and arduino (pin A0)
5) add low pass filter to breadboard using a 0.1 uf capacitor and 22k ohm resistor to clean up the IR signal (if needed).
see attached schematic
if you wanted to use a photoresister instead of an IR sensor, check out this instructable:
http://www.instructables.com/id/Control-Servo-with-Light/
For more detail: How to make a robotic dart shooting sentry
- How do I assemble the crossbow base?
Hot glue two tongue depressors in a T shape, notch the top piece, tie a rubber band in the notches, and hot glue a clothespin to the back. - Can I control the crossbow digitally?
Yes, by attaching a servo to the clothespin arm and connecting it to an Arduino via a breadboard and hookup wire. - What is the best way to power the electronics?
Power the breadboard directly from the Arduino using the 5v and ground connections. - Does the code turn on an LED when the gun fires?
Yes, the program sets the LED pin to HIGH for one second when the button is pressed to indicate firing. - How do I connect the trigger servo?
Attach the servo arm to the clothespin wire and connect the yellow signal wire to pin 10 on the Arduino. - What components clean up the IR signal?
A low pass filter consisting of a 0.1 uf capacitor and a 22k ohm resistor can be added to the breadboard. - Which pin does the IR sensor connect to?
The IR sensor connects to pin A0 on the Arduino after being wired to power and ground on the breadboard. - Can I use a photoresistor instead of an IR sensor?
Yes, the article suggests checking a specific Instructables guide for using a photoresistor with a light-controlled servo.