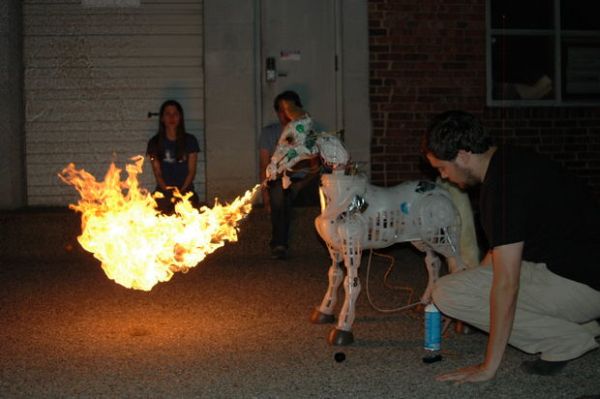
For Maker Faire Detroit 2011, I displayed a hack I made to a FurReal Friends Butterscotch Pony. My fellow LVL1 Hackers and I had taken control of the motor control system of the toy and added a flame thrower to it. It seemed to go over really well with the crowd, so I am putting up the information for anyone to make there own. It was a blast to make and I hope everyone has as much fun remaking it. Just remember that this project uses Fire and should only be built and operated by no less then 2 adults with appropriate experience in fire safety and proper fire safety equipment on hand.
Step 1: Get it before you hack it
At one time, Butterscotch and S’more ponies both sold for around $300, but they seem to be discontinued. I would never suggest someone pay this much for something new, just to make it better. Thankfully, there is a fairly steady stream of them showing up on Craigslist and second hand stores.
I purchased my first Butterscotch off of Craigslist for $20. I have since picked up a second one for $25 from a peddlers mall. I commonly see them listed for ~$100, but with a little negotiation and/or patience you should be able to pick one up for dirt cheap.
Step 2: What you will need.
The tools you will need vary in this project. I will try to tier it based on what you want to accomplish with your FurReal pony.
Hardware you will need:
- FurReal Butterscotch or S’More Pony
- Arduino Mega
- Wire 18g
- Solder
- Electrical tape
- Wii nun-chuck
- Wii Nunchuck breakout adapter
- 0.1″ 16-pin strip male header
- 1/8th OD ptfe tube (trade name Teflon)
- Bowden cable (brake cable for the back wheel of a bike)
- Scrap PVC tube around 3″ at about 1′ long
- Scrap plexi glass
Tools you need
- Wire Strippers
- Razor blade
- Phillips head screwdriver
- Flat head screwdriver
- Multimeter
- Soldering Iron
- Computer to program the Micro Processor (Any OS)
Step 3: Removing the skin: Head first
Step 4: Removing Skin: ENT
Now we are going to remove the skin from around the face. The face is attached in 4 areas: the ears, eyes, nose, and mouth. Pull the skin up the back of the neck so you can get inside the back of the ponies head.
The ears break off easy (one was already missing when I got to this point). The other broke off when I was trying to get the skin off. This is not a problem as you can glue them back on easily. If you wish to keep the ears attached, you can cut the cloth around the ear holes with a razor. If you are OK with taking them off, a hard tug should pop them right off. Once the ears are removed, pull on the fabric where it tucks into the head. This will rip the seams, freeing it up.
Roll the skin further down, and you will get to the eyes. The fabric is sewn into the top and bottom of the eyes. Simply cut the stitches here to detach the fabric. Try to not look your pony in the eyes when you do this, as you may start feeling bad about what you are doing.
Moving down to the ponies nose, there are 2 pegs holding the rubbery snout on. One in each nostril. These slide out without much trouble, away from the body in a parallel fashion. The rubber on the snout is thin, so try to get a grip on the hard plastic with your tool as not to tear it.
Step 5: Remove Skin: Straight from the horses mouth
The last step of peeling your ponies face off is to removed the skin from the mouth. The the skin on the upper and lower jaw are both connected in their own way.
To removed skin from the upper jaw you just need to fold the face down until you see a horse shoe shaped piece of plastic around the mouth. It will have 4 pegs pushed up into holes with 3 legs that close around them. You will just need to bend 2 of the legs on each peg back and they will pop right out.
The bottom jaw will most likely have popped off by this point. We need to remove the jaw plastic from the rubber. It for the most part will pill off but it will take some time. I also had to cut some spots with a razor that where to fused.
After you get the lower jaw removed slide it back into the slot under the chin and glue it into place.
Step 6: Remove Skin: The body
Removing the skin from the body is a lot of the same. there is a few more places that they sew the fabric to the plastic. I followed the seem in most parts. just cutting a little bit of the thread then pulling it apart.
On the underside pull the velcro open. In the back side where the Velcro ends you will find a zipper leading up to the tail. There will be stitches at each end holding it together but no slider. cut the stitches and it will come unzipped. There will only be a small area holding the zipper area to the Velcro area. Cut this small bit of fabric and we will move to the front.
The frond end of the Velcro has a small stitch leading to a T intersection. Unstitch this area then unstitch along both sides of the T till you get to the legs.
Step 7: Removing the skin: The legs
There is an inner seem along each leg. Snip the stitch and tear down each of them till you get to the feet. The feet are held on with a different fabric that is then looped around a rope inside of the hooves. Just cut around the bottom of the leg removing this other fabric and freeing the rest of the leg.
At the top of each leg you will need to remove some stitching leading around the intersection of the inner leg and the lower side of the body. When you get close to the stitches running along the bottom of the pony that you have already cut, snip away the fabric in between. You should not be able to lift the skin up all the way around the head.
Step 8: Removing the skin: the Neck
The very last step is to remove the part that is holding the fabric to the neck. I did this by cutting through the lighter, fur-less fabric at the neck. After I removed it, I found that it was held on by a zip tie inside of that loop of fabric. You can do it my way, or you can insert the wire cutters into the fabric at the nap of the neck and simply cut the large zip tie. This should allow you to remove the skin completely.

Step 9: Removing the face
To get to the main circuit board in the head, you need to removed the left side of the face (the pony’s left, not yours) There are quite a few screws that you will need to remove to do this. I tried to mark all of the screws in the images below, but if it will not come loose after removing those, just look around for extras I may have missed. There is also a clip that holds the snout onto the rest of the face. This clip was difficult to remove and I ended up marring the face a bit with a screwdriver and wire snips.
Under the face you will find that the circuit board is held in place by 4 screws. Remove these screws, as we will do most of our work from the lower side.
Step 10: Getting access to the Circuit board in the lower body.
I removed every screw I could find from the pony and still could not get the body open. I could not see any clips I could open, or anything else I could remove to release it, so I did the next best thing and dremeled a hole in the stomach. This ended up working out in the end as it provided a good place to put the fuel for the flame thrower. You will want the hole large enough to allow your PVC tube to just slide in.
For more detail: Make a Fire Breathing Animetronic Pony from FurReal Butterscotch or S’Mores