Summary of Make A 64×16 RED LED Marquee Using Arduino
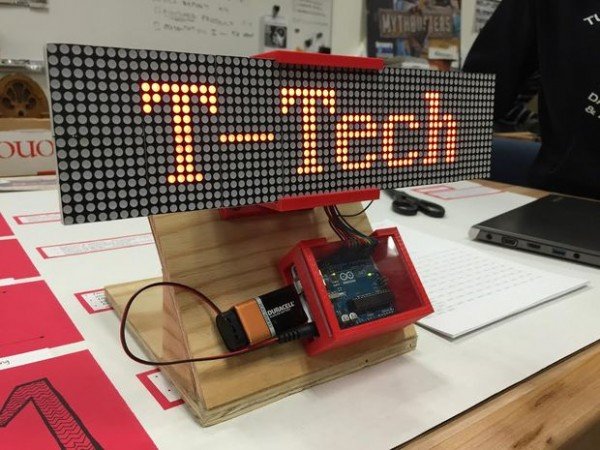
This article outlines building a small-scale 64x16 LED marquee for classrooms to display messages centrally while saving whiteboard space. The project uses an Arduino UNO, a 3D-printed mount, and a 9V battery. It involves designing a containment box, wiring specific pins, uploading custom code, and powering the device.
Parts used in the Miniature Marquee:
- 64x16 LED matrix
- SolidWorks or similar 3D modeling software
- Arduino UNO processor
- Arduino coding software
- 9v battery
- 9 male-female pin cables
- Battery power adapter
The purpose of this small scale LED marquee is to display messages to our classroom in a more modern and centralized way. In the classroom, this construction would save white board space and is convenient because it can store a large amount of information. It is also fairly simple to program and has a mount, making it easy to place anywhere within the classroom setting.
Step 1: Materials
The first step of this project is to gather all the materials necessary to assemble your miniature marquee.
- 1 64×16 LED matrix that can be ordered here.
- Access to a 3D modeling computer program such as SolidWorks in which you will be able to create the mount for the Marquee and the containment box for the Arduino processor
- 1 Arduino UNO processor and Arduino coding software
- 1 9v battery
- 9 male-female pin cables
Step 2: Construct your Marquee mount
Using your 3D software, design a mount and Arduino processor containment box.
We have provided our own measurements for both the mount and the containment box but feel free to make your own adjustments.
Print out your designs.
Step 3: Schematic/Pin Assignments
The Pin assignments are as followed (as well as included in the code):
LT=8;
SK=12;
R1=10;
R2=11;
EN=2;
LA=3;
LB=4;
LC=5;
LD=6;
GND=GND
Step 4: Program your Marquee and add power
Attached is the Arduino code that we used for our marquee.
Adjust our provided code to your purpose and upload your message into your Arduino.
Using a battery power adapter, connect your Arduino processor to your nine volt battery to power up your marquee!
For more detail: Make A 64×16 RED LED Marquee Using Arduino
- What is the purpose of this LED marquee?
To display messages in a modern, centralized way that saves whiteboard space. - How do I design the mount for the marquee?
Use 3D modeling software like SolidWorks to create the mount and Arduino containment box. - Can I adjust the measurements provided for the design?
Yes, you are free to make your own adjustments to the provided measurements. - Which pins are assigned for the LED matrix connections?
Pins LT=8, SK=12, R1=10, R2=11, EN=2, LA=3, LB=4, LC=5, LD=6, and GND=GND. - How do I add power to the Arduino processor?
Connect the Arduino processor to a nine volt battery using a battery power adapter. - What software is needed to program the marquee?
You need Arduino coding software to upload your message into the Arduino. - Is it easy to place the marquee in a classroom?
Yes, it includes a mount making it easy to place anywhere within the classroom setting.