
Summary of Mailbox Phone Alert
This project creates a DIY Mailbox Phone Alert using an Arduino to send text notifications when mail is delivered. A photoresistor detects light changes indicating the mailbox is open, while a pushbutton allows users to arm the system to prevent false alerts during personal checks. The device requires a GPRS/GSM shield and SIM card for cellular connectivity, housed in an enclosure with a dedicated antenna hole. It is ideal for those anxious about mail delivery or concerned about theft.
Parts used in the Mailbox Phone Alert:
- Arduino Uno
- GPRS/GSM Shield
- Prepaid SIM Card
- CR1220 coin battery
- Photoresistor
- Project Enclosure
- SPST Pushbutton Switch
- Grid-style PC Board
- M-type power plug
- 9 volt battery
- 9 volt battery snap
- 10kOhm Resistor (x2)
The mailbox phone alert sends you a text whenever you get mail. I remember anxiously checking my mail multiple times a day during the spring of my senior year of high school as I awaited letters back from colleges. Nervously, I would walk up to the mailbox. My heart would skip a beat as I opened it. Nothing inside. I would then go through the same process an hour later. I thought, if only there were a solution to this nerve wracking struggle of checking the mail all the time. I have come to the solution, but sadly I am two years late. Fortunately, this is still a super handy device that I enjoy using and now YOU can prevent future mail angst by making it for yourself.
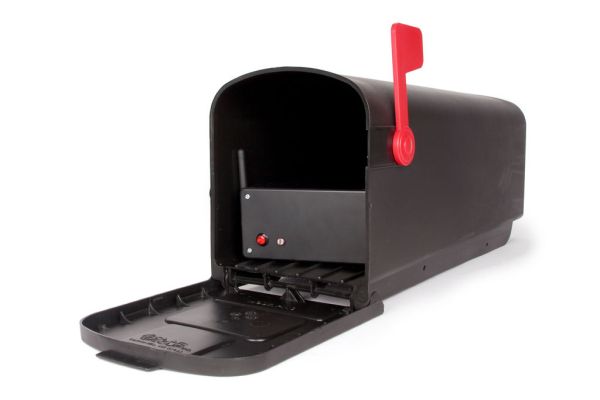
This project is perfect for you if you’re anxious to get your mail, you have issues with mail theft, you like to be updated by phone on every aspect of your life, or you just want to make something cool.
The device uses a photoresistor to detect the light levels in the mailbox. When the light is above a certain threshold, the Arduino knows the mailbox is open. There is a red button on the front of the device that you press to arm it. After you press the button, the next time the mailbox is opened, presumably by the mailman, you will get a text. It will not send you a text again until you have armed it again. This ensures that you don’t get a text every time you open the mailbox. Every time you pick up your mail, arm the mailbox phone alert and enjoy instant mail notification.
Preliminary advice: Inform your mailman of your contraption so that he does not think you have a planted a bomb in your mailbox and use a non-metal mailbox for good cellular connection.
Step 1: What you need
(x1) Arduino Uno (RadioShack #276-128)
(x1) GPRS/GSM Shield (RadioShack #276-246)
(x1) Prepaid SIM Card (RadioShack #17-8167)
(x1) CR1220 coin battery (RadioShack #23-793)
(x1) Photoresistor (RadioShack #276-1657)
(x1) Project Enclosure (RadioShack #270-1805)
(x1) SPST Pushbutton Switch (RadioShack #275-646)
(x1) Grid-style PC Board (RadioShack #276-149)
(x1) M-type power plug (RadioShack #274-1569)
(x1) 9 volt battery (RadioShack #23-1134)
(x1) 9 volt battery snap (RadioShack #270-324)
(x2) 10kOhm Resistor (RadioShack #271-1335)
Step 2: Set up GPRS/GSM Shield

Insert the coin cell battery into the holder on the bottom of the shield. Activate your SIM card by inserting it into an international phone or by calling the service provider. Slide the SIM card into the slot provided.
Step 3: Drill
Drill two holes about a 1/4″ apart on the front of your enclosure using a 1/16″ drill bit. You will thread the two wires of your photoresistor through these holes.
Drill a hole next to the two 1/16″ holes you just drilled using a 1/2″ drill bit for your pushbutton.
Insert the two wires of the photoresistor into the 1/16″ holes drilled on the front of the enclosure. Glue it in place.
Insert the pushbutton in the 1/2″ hole. Fasten it in place with its mounting nut.
Step 5: Power
Take apart the M-type power plug.
Feed the black cover through the wires on the battery snap connector.
Solder the red wire of the battery snap to the tip terminal on the plug and the back wire to the barrel terminal.
Fit the GPRS/GSM Shield on top the Arduino and plug the M-type connector into the Arduino.
Step 6: GPRS/GSM Antenna
Place the GPRS/GSM Shield which is now attached to the Arduino and the 9V battery inside the project enclosure.
You will screw the cellular antenna onto the gold connector on the left side of the GPRS/GSM shield (labeled in the first image above). However, you will need to drill a hole in the project enclosure in order for it to fit.
Make a mark where the antenna should go on the side of the enclosure.
Drill a hole where you have marked the enclosure using a 27/64″ drill bit.
Insert the antenna into the hole you just drilled and screw it onto the connector
For more detail: Mailbox Phone Alert
- How does the device detect when the mailbox is opened?
The device uses a photoresistor to detect light levels; when light exceeds a certain threshold, the Arduino knows the mailbox is open. - Can I use a metal mailbox for this project?
No, you should use a non-metal mailbox to ensure good cellular connection. - Why should I inform my mailman about this contraption?
You should inform your mailman so he does not think you have planted a bomb in your mailbox. - What prevents the device from sending texts every time I check my mail?
You must press the red button to arm the device after picking up mail, ensuring it only sends a text upon the next opening after being armed. - What components are required to set up the GPRS/GSM Shield?
You need to insert a CR1220 coin cell battery into the holder and slide the activated SIM card into the provided slot. - How do I install the cellular antenna on the enclosure?
You must drill a 27/64 inch hole in the side of the enclosure and screw the antenna onto the gold connector on the shield through that hole. - What is the best way to power the Arduino and Shield assembly?
You solder the battery snap wires to an M-type power plug and plug it into the Arduino after placing the Shield on top. - Does the device send multiple texts if the mailbox stays open?
No, the device will not send another text until you press the button again to re-arm it after the initial notification.
