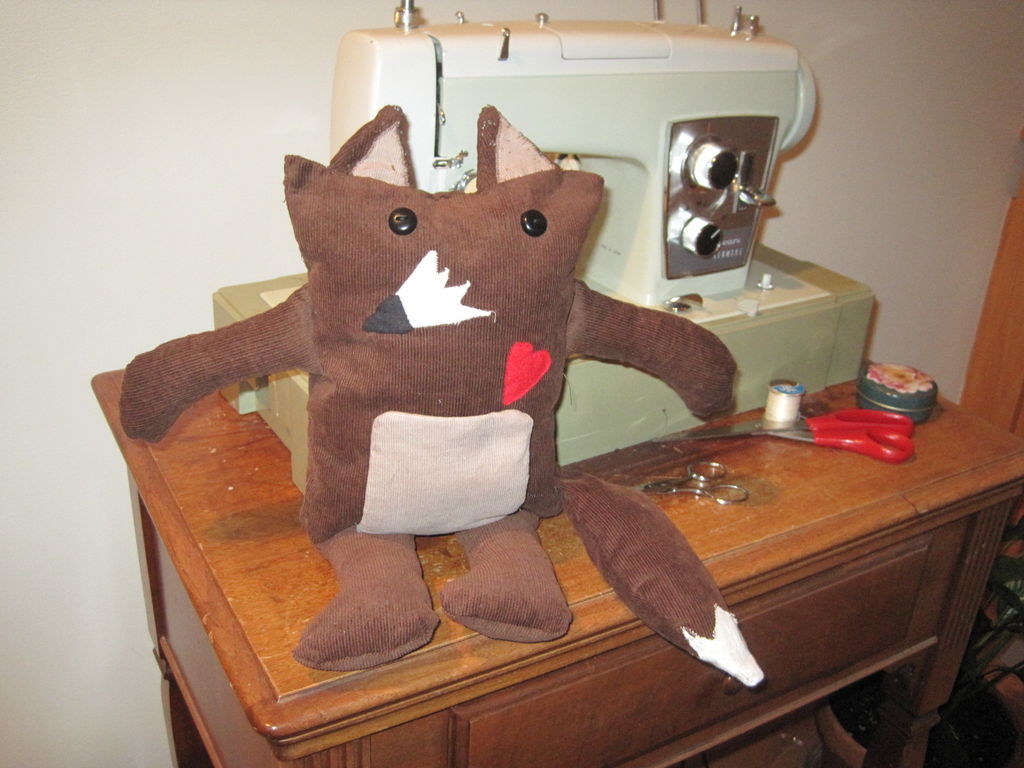
For a class on technology in libraries, I had to create a project that used the LilyPad Arduino, and I chose to create a stuffed animal that sings “Jesus Loves Me” while lights flash with the notes. I made a fox, but the pattern to which I’ll link can be used to make a raccoon as well.
Step 1: Materials
Electronic
- LilyPad Arduino Simple board – https://www.sparkfun.com/products/10274
- 5 white LilyPad LEDs – https://www.sparkfun.com/products/10274
- 1 Tri-Color LilyPad LED – https://www.sparkfun.com/products/10274
- 1 LilyPad Buzzer – https://www.sparkfun.com/products/10274
- Li-Po battery – https://www.sparkfun.com/products/10274
- Conductive thread – https://www.sparkfun.com/products/10274
- LilyPad FTDI basic – https://www.sparkfun.com/products/10274
Note: All the items listed above are included in the ProtoSnap LilyPad Development Board
- Mini-USB cable (the chord for a Canon camera works)
In order to program your LilyPad, you’ll need to install the Arduino IDE software as well as an FTDI driver on your computer.
Crafting
- Sewing needle
- Sewing machine
- Pins
- 1/2 yard dark brown material for body
- 1/4 yard light brown material for tummy/ears
- Red felt for heart
- Black felt for nose
- White material for snout/tail end
- 1/4 yard scrap material in whatever color available
- Dark brown thread, red thread, black thread, white thread
- Two buttons for eyes
- Velcro “sticky back” circles
- Small bag of polyester fibre fill
- Small bag of polyester quilt batting
Step 2: Coding the LilyPad
I have never coded anything before, which made this the trickiest part for me. Before I began, I used Leah Buechley’s LilyPad Tutorials to familiarize myself with how the LilyPad worked. This taught me how to use the software, what the different terms in the code mean, what different sections are necessary when you write a code, etc. I recommend that you play around with these tutorials before you start to write a code for yourself.
I really wanted to have the stuffed animal play a song, and I thought it would be fun to have lights flash along with the notes. I used the setup for a song that Leah Buechley has in her tutorial. I wrote out the notes to “Jesus Loves Me” before I used this chart to assign frequencies to the notes, and I sang the song repeatedly to decide which notes needed to be longer/where to put a delay in the code. I tweaked a lot along the way, keeping multiple drafts when I changed things, and I tested it out continually as I worked, loading every version I tried onto the LilyPad with the Mini-USB chord. When I was happy with the song, I added “digitalWrite” instructions before/after each note to have different LEDs turn on/off with each note. The code is attached.
NOTE: I wanted to have the pink LED from the Tri-Color LED stay on throughout the song, and I found that to do that I needed to specify in the code that the light be on HIGH as well as on LOW. I don’t know why it works when the code is written that way, but it does!
Step 3: Plan
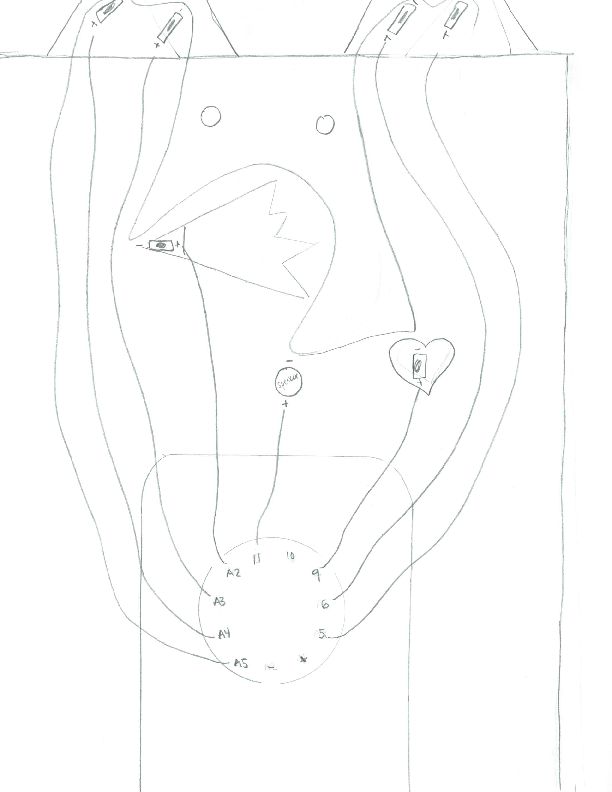
It’s important to know where you’ll put the components of the LilyPad on the stuffed animal before you start, which is why it’s a good idea to draw it out first.
- Trace the body piece on paper with a pencil, and trace the ears on top, where the snout is, where the heart is, and where the LilyPad Arduino Simple Board will be attached.
- Draw where you want the white LEDs, the Tri-Colored LED, and the buzzer, and draw the positive connections as well as the negative connection. The connections cannot cross each other, and that’s really what’s important about this step. My drawing is attached.
Step 4: Start to Make the Stuffed Animal
I used this pattern for a stuffed animal, adjusting the instructions slightly in order to incorporate the LilyPad.
The material that you use is up to you, but you might want to use a lighter material if you want the LEDs to be able to shine through the material. I used a thicker material, and I had to cut out holes for the lights to be seen. Use whatever colors you like!
- Print out the pattern pieces that are provided, cut them out, pin them to the material, and cut out the legs, arms, tail, ear, body, and tummy. You should make the tummy about an inch larger than is recommended, and cut out two tummy squares rather than one.
- Cut two identical tail ends from white scrap material, and use the zigzag stitch (which should be a setting on your sewing machine) to attach them to the two pieces of the tail.
- Pin the two pieces for each arm, each leg, and the tail together with the outsides facing in, and use a sewing machine to sew them together along the edge. Turn them inside out (or outside out!), and stuff the arms, the legs, and the tail with the polyester fibre. The instructions that accompany the pattern does not have you stuff the tail, but I recommend that you do. It’s cuter with a stuffed tail!
- Cut smaller triangles from a different material, and sew those onto the front, outside pieces of the ears with a zigzag stitch. Then pin the two pieces of each ear together with the outsides facing in, and use a sewing marching to sew them together along the edge. The ears won’t be stuffed.
- Cut out a small red heart from red felt.
- Cut out a small white snout from white scrap material.
- Use the zigzag stitch to sew the heart as well as the snout onto the front body piece.
- Sew the ears by hand to the top of front body piece; you should not have turned the ears right side out yet, and you should only sew the back piece of each ear onto the body.
- Rather than sew the material for a tummy onto the animal, make a small pad with the tummy, cutting out two squares rather than one, sewing them together like you did with the arms/legs/tail/ears, and stuffing them with the quilt batting.
- Attach small Velcro circles to the tummy that corresponded with Velcro on the front body piece. (I used “sticky back” Velcro pieces, but you can use ones that you sew on to be more durable/classier.) These changes to the tummy allow you to use the tummy as a removable cover for the LilyPad Arduino Simple Board that will be sewn on to the stuffed animal.
For more detail: LilyPad Arduino Stuffed Fox Toy


