Step 1: Finding your materials.
• Sewing Machine [while it may be theoretically possible to create this Kindle case without a sewing machine, it would be difficult] • Two ¼ yard pieces of upholstery fabric [or thick cotton quilting fabric]—these are for the outside of the case and the lining, so pick two patterns that complement each other. 1/4 yard is MORE than enough, but it’s always nice to have extra.
• One ¼ yard piece of batting
• Eight inches of sewable velcro
• Sewing needle
• Thread [I used pink and white] • One sheet of felt [a complementary color to your fabric] • Glue gun [could also use fabric glue]
Electronic materials:
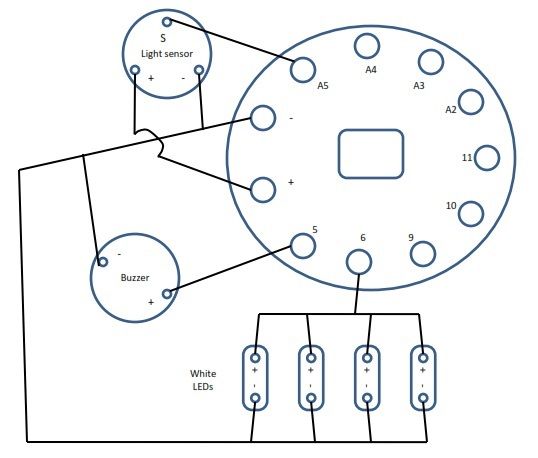
• ProtoSnap Arduino LilyPad Developent board – https://www.sparkfun.com/products/11262
[this project uses the light sensor, four white LEDs, Piezo buzzer, battery, and the simple board]
• Mini-USB cable
• FTDI driver (http://arduino.cc/en/main/software) and Arduino IDE (http://arduino.cc/en/main/software) should be installed on your computer
• Conductive thread
Step 2: Thinking about your design.
Your electronic parts are going to be on the outside of the case, with a fabric envelope flap on top. As you will basically be sewing this case inside-out, you will add the electronic components before you sew the bulk of the case together. Therefore, these steps call for coding your project before any actual sewing steps take place!
Step 3: Coding your project.
This is what I wanted my project to do: When the top case flap was opened, the newly exposed light sensor would sense light and turn on four white LEDs and play a short snippet from Hedwig’s Theme on the buzzer. The envelope flap would remain closed over the electronic pieces while this was happening. The music would play once with the lights and then go off. The sensor would have to go dark again and then sense light to start the music/lights again.
My project code is contained in the first file below. I tried to explain my steps throughout the coding text. I took most of my code from the Arduino examples [Blink, ToneMelody, and AnalogInput], modifying to fit my project. I coded the first 14 notes from Hedwig’s Theme using the guide in ToneMelody and the song’s sheet music. I got it as close as I could get to the real sound—some imagination might be necessary! The second file contains the ‘Pitches’ information, necessary to play the melody.
What is the third code? I somehow damaged my sensor after completing the project. I therefore had to change the coding so the case would play music and light up [just once] when I turned it on. The third file below represents this code. Unless your sensor somehow gets damaged [and I’ll include a warning about this at the appropriate spot in my sewing instructions], you will not need the third block of code!
Step 4: Testing your program.
Step 5: Sewing the first part of your case.
1. Use your measurements from Step 2 to prepare your main fabric. You are going to add 1 inch to each side of the width to make sure the fit is generous and to provide enough extra fabric for sewing the seams. I made this case for an e-reader that is 5 inches wide, so my fabric had a width of seven inches. For the height, you are going to double your measurement [as the case will be essentially folded in on itself] and then you need to add four inches to provide room for seams and for creating the top flap. My e-Kindle is 7 inches high, so the length of my fabric piece I cut was 18 inches. It will seem like too much—it won’t be! Cut out both pieces of fabric and the batting to this same measurement [in my case, 7 inches by 18 inches].
2. At the top of the outside fabric [for my project, it was the striped fabric] attach two strips of the fuzzy velcro pieces [the velcro that gets connected to]. At the top of the inside fabric [in my example, fabric with circles], attach two strips—same size and same location—of the spiky velcro pieces [the velcro that connects to the other]. Make sure that your velcro pieces will line up perfectly. [This is the sewing mistake I made with my project. My velcro pieces did not line up and my guess is that the velcro scratched my light sensor. As long as your velcro lines up, this will NOT happen to you!]
3. Lay the fabric together to mimic how your case will look. Take your outside fabric with the velcro facing you and fold it backwards up behind the front flap. Add your batting directly underneath the outside fabric—the entire way. Take your inside fabric and fold it on the inside of the outside fabric and batting[see picture], so the batting is sandwiched between the two pieces of fabric. Both pieces of fabric and the batting will be folded so that the pieces on the bottom are longer—this makes your top flap!
4. Now, we need to cut out material for the envelope flap that will cover the electronic components of your project. For my project, I chose the striped fabric, but I think using the inside fabric would look great, too! Your envelope flap is a doubled piece of fabric [no batting necessary] that will start just below the outside fabric velcro and reach almost all the way across [see picture]. Use a measurement that is the width of your e-reader, double it, and add one inch. For the height, you can take your e-reader height and just add one inch. So, the width for my envelope flap was 11 inches and the height was 8 inches. Fold your piece of fabric, width-wise, with the right sides together and sew up two sides, then turn the flap right side out. The left side can be open and not sewed together at this point, as you are going to sew it directly into the main case seam.
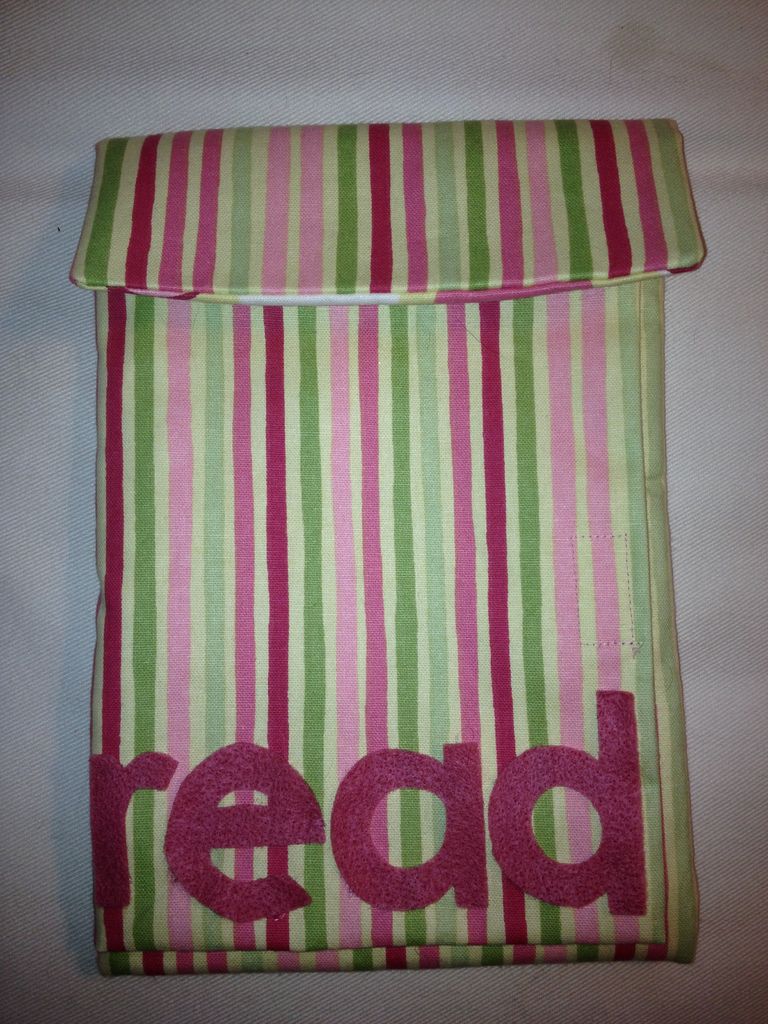
5. On the bottom of the envelope flap, I wanted to put felt letters spelling out read. The purpose for this was threefold. One, it gave some decoration to the front. Two, it tied the whole project into literacy for me. Three, and perhaps most importantly, the letters covered up the holes I cut in my envelope flap to allow the LED lights to shine through. The LED lights are bright enough to be visible through the felt. To cut out my letters, I simply printed r e a d in an appropriately sized font [I used Century Gothic] and then used those cut letters to trace and cut the felt letters. Set your letters aside for now.
6. Take a look at your case. Laying it out the way outlined in the steps above allows you to see how the case will be put together. We’re going to switch to sewing on the circuits in the next step. When we start sewing the case together [Step 7], the sewing will almost seem backward as we sew inside-out. It’s good to pause and visualize the finished case at this step.