Tutorial 1
Part One
Materials needed for tutorial
- Working BBB, RBBB, Arduino, or other Arduino compatible (BBB shown in photos)
- Solderless breadboard
- 22 gauge solid wire for use with breadboard
- 3 6mm momentary switches
- 8 LED’s, any color
- 8 1k resistors, (470 ohm or 220 ohm will also work fine if you want brighter LEDs)
- 3 10k resistors,(1k will also work fine)

Part One
Software install See the page on installing the Arduino IDE
- attach RED wire to connect the +5V rails on each side of the Breadboard
- attach BLACK wire to connect the +5V rails on each side of the Breadboard
NOTE:
do not use digital pins 0 & 1 for this assignment. They are used for BBB communication with your laptop!
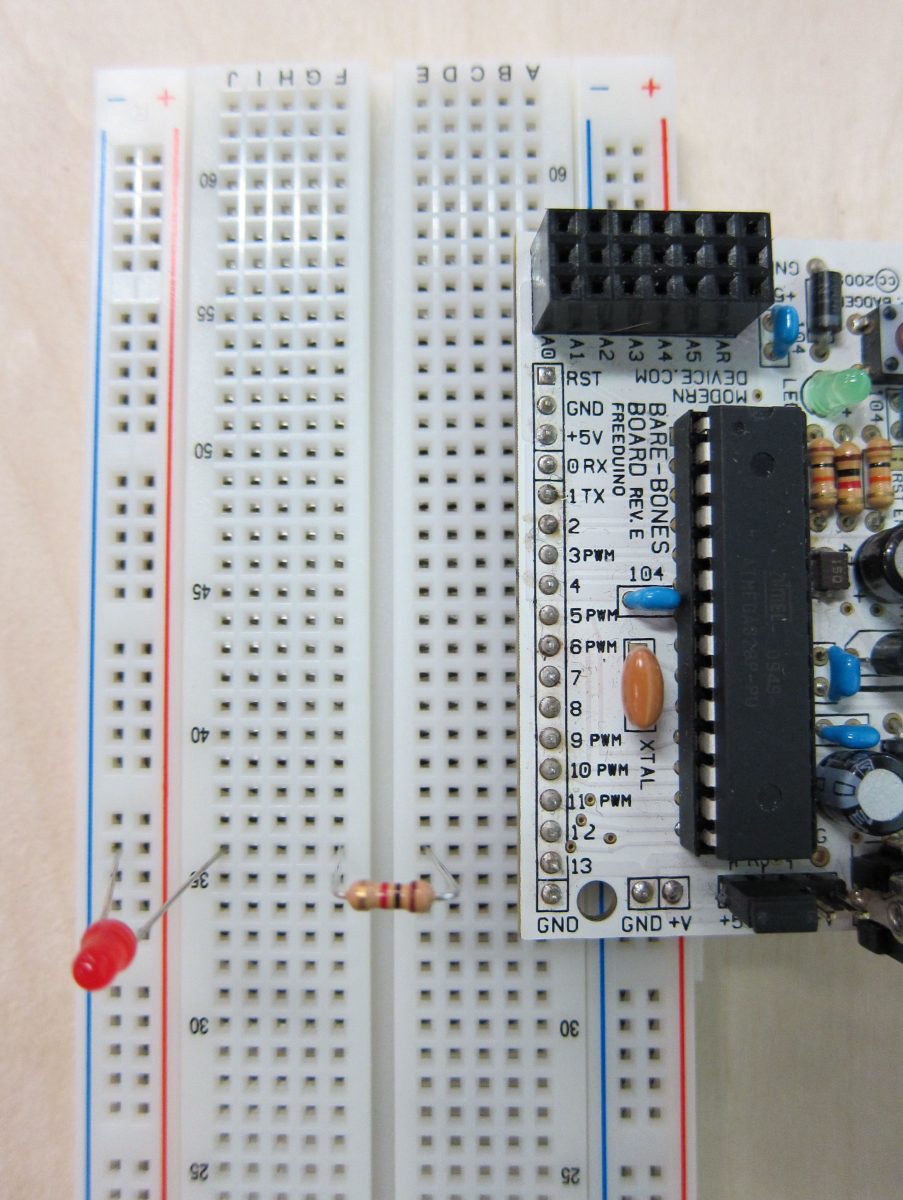
Breadboard Setup
- Insert your BBB into the breadboard, with the +V power rail pin on the red stripe (positive) and the ground power rail pin on the blue stripe (negative). See the arrows in figure 1. This detail is also visible in figure 3.
- Set up your breadboard by tying both of sides of the power rails together with appropriate colored wires as seen in figure 1. Use warm colors for positive and cool colors for negative. This will distribute power and ground to both sides of the breadboard. While other arrangements for the power rails are sometimes useful, this is a good default power rail setup for beginners and makes hooking up many circuits more convenient.
LED Setup
Insert one LED in pin 13 in series with a 1k resistor as shown on the right side of figure 3. LEDs are Light Emitting Diodes, which conduct electricity only in one direction, consequently it is important to insert them in the correct direction. LEDs always have one longer lead to indicate the anode or positive lead. Insert the LED with this long lead (anode) facing the BBB.
Blink is pretty simple sketch, you can read about it here. A couple more comments are in order, so here is the listing of the whole sketch.
const int ledPin = 13; // LED connected to digital pin 13// The setup() method runs once, when the sketch starts
void setup() {
// initialize the digital pin as an output:
pinMode(ledPin, OUTPUT);
}
// the loop() method runs over and over again,
// as long as the Arduino has power
void loop()
{
digitalWrite(ledPin, HIGH); // set the LED on
delay(1000); // wait for a second
digitalWrite(ledPin, LOW); // set the LED off
delay(1000); // wait for a second
}
It is important to understand every line of a program when troubleshooting and analyzing the code. A line that one doesn’t understand is a potential place for a problem. We will briefly move through the code.
For more detail: Artist’s Machine