
Summary of LED Ukulele
This article guides beginners in building an LED ukulele that teaches four chords: C, G, Am, and F. Using an Arduino board, 11 LEDs, wires, soldering tools, hot glue, and electrical tape, the project involves drilling holes in the fretboard and headstock to embed lights. The code controls LED sequences for each chord, providing visual cues for strumming. No prior musical or coding experience is required.
Parts used in the LED Ukulele:
- Ukulele
- 3mm LEDs x11
- Arduino board
- Wires
- Soldering kit
- Hot glue
- Electrical tape
Hi, my name is Elaine. This project combines a lot of things that I enjoy so I hope you enjoy it as well!
The LED ukulele we’ll be building teaches you how to play the four most played chords: C, G, Am, and F. No previous musical experience required to start strumming along popular songs. It’s a great project for both Arduino and ukulele beginner. 😉 If you’re looking for something a little more challenging, try the Shadow Swipe upgrade at the end of this Instructable.
Step 1: Hardware
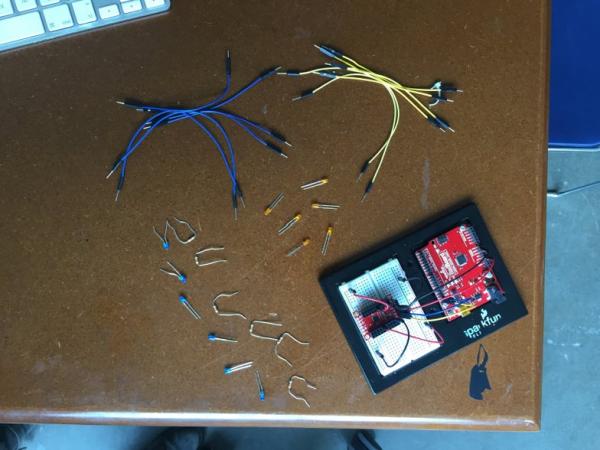
1. A ukulele: I recommend grabbing a $30- 50 instrument off of Amazon or your local music store. We’ll be drilling into the fingerboard and head plate. I also suggest a set of strings if you don’t already have a set. Here’s also a chart from Ukeguides.com that shows you the parts of an ukulele. It’ll be helpful to get familiar with your instrument.
2. 3mm LEDs x11: We’ll use a total of 12 LEDs in this project—6 in the fretboard and 5 in the head. Use whatever colors you’d like. In fact, if you’d like more LEDs on your ukulele, feel free to add as many as your Arduino board will support. For this tutorial, there must be 6 LEDs in the fretboard, but any more is up to you.
3. Arduino board: I used both a genuine Arduino Uno board and the Sparkfun equivalent. Either one will work. A bigger board with more pins will support more LEDs.
4. Wires and a basic soldering kit: If it’s your first time soldering, I recommend this guide before getting started.
5. Hot glue and electrical tape
Step 2: Code
// Define LED pins
int allPins[] = {2, 3, 4, 5, 6, 7, 8, 9, 10, 11, 12, 13};<br>int posPins[] = {8, 9, 10, 11, 12, 13};
int ledPins[] = {2, 3, 4, 5, 6};
int ledNum = 6;int led_C = 8;
int led_G1 = 9;
int led_G2 = 10;
int led_G3 = 11;
int led_Am = 12;
int led_F2 = 13;
// Define global variable
int timer = 5000;
//Define pin mode
void setup() {<br>  for (int i; i < 13; i++) {
    pinMode(allPins[i], OUTPUT);
  }
}
// Game state 0: Initial sequence
//Using for loops to send commands to a chain of LEDs
for (int i; i < 5; i++) {<br>   digitalWrite(ledPins[i], HIGH);
   delay(150);
  }
  for (int i; i < 6; i++) {
   digitalWrite(posPins[i], HIGH);
  }<br>delay(2000);
// Game state 1: “C” Chord
// Begin with turning off all LED pins and lighting up only the LED representing the “C” Chord
for (int i; i < 5; i++) {digitalWrite(ledPins[i], LOW);
   delay(150);
  }
for (int i; i < 6; i++) {
   digitalWrite(posPins[i], LOW);
  }
delay(2000);
digitalWrite(led_C, HIGH);
delay(timer);
digitalWrite(led_C, LOW);
for (int i; i < 5; i++) {
   digitalWrite(ledPins[i], HIGH);
   delay(150);
  }
//Game state 2: “G” Chord
for (int i; i < 5; i++) {
   digitalWrite(ledPins[i], LOW);
  }
digitalWrite(led_G1, HIGH);
digitalWrite(led_G2, HIGH);
digitalWrite(led_G3, HIGH);
delay(timer);
digitalWrite(led_G1, LOW);
digitalWrite(led_G2, LOW);
digitalWrite(led_G3, LOW);
for (int i; i < 5; i++) {
   digitalWrite(ledPins[i], HIGH);<br>   delay(150);
  }
//Game state 3: “Am” Chord
for (int i; i < 5; i++) {
   digitalWrite(ledPins[i], LOW);
  }
digitalWrite(led_Am, HIGH);

delay(timer);

digitalWrite(led_Am, LOW);

for (int i; i < 5; i++) {digitalWrite(ledPins[i], HIGH); delay(150); }
//Game state 4: “F” Chord
for (int i; i < 5; i++) {<br> digitalWrite(ledPins[i], LOW);<br> }<br>digitalWrite(led_Am, HIGH);<br>digitalWrite(led_F2, HIGH);<br>delay(timer);<br>digitalWrite(led_Am, LOW);<br>digitalWrite(led_F2, LOW);<br>for (int i; i < 5; i++) {<br> digitalWrite(ledPins[i], HIGH);<br> delay(150);<br> }<br>for (int i; i < 5; i++) {<br> digitalWrite(ledPins[i], HIGH);<br> }<br>delay(150);
// Game state 5: Ening sequence
for (int i; i < 5; i++) {<br> digitalWrite(ledPins[i], LOW);<br> }<br>delay(150);<br>for (int i; i < 5; i++) {<br> digitalWrite(ledPins[i], HIGH);<br> }<br>delay(150);<br>for (int i; i < 5; i++) {<br> digitalWrite(ledPins[i], LOW);<br> }<br>for (int i; i < 5; i++) {<br> digitalWrite(ledPins[i], HIGH);<br> delay(150);<br> }<br>for (int i; i < 5; i++) {<br> digitalWrite(ledPins[i], HIGH);<br> }<br>delay(150);<br>for (int i; i < 5; i++) {<br> digitalWrite(ledPins[i], LOW);<br> }<br>delay(150);<br>for (int i; i < 5; i++) {<br> digitalWrite(ledPins[i], HIGH);<br> }<br>delay(150);<br>for (int i; i < 5; i++) {<br> digitalWrite(ledPins[i], LOW);<br> }<br>delay(1000);<br>}
Step 3: Hook Up Guide
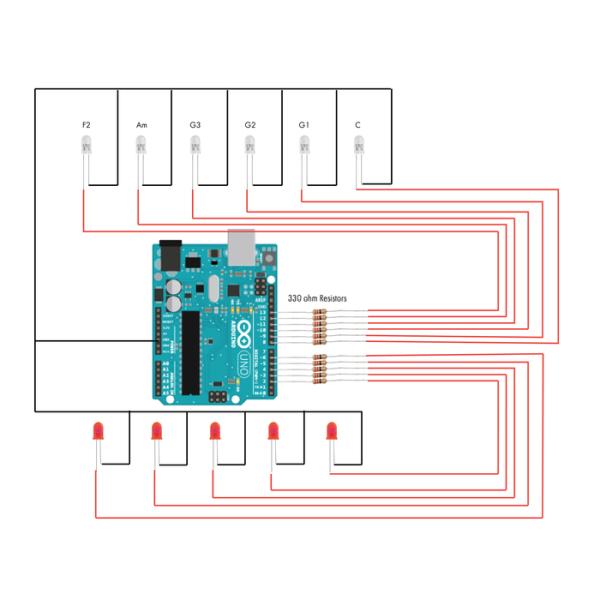
Hooking up this project is pretty simple. Make sure to follow the hook up diagram. I recommend hooking up the circuit and testing out the code before the next step. We’ll get to drill into our instrument and begin assembling all our components.
Step 4: Assembly
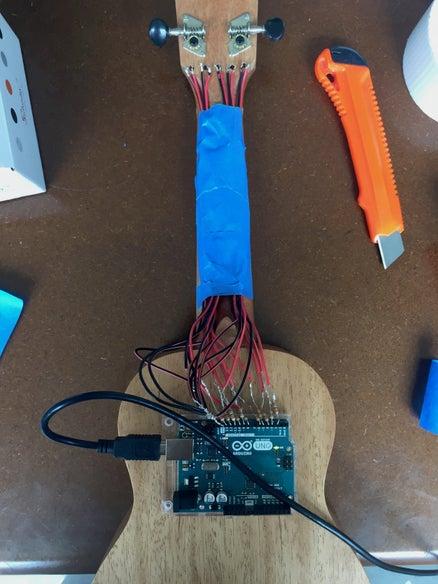
Part one: Unstring that ukulele. Following the diagram above, drill 4mm holes into the fretboard and head. I recommending drilling from the backside of the instrument.
Customization: I’ve found 3mm LEDs fit best, but I’m sure other size LED would work fine as well. Feel free to experiment—I’d love to see how your variation comes out. 🙂
Part two: Fit LEDs into corresponding holes of the ukulele. Once the LEDs are in place, push the pins apart as anchors to hold them in place.
Part three: Attach Arduino board to the back of the ukulele. I ended using a few spots of hot glue to attach my board.
Part four: Solder wires according to the hookup guide. Again, if it’s your first time soldering, check out this guide first!
Step 5: Finish!
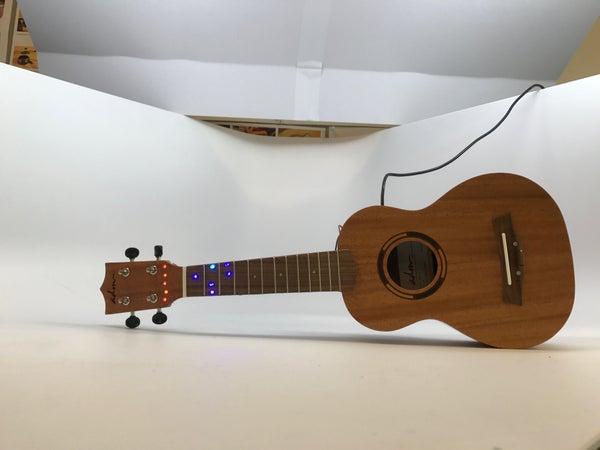
Finally, string up your ukulele, power up your Arduino and play away.
You’ll be surprised how many songs you can now play along with just these four chord. I hope this instructable has been helpful, inspiring you to play and tinker more. Please feel free to drop me a comment if you have any questions. Otherwise, Happy playing and hope to hear from you soon! 🙂
Source: LED Ukulele
- How many LEDs are needed for the project?
A total of 12 LEDs are used, with 6 in the fretboard and 5 in the head. - Which chords does the LED ukulele teach?
The project teaches the four most played chords: C, G, Am, and F. - Can I use a different size LED than 3mm?
Yes, while 3mm fits best, other sizes may work fine if you experiment. - Where should I drill holes for the LEDs?
Drill 4mm holes into the fretboard and head plate, preferably from the backside. - What is the recommended price range for the ukulele?
A $30-50 instrument is recommended for this project. - Is previous musical experience required to start?
No, no previous musical experience is required to start strumming along popular songs. - How do I attach the Arduino board to the ukulele?
You can attach the board to the back of the ukulele using spots of hot glue. - What colors of LEDs can be used?
You can use whatever colors you like for the LEDs. - Does a bigger Arduino board support more LEDs?
Yes, a bigger board with more pins will support more LEDs. - What should I do after soldering the wires?
String up your ukulele, power up your Arduino, and play away.
