
Summary of James – Your first Arduino Robot
This article guides readers through building "James," a beginner Arduino robot created for a high school robotics class. The project honors the author's grandfather and involves designing, cutting acrylic or alternative materials, mounting an Arduino Uno with a prototyping shield, and installing ultrasonic sensors using servos. The guide emphasizes safety when drilling and sawing while providing a foundational approach to constructing a functional robot.
Parts used in the James Robot:
- Arduino Uno
- Prototyping Shield
- M3 screws
- Spacers
- Servo motor
- Ultrasonic sensor
- Acrylic sheet (or balsa wood, ply-board, foam-core, cardboard)
Edit:
Thank you so much everyone for voting for James in the Toy Contest! He got first place and I won a $500 Shapeways voucher! Expect to see more robot instructables from me in the future! 😀
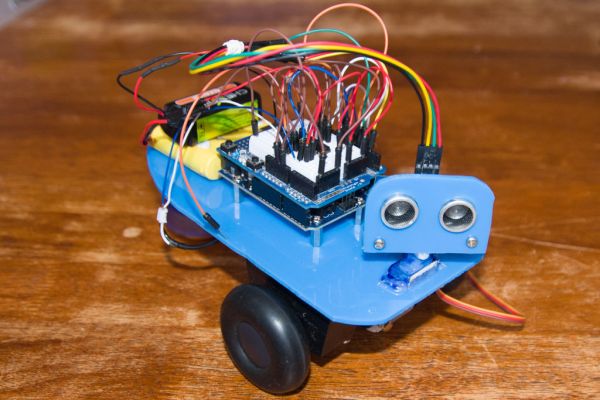 So you want to make a robot? Don’t know where to start? How about you learn how to make a robot with me and make James!
James was made as part of a Robotics Class I teach to a few high school students.
I called him James in memory of my late Grandfather James Manning Edwards who passed away 14-3-2013. He loved teaching and helping kids and died doing what he loved, hopefully this James will carry on that legacy.
Step 1: Gather your Components and Tools
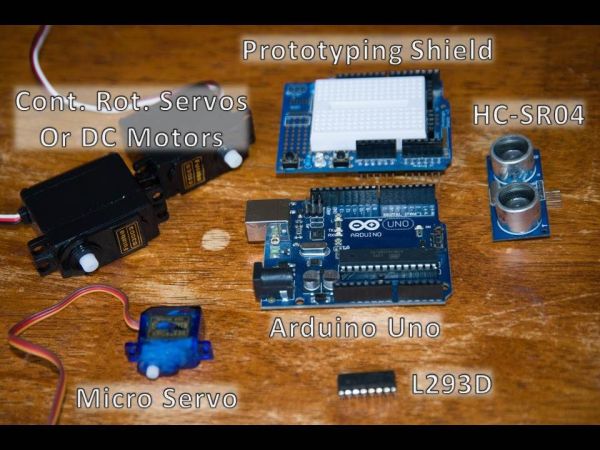
For this build we will be using the Arduino Uno with a Prototyping Shield. You could use whichever Arduino you want with its own Prototyping Shield or Breadboard.
If you are looking to buy this Prototyping Shield search on ebay for “arduino prototype shield uno” and you should see it. Alternatively you can buy a similar looking one from Core Electronics: http://tinyurl.com/brxjx5h
Step 2: Planning
On a piece of paper sketch out a rough sketch of the shape you want your robot body to have. It is always best to have an idea of what you want your robot to look like before you begin its construction.
Next you will want to sketch the shape of the robot body onto the protective sheet of the acrylic, this can be done easily with a pencil. If you do not have acrylic you could use; balsa wood, ply-board, foam-core, cardboard plastic containers or even food containers! You will also need to mark out where you want your servo to go. To cut out the hole for the servo drill four holes on each corner where you want to put the servo, this is to allow the blade of the saw to be easily maneuverered, preventing finger loss.
Step 3: Arduino Mounting Holes
The Arduino will be attached to the robot body using M3 screws and spacers so you will also mark where the mounting holes are on the Arduino so they can be drilled out. Once all of this has been done cut out the robot shape on a bandsaw, if you don’t have a bandsaw you can use a coping saw.
Step 4: Ultrasonic Mounting Bracket
For more detail: James – Your first Arduino Robot
- What is the main purpose of this project?
This project teaches beginners how to build a robot named James as part of a high school robotics class. - Can I use a different Arduino board for this build?
Yes, you can use whichever Arduino you want with its own Prototyping Shield or Breadboard. - What are some alternative materials if I do not have acrylic?
You could use balsa wood, ply-board, foam-core, cardboard plastic containers, or food containers. - How should I mark the shape on the material before cutting?
Sketch the rough shape onto the protective sheet of the acrylic using a pencil. - Why must I drill four holes on each corner for the servo?
Drilling these holes allows the blade of the saw to be easily maneuvered, preventing finger loss. - What tools are recommended for cutting out the robot shape?
You can use a bandsaw, or if you do not have one, you can use a coping saw. - How will the Arduino be attached to the robot body?
The Arduino will be attached using M3 screws and spacers. - Where did the name James originate from?
The robot was named James in memory of the author's late grandfather, James Manning Edwards.
