Summary of ITTT – Cat Laser
This article details a school project by Rens Kuilman to create an automated random laser pointer for lazy cats using Arduino. After failing with a robot and game controller, the author built a two-servo system that moves a laser randomly. The project evolved from cardboard prototypes to a 3D-printed case, utilizing a VarSpeedServo library to control movement speed effectively.
Parts used in the Random Cat Laser:
- Arduino Uno
- SG90 Mini Servo (2x)
- Pinwires (6x)
- Red Laser Module 5V 650nm
- Cardboard box
- Beer coasters
- Pen (temporary replacement)
- 3D printed case
Heey my name is Rens Kuilman. For a school project (If This Then That) we had to make something using the Arduino. After a few misses I decided to make a random laser, which I a lazy cat owner could use the get his lazy cat to move.
Supplies
- Arduino Uno [1x]
- SG90 Mini Servo [2x]
- Pinwires [6x]
- Red Laser Module 5V 650nm [1x]
Step 1: Mistakes Were Made
At first I wanted to make a small moveable robot like machine. But I quickly realized that something like this wasn’t that doable with the skill level I was on (and still are on). It kind of felt like banging my head against a rock.
I did have more images and video’s of this process, but 1 broken phone and moving house later and lost most of it.
I played around with sound/pitch and even made a prototype using lego.
I also tried working on a controller for a game, but scrapped it because it wasn’t what they wanted us to make for a project like this.
It also turned out pretty boring and was just the same as already excisting controllers
Eventually I decided to just make something. Something I would enjoy working on, and so I did…
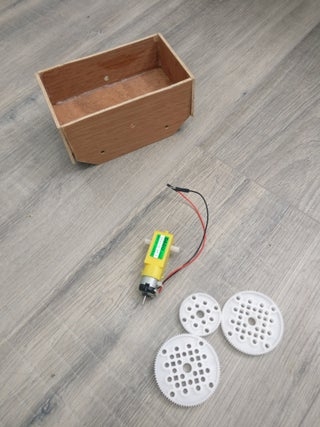
Step 2: First Prototype
Using a cardboard box and some beer coasters I quickly put together a prototype. The pen was a temporarily replacement for the laser module.
Code:
#include <Servo.h>

Servo servoOne;
Servo servoTwo;

void setup() {

  Serial.begin(9600);

  servoOne.attach(3);
  servoTwo.attach(2);
}

void loop() {

    // Uncomment these lines to align servo's
    //servoOne.write(0);
    //servoTwo.write(0);

    // Give servo's random angle
    servoOne.write(random(0, 30), random(30, 80));
    servoTwo.write(random(20, 160), random(30, 80));

    delay(1000);
}
As you can see in the video. The servo’s move way to quickly. The cat wouldn’t even see the laser pointer before it moved again.
Step 3: Second Prototype
The problem in the previous step was that you can’t adjust the speed of a servo. This would lead to almost instant movement.
Luckily someone made a library that gives servo’s a little bit more controllability.
Using this I could add random speeds to the servo’s every time they move.
Code
#include <VarSpeedServo.h>

VarSpeedServo servoOne;
VarSpeedServo servoTwo;

void setup() {

  Serial.begin(9600);
  servoOne.attach(3);
  servoTwo.attach(2);
}

void loop() {

    // Uncomment these lines to align servo's
    //servoOne.write(0);
    //servoTwo.write(0);

    // Random angle, random speed.
    servoOne.slowmove(random(0, 30), random(30, 80));
    servoTwo.slowmove(random(20, 160), random(30, 80));
    delay(1000);
}
Step 4: Design/Print Case
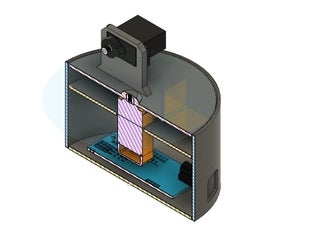
Because I used coasters for the paper prototype, I already had a good idea of how I wanted it to look.
https://puu.sh/FVWaX/b145786331.png
With some help of my brother who has a 3D printen and also has waaaay more experience using one, we made a case for my project.
https://puu.sh/FVW8g/b6a29556fd.jpg
https://puu.sh/FVWcw/a6a0ae5251.jpg
https://puu.sh/FVWgp/d716158663.png
The top part has not been printed yet at the time of writing this.
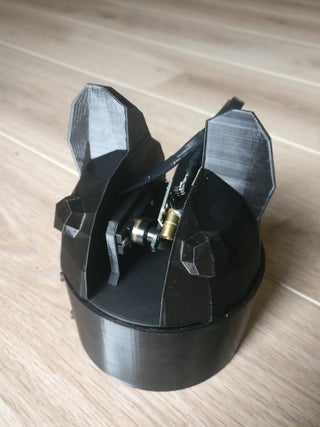
Step 5: Assembling
Fully assembled and soldered (missing cap, not yet printed)
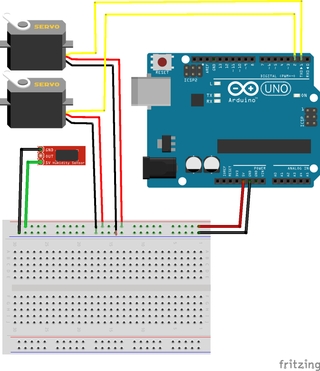
Step 6: Wire Assembly
Source: ITTT – Cat Laser
-
Why did the author abandon the initial robot idea?
The author realized building a moveable robot was not doable with their current skill level. -
What problem occurred in the first prototype?
The servos moved too quickly for the cat to see the laser pointer before it moved again. -
How was the servo speed issue solved in the second prototype?
The author used the VarSpeedServo library to add random speeds to the servos every time they move. -
What components were used for the initial prototype housing?
A cardboard box and beer coasters were used to quickly put together the first prototype. -
Who helped create the final case for the project?
The author's brother, who has more experience with 3D printing, helped make the case. -
What code library is required for the second prototype?
The VarSpeedServo.h library is included to allow for controlled movement speeds. -
Which pins are used to attach the servos in the code?
ServoOne is attached to pin 3 and ServoTwo is attached to pin 2.