Summary of Interval Long Exposure Camera
This article details building a custom long-exposure camera using RC photo paper and an Arduino-controlled shutter to capture exposures lasting days or weeks. Unlike standard DSLRs limited to 30 seconds, this DIY project utilizes light-sensitive paper that registers images over extended periods without traditional chemistry. The guide covers harvesting a shutter from an old SLR camera, selecting an actuator, constructing a light-tight wooden box, and assembling the electronic control system.
Parts used in the Custom Long Exposure Camera:
- 3/8 inch wood
- black caulk
- wood glue
- black paint
- flat head screws and matching wing nuts
- 1/4 nut
- SLR lens with rear cap
- 50mm SLR lens with cap
- black felt
- plexiglass
- donor 35mm SLR camera
- Arduino Uno
- 9 Volt battery
- actuator from radio controlled car steering mechanism
- wire
- button
- paper clips
- wooden dowel
- RC photo paper
First, a little science. Anyone who has taken a basic photo course knows at least the basics behind film processing. The light reacts with the paper, and then chemicals alter the products of these reactions so that an image can be seen. Now throw that idea out the window. Funny thing about RC photo paper is that it reacts noticeably to light regardless of any chemistry you may add after the exposure. Its something to do with the silver ions and electrons and other things that bald guys who carry around calculators for fun would be able to explain. But what does that mean for you if you’re not bald and don’t carry around a calculator for fun? It’s the key to your long exposures. If the paper is exposed much much much longer than any exposure time that would work with darkroom chemistry, a discernible image will fry itself into the paper. You can capture entire days this way: the sun can be seen in a trail across the sky and only objects that remained stationary for long periods of time will appear. This image can then be taken to a flatbed scanner and scanned onto the computer.
So all you gotta do now is build your own camera to put the paper in. Your camera can range from a basic shoebox with a pinhole to something with shutters and SLR lenses and all kinds of crazy things. For this instructable, I’m going to show you how to go crazy with it. Cool things can be captured by just opening up a lens and continuously letting light in, but what if you want an Arduino- controlled shutter that allows you to control when the paper is exposing and when it isn’t? That’s what I’m going to show here.
 Remove these ads by Signing Up
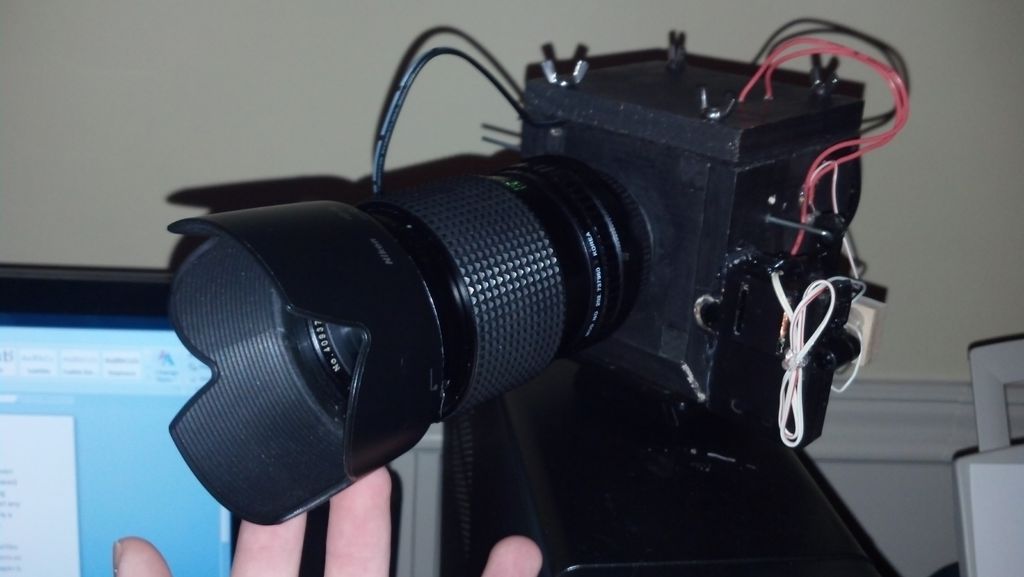
Step 1: Materials
First, the building materials:
3/8 inch wood
black caulk
wood glue
black paint
flat head screws and matching wing nuts (relatively small and about an inch long)
1/4 nut
any SLR lens with rear cap (it is imperative you have this cap)
50mm SLR lens with cap (yes, my design uses two different lenses)
black felt
plexiglass
donor 35mm SLR camera
Arduino Uno
9 Volt battery
actuator (I got mine from the steering mechanism of a radio controlled car I got from the thrift store)
wire
button
paper clips
wooden dowel
RC photo paper
And tools:
Hack saw
Some kind of miter saw or miter brace
Hole saw
Drill press
screw driver
hot glue
clamps
sandpaper
**** depending on the route you take with this, you may need additional tools to take your donor camera apart. a hammer always helps!
Other various workshop tools are always handy too. There is no right or wrong way to build something. And again, I stress that these are more along the lines of guidelines to an idea than instructions to building a refined product. Go crazy with your design!
Step 2: Step 1: Harvesting your shutter
I find the best approach to taking things apart is if you see a screw, it probably needs to be removed. Sometimes on these cameras, the fake leather trim has to be peeled back for the screws to be accessed. Other times, screws can be so elusive that your best option is to just break out the hammer and take a few good whacks.
Use your best judgment on this step. If a component doesn’t appear to be necessary to the shutter’s function, remove it. There is a lot of clockwork inside of a camera, and almost none of it is necessary to the basic opening and closing of the shutter. Once you’ve taken absolutely everything you can off of the camera (with the exception of the shutter mechanism which is built into the body). cut away the aluminum body as close to the shutter as you can with the hack saw. The bodies are almost always made of aluminum, so any blade for non-ferrous materials will be fine. You’ll want to brace the camera in a miter box so that you can get a clean cut.
When the shutter is out, you should have only the screens on the shutter and a few pins on the side of the housing that control the actuation of the screens. I’ve pictured the shutter once I got it out of the camera. Yours should look similar. Play with the mechanical parts on the side of the shutter and figure out what piece you need to move to get the shutter to open and close. There should be a small pin that meshes with the mechanical system of the camera when the shutter was still attached. Make note of the location of this pin.
Step 3: Step 2: Choosing an actuator
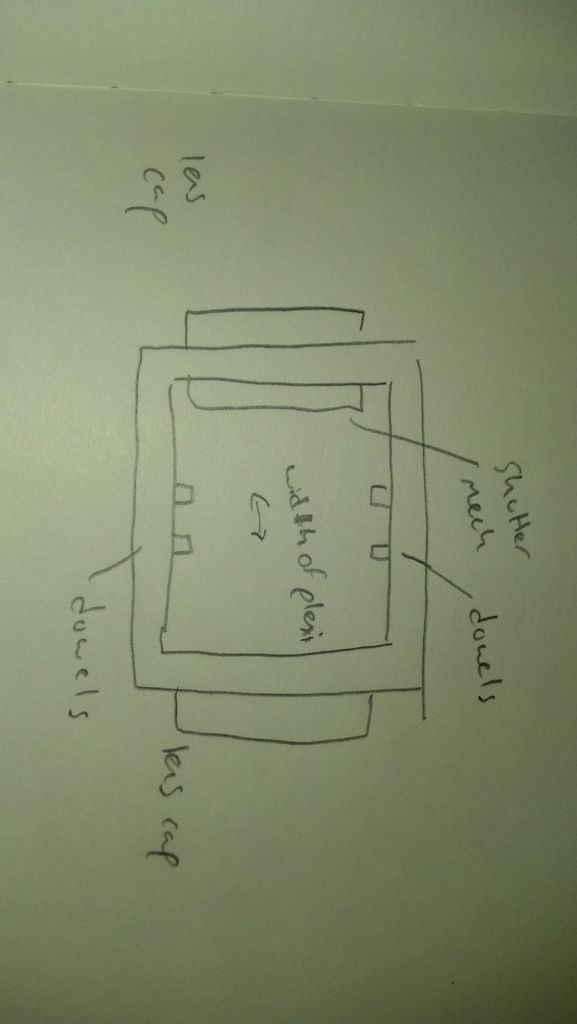
Step 4: Step 3: Build a Box
1. Light tight. After the box is constructed, seal the edges with the black caulk. Light leaks will ruin your photos, so it’s important to make sure the box is light tight.
2. One side opens. Make sure one side of the box opens. This opening side still needs to be light tight when it is closed, so felt can be used to make a gasket (see pic).
3. A 1 inch hole needs to be cut on opposite sides of the box. These holes should line up relatively well so you can see through the box.
So what size do you need?My box had about 2.5×2.5×2.5 inches of internal space. It needs to accommodate the shutter mechanism, so if that size seems a bit too small to put your shutter into, feel free to make it a bit bigger.
In addition to being sealed from light, the inside of the box needs to be painted black to absorb any stray light.
- Why build your own camera for long exposure photography?
Modern DSLRs are limited to 30-second exposures, and using the bulb function drains the battery quickly. - What type of paper is used for these long exposures?
RC photo paper is used because it reacts to light regardless of post-exposure chemistry. - How can you capture entire days in a single frame?
The paper is exposed for much longer than normal darkroom times, allowing the sun to appear as a trail while stationary objects remain visible. - Where can you find a donor camera for the shutter mechanism?
Old 35mm SLRs are easily found at thrift stores, flea markets, garage sales, or in attics and garages. - What tool is recommended for cutting away the aluminum camera body?
A hack saw is used to cut the aluminum body as close to the shutter as possible. - What are the three main requirements for the camera box?
The box must be light tight, have one side that opens with a felt gasket, and feature two aligned 1-inch holes on opposite sides. - How do you prevent light leaks in the camera box?
You seal the edges with black caulk and use black felt to create a gasket on the opening side. - What color should the inside of the box be painted?
The inside needs to be painted black to absorb any stray light. - Can the design of the camera box be customized?
Yes, the project is open-ended, and you can build the box to be as basic or creative as desired. - What kind of motion does the actuator provide for the shutter?
The actuator moves a little arm from side to side, which is ideal for opening and closing the shutter screens.