
Summary of Interfacing RFID with Arduino – How to Read RFID Cards using Arduino
This tutorial explains how to interface an RFID reader with an Arduino using electromagnetic induction. The system powers the tag via induction and transmits unique data serially to the microcontroller. The guide covers wiring requirements, voltage compatibility, output types (TTL vs RS232), and provides a C++ code snippet using the SoftwareSerial library to read and display tag data on the Serial Monitor.
Parts used in the RFID Reader to Arduino Project:
- Arduino Board
- RFID Reader Module
- RFID Tags
- Power Supply (12V, 5V, or 9V)
- RS232 to TTL Converter (MAX232 IC) if needed
- Connecting Wires
In this tutorial, we are dealing with yet another interfacing technique. This time we are interfacing an RFID Reader which can read RFID Tags to Arduino. RFID is Radio Frequency Identification. An RFID reader is used to read RFID tags (which contain certain unique data stored in a chip). An RFID reader and an RFID tag, both have a coil surrounding them.
When an RFID tag is shown near an RFID Reader, it collects the unique tag data (a combination of digits and characters) from the RFID tag. You will be wondering how the chip inside RFID tag gets power ? This is made possible via Electromagnetic Induction. I told you, both RFID reader and RFID tag comes with a coil in them. We power the RFID reader from power supply for reading purpose. Now when an RFID tag is shown near the reader, electromagnetic induction will take place between the coils and this powers the chip inside tag. This chip will send data electromagnetically to the reader. The reader will receive this electromagnetically transferred data and outputs it serially. Every RFID reader comes with Serial output pins. We can collect the read data through these serial pins using arduino or any other micro controller. So here begins our classic tutorial on Interfacing RFID with Arduino.
How to Interface RFID Reader to Arduino
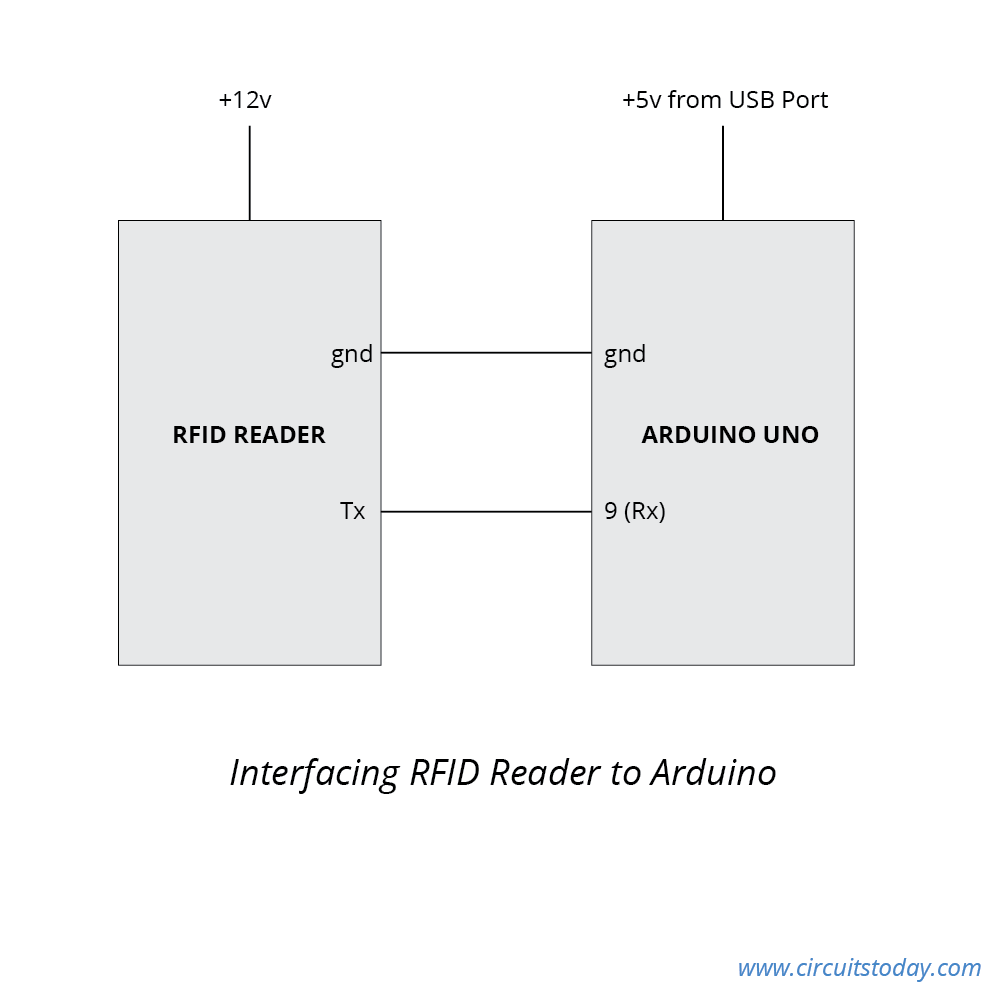
Lets first wire the whole thing up. You may observe the circuit diagram given below. Take note of the following stuffs.
Note 1:- Power supply requirement of RFID Readers vary from product to product. The RFID reader I used in this tutorial is a 12 Volts one. There are 5 Volts and 9 Volts versions available in the market.
Note 2:- You may ensure the RFID Reader and RFID Tags are frequency compatible. Generally they are supposed to be 125Khz. You may ensure this before purchasing them.
Note 3:- There are two possible outputs from an RFID Reader. One is RS232 compatible output and other one is TTL compatible output. A TTL compatible output pin can be connected directly to Arduino. Whereas an RS232 compatible output must be converted to TTL using an RS232 to TTL converter (You can design this yourself using MAX232 IC)
Make connections as shown. Make sure you connect Ground Pin of RFID reader to Ground Pin of Arduino. I am using the SoftwareSerial Library of Arduino which enables digital pins to be used in serial communication. I have used pin 9 as the Rx of Arduino. (You can also use the hardware Rx pin of Arduino uno – that’s pin 0). If you are new to SoftwareSerial Library, you may read my previous tutorial on interfacing GSM module to Arduino (this article clearly explains how to use Software Serial Library).
Lets get to the programming side!
 #include <SoftwareSerial.h>

SoftwareSerial mySerial(9, 10);
void setup()
{
  mySerial.begin(9600); // Setting the baud rate of Software Serial Library
  Serial.begin(9600);  //Setting the baud rate of Serial Monitor
 }void loop()
{

 if(mySerial.available()>0)
  {
  Serial.write(mySerial.read());
  }
}
mySerial.available() – checks for any data coming from RFID reader module through the SoftwareSerial pin 9. Returns the number of bytes available to read from software serial port. Returns a -1 if no data is available to read.
Read More: Interfacing RFID with Arduino – How to Read RFID Cards using Arduino
-
How does the chip inside the RFID tag get power?
The chip is powered via Electromagnetic Induction between the coils of the RFID reader and the tag. -
What are the two possible outputs from an RFID Reader?
The two outputs are RS232 compatible output and TTL compatible output. -
Can an RS232 output be connected directly to Arduino?
No, an RS232 output must be converted to TTL using an RS232 to TTL converter like the MAX232 IC before connecting. -
Which digital pin was used as the Rx pin for the SoftwareSerial Library in this tutorial?
Pin 9 was used as the Rx pin of the Arduino. -
What is the baud rate set for both the Software Serial Library and the Serial Monitor?
The baud rate is set to 9600 for both connections. -
What frequency should the RFID Reader and RFID Tags generally be compatible with?
They are generally supposed to be 125Khz. -
What function checks for any data coming from the RFID reader module?
The mySerial.available() function checks for available data.
