This post is a guide for people that are interested in my previous posts about dual monitor VGA hacking (see 1, 2 and 3).

You will need:
• A laptop or a computer with a VGA output
• A breadboard (optional) and some wires or a strip board for soldering
• Wire and breadboard jumpers (optional)
• 2 female VGA connectors
• 1 male VGA connector
• up to 3 lots of 15×1 or 15×2 pin headers (optional)
• An Arduino, Picaxe or other microcontroller with an onboard ADC or a standalone ADC
• Audio cable and connector
• 1 or 2 CRT or LCD monitors
Hardware Setup:
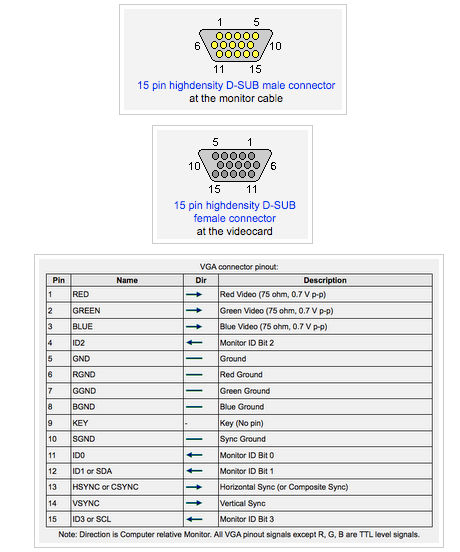
The idea here is to connect the horizontal and vertical sync signals from the computer / laptop to the other monitors. However, the actual RGB data lines will be controlled by the Arduino / µC / ADC. You can see the pinouts for the VGA ports below (taken from pinouts.ru).
So, either solder or breadboard up some connectors!
From the VGA output of the computer / laptop to the first external monitor, connect pins:
4, 5, 6, 7, 8, 10, 11, 12, 13 and 14.

From the first external monitor to the second external monitor, connect pins:
5, 6, 7, 8, 13 and 14. Then connect pin 1 of the first external monitor to pin 2 of the second external monitor, pin 3 to pin 2 and pin 2 to pin 3. By changing this mapping, you can change the way the colour of the second monitor looks like compared to the first one.
For my setup, I used an Arduino board. So I took an audio signal and connected the signal wire to analog pin 0 and the shield to Arduino ground. I also connected Arduino ground to pin 5 of the VGA connectors. Then I connected Arduino pins 4, 5 and 6 to pins 1, 2 and 3 of the first external monitor connection.
Also, for my setup, I basically made up three little jumper boards with pin headers that connect all fifteen VGA pins to the breadboard. Then it was simply a matter of using breadboard jumpers to connect each appropriate pin to the other – easy!
For more detail: How to: Use Arduino to Generate Glitchy Audio VGA Visuals
