Summary of How to Simulate Arduino in Proteus
Summary: This article explains how to simulate an Arduino UNO in Proteus by adding the Arduino simulation model, creating the HEX file from Arduino IDE, and loading that HEX into Proteus. It outlines copying .IDB and .LIB files into Proteus MODELS folder, restarting Proteus, placing Arduino UNO in the schematic, compiling code with compilation messages enabled to find the HEX file path, pasting that path into the Arduino component, wiring an LED circuit, and running the simulation to observe the blink.
Parts used in the How to Simulate Arduino in Proteus:
- Arduino UNO simulation model files (.IDB and .LIB)
- Proteus 8 Professional
- Arduino IDE
- LED
- Resistor
- Wiring/jumper connections
Hey, fellas I hope you are doing well and getting smarter every day. This post is about How to Simulate Arduino in Proteus, here we will see how we can simulate Arduino codes in Proteus.

Arduino UNO is a popular development board based on ATMEGA 328P which is an 8-bit microcontroller and Proteus is a popular tool for simulating electronic circuit, drawing schematics and designing PCB. Simulation means to imitate the behavior of circuit using software tools to assess the flaw in the circuit or bug in the code.
How to Simulate Arduino in Proteus
- Proteus is a popular tool used for simulating electronic circuits, it has an extensive library of resistors, capacitors, inductors, operational amplifiers and other common ICs.
- In order to simulate a circuit in any simulation tool it is important that the simulation model of all the electronic components employed in the circuit are present in that tool, large number of simulation models are preinstalled in the Proteus by default.
- From the above discussion note that in order to simulate Arduino UNO in Proteus its simulation model must be present in Proteus, but unfortunately Proteus does not come with the preinstalled simulation model of Arduino UNO and we need to download it first.
2 seven segment display arduino in proteus | up down counter using arduino
- We will present from here on the step by step guide to do simulation of Arduino UNO in Proteus.
- Note from the above discussion that first and foremost step is to download the simulation model of Arduino UNO. You can download the simulation model of Arduino UNO from the following link:
- Extract the folder and you will see two files with extensions .IDB and .LIB.
- Now copy and paste the above two files in the following folder: C:\Program Files (x86)\Labcenter Electronics\Proteus 8 Professional\MODELS
- Restart the Proteus.
- Go into the device selector and type “Arduino UNO” in the search tab. You will see the list of newly installed Arduino devices on the right side of the window
- Double click on Arduino UNO to select it and then drop it into the Design window.
- Now we will write a small LED blinking code in Arduino IDE. If you do not have Arduino IDE download it from Arduino.cc
- When you have written the code in your Arduino IDE, compile it. Bear in mind one important thing, when you compile and upload the code into Arduino, Arduino IDE does not create the HEX file. We have to make some changes in the Arduino IDE in order to let it generate HEX file.
- In Arduino IDE, go to file and click preferences. Check the compilation box and click ok.
- Click on the compilation button again.
- Identify the location where Arduino IDE has saved the HEX file. When the compilation is complete go into messages pane and find out the following address.
- Copy the address. Now open the Proteus again and double click on the Arduino. A tab will open.
- Paste the address in the Program file tab and click ok.
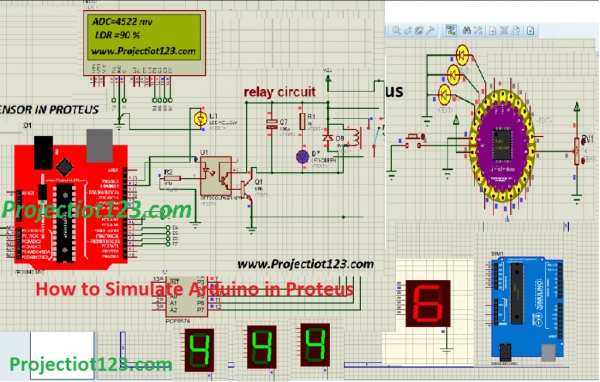
- Now draw the circuit as shown in the following figure:
- Press the simulation button and you will see the LED blinking.
Arduino Simulation in Proteus
Let me conclude the post here. In this post we have covered basics of Arduino Simulation in Proteus. We have simulated a simple circuit but by downloading other simulation models of other modules and writing the code we can do simulation of projects of diverse complexities. In the upcoming posts I will cover other modules as well.
I hope this post must have added some value in your learning, looking forward for your feedback comment section. Till then stay focused and keep learning. Bye Bye!
Source: How to Simulate Arduino in Proteus
- How do I add Arduino UNO to Proteus?
Copy the Arduino .IDB and .LIB files into the Proteus MODELS folder and restart Proteus, then search for Arduino UNO in the device selector. - Can Proteus simulate Arduino UNO by default?
No, Proteus does not come with Arduino UNO simulation model preinstalled; you must download and add the model files. - How do I get the HEX file from Arduino IDE?
Enable compilation messages in Arduino IDE preferences, compile the sketch, then copy the HEX file location from the messages pane. - Where do I paste the HEX file path in Proteus?
Double click the Arduino component in Proteus and paste the HEX file path into the Program file tab. - What is the first step to simulate Arduino in Proteus?
First download the Arduino UNO simulation model and place its .IDB and .LIB files into the Proteus MODELS folder. - How do I test the Arduino code in Proteus?
Write and compile the code in Arduino IDE to produce a HEX file, load the HEX into the Arduino in Proteus, wire the circuit (for example an LED and resistor), then run the simulation. - Does Arduino IDE automatically create the HEX file on upload?
No, Arduino IDE does not create the HEX file by default for uploading; you must enable compilation messages to find the HEX file after compiling. - What components are needed for a simple LED blink simulation?
An Arduino UNO in Proteus, an LED, a resistor, and wiring are needed to simulate the LED blink.