Summary of How to Make a Rechargeable Mini Lightning Cloud
Summary: This tutorial shows how to build a rechargeable mini lightning cloud: wiring an Arduino Pro Mini, WS2812 LED strips, DFPlayer Mini, PIR sensor, relay, boost modules and battery into a bottle, installing a speaker and masking with cotton to simulate a cloud, then uploading code to animate LEDs and trigger thunder sounds when motion is detected.
Parts used in the Rechargeable Mini Lightning Cloud:
- Blazing WS2812 LED strip
- Pegboard
- DFPlayer Mini module
- Hot glue gun and glue stick
- Trumpet (speaker enclosure)
- Cotton
- High frequency relay
- Leads (wires)
- Pyroelectric infrared sensor for human body (PIR sensor)
- Masking tape
- 5V Voltage Step Up Boost Module (and 3.7V boost module)
- Light Emitting Diodes
- Arduino Pro Mini
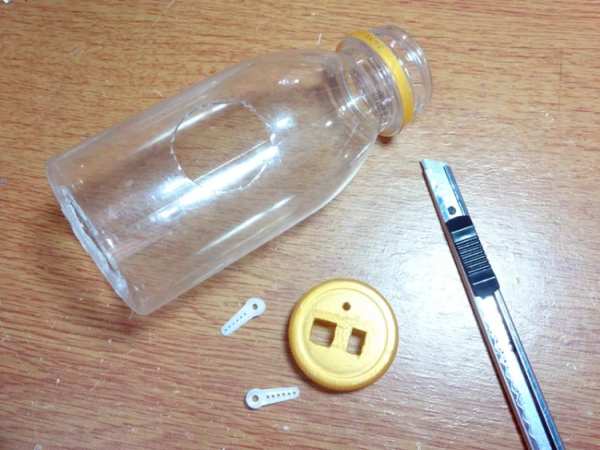
- A plastic bottle
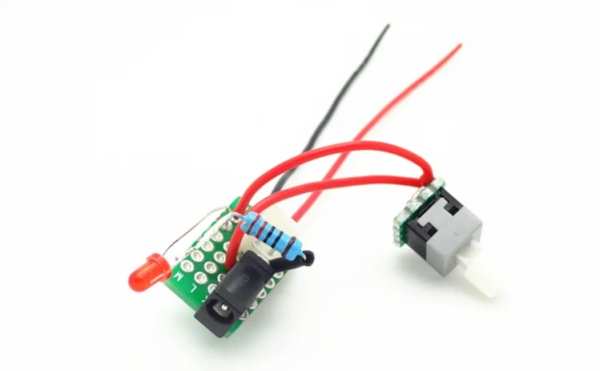
- Self-locking switch
- Steering arm
- 220 Ohm resistor
- Power supply connector
- Color pin header
- 1000mA lithium battery
- 16V 330uF capacitor
- 16G memory disk (microSD card)
Do you want to build a rechargeable mini lightning could? Follow this tutorial, you’ll be taught how to make one!
Step 1:
Material List
Pegboard
Hot glue gun & glue stick
Trumpet
Cotton
High frequency relay
Leads
Pyroelectric infrared sensor for
human body
Masking tape
5V Voltage Step Up Boost Module
Light Emitting Diodes
Arduino Pro mini
A plastic bottle
Self-locking switch
Steering arm
220 Ohm Resistor
Power supply connector
Color pin header
1000mA lithium battery
16v330uF capacitor
16G memory disk
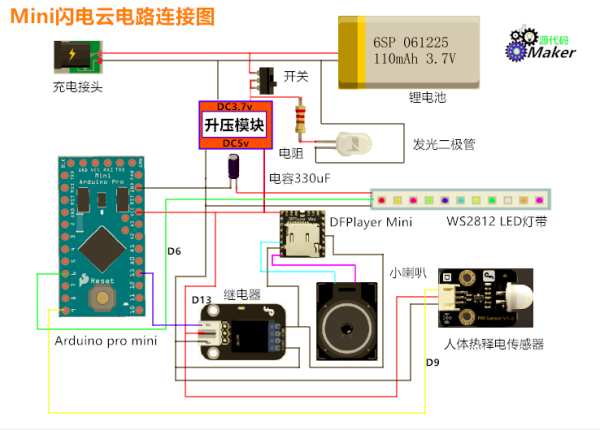
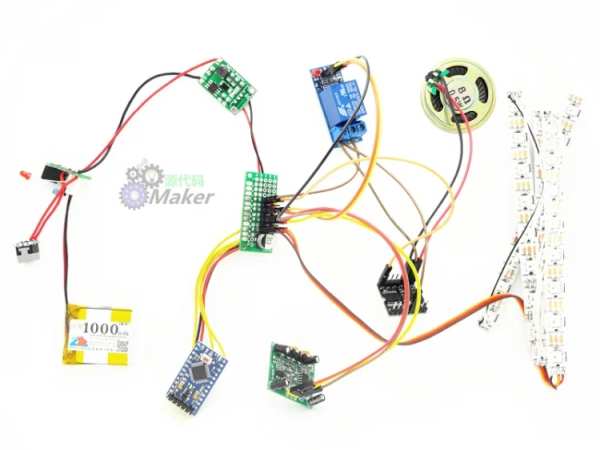
Circuit Diagram
Step 2:
Step 3: Hardware Making Procedure?Connect Each Hardware With Reference to My Circuit Diagram?
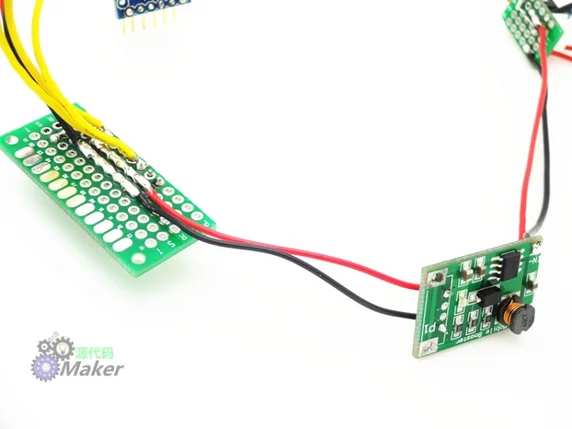
1. Weld the power supply connector, self-locking switch, battery interface, light emitting diodes and resistor with batteries and switch boards according to the circuit diagram.
Step 4:
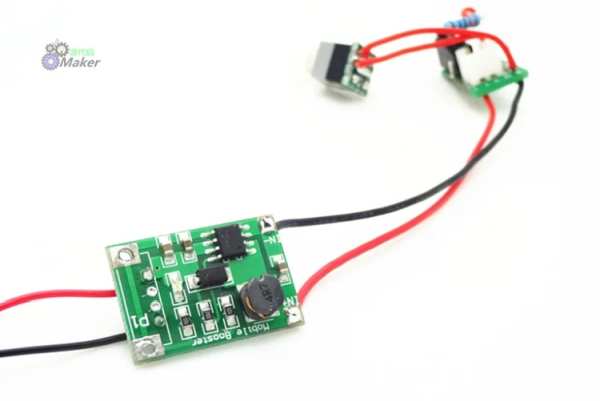
2. Weld the 3.7V and 5V voltage step up boost module in parallel connection on the switch board.
Step 5:
3. Use pegboard, color pin header and capacitor to weld a sensor shield; weld the digital pins of D6, D9 and D13 in yellow line on the Arduino mini board separately with the yellow pin headers on the sensor shield.
Step 6:
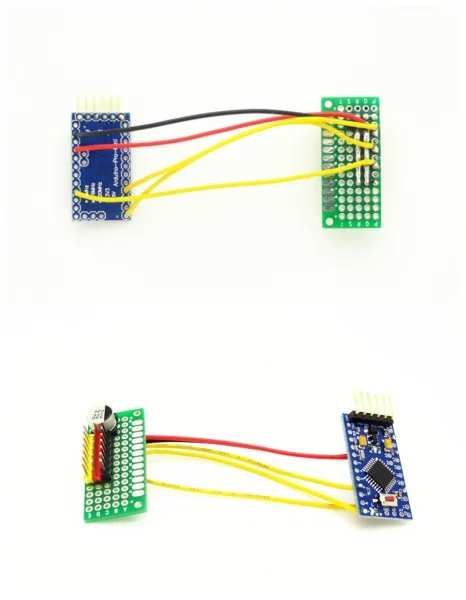
4. Weld output terminal of the voltage step up boost module with the sensor shield terminal as completion for the whole welding part. Up next is mainly to connect the sensor and deal with the performance of it.
Step 7:
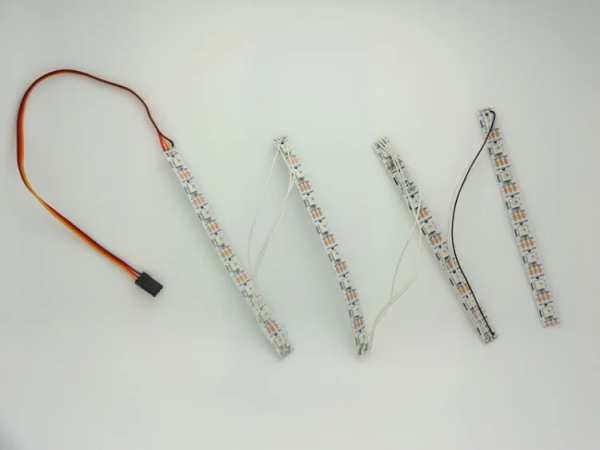
5. Use eight WS2812 LED strips as a whole bunch, cut it with scissors into four sections, before welding them together with leads.
Step 8:
6. The main purpose of using relay is to detect if there is human body coming close with pyroelectric infrared sensor. When the contact of the relay is closing up, the DFPlayer Mini is powered on. Meanwhile, long press the switch to connect ADKEY 1 with negative pole in short circuit, so that the DFPlayer Mini can repeat the first song. The actual test performs better than using serial port control. Connect the relay and DFPlayer Mini module with dupont line. The rest of the two dupont lines are plugged into the positive and negative pin headers separately on the sensor shield. Insert the memory disk in which the already downloaded lightning sound was stored.
7. Plug the human pyroelectric infrared sensor into D9 pin on the sensor shield; insert the WS2812 LED strip into D6 pin on the shield board.
Step 9:
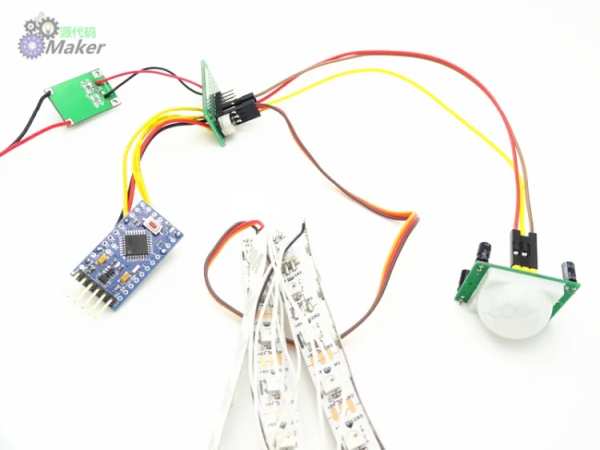
8. Plug the relay into the D13 pin on the sensor shield, connect the DFPlayer Mini module, link the circuit and check the performance of each hardware.
Step 10:
Step 11: Upload Codes Onto Arduino Board
#include
#define PIXEL_PIN 6 //??????
#define SENSOR_PIN 9 //???????
#define SPEAKER_PIN 13 //????????
#define PIXEL_COUNT 32 //?????
Adafruit_NeoPixel strip = Adafruit_NeoPixel(PIXEL_COUNT, PIXEL_PIN, NEO_GRB + NEO_KHZ800);
int randomNumber;
void setup() {
pinMode(SPEAKER_PIN, OUTPUT);
digitalWrite(SPEAKER_PIN, LOW);
strip.begin();
strip.show();
pinMode(SENSOR_PIN, INPUT);
randomSeed(analogRead(0));
Serial.begin(9600);
}
void loop() {
if( digitalRead(SENSOR_PIN) == HIGH){
digitalWrite(SPEAKER_PIN, HIGH);
randomNumber = random(300);
Serial.println(randomNumber % 67);
thunder_strike(randomNumber % 67);
delay(3000);
digitalWrite(SPEAKER_PIN, LOW);
}else{
if(millis() % 100000 == 0){
for(int i=20; i<100; i++){
colorWipe(strip.Color(i,i-20,0),0);
}
for(int i=100; i>20; i–){
colorWipe(strip.Color(i,i-20,0),0);
}
colorWipe(strip.Color(0,0,0),0);
delay(3000);
}
}
}
void thunder_strike( int type) {
if(type < 20){
colorWipe_short(0, PIXEL_COUNT, strip.Color(73, 147, 255), 3);
colorWipe(strip.Color(0, 0, 0), 0);
delay(500);
colorWipe_short(0, PIXEL_COUNT, strip.Color(73, 147, 255), 3);
delay(20);
colorWipe(strip.Color(0, 0, 0), 0);
delay(500);
}else if(type < 40){
colorWipe(strip.Color(104, 94, 94), 3);
colorWipe(strip.Color(0,0,0), 0);
delay(500);
colorWipe(strip.Color(104, 94, 94), 3);
delay(20);
colorWipe(strip.Color(0,0,0), 0);
delay(500);
}else if(type < 60){
colorWipe(strip.Color(181, 165, 95), 3);
delay(1000);
colorWipe(strip.Color(0,0,0), 0);
delay(100);
colorWipe(strip.Color(181, 165, 95), 3);
delay(500);
colorWipe(strip.Color(0,0,0), 0);
delay(500);
}else{
rainbowCycle(5);
colorWipe(strip.Color(0,0,0), 0);
}
}
void colorWipe_short(uint16_t be, uint16_t en, uint32_t c, uint8_t wait){
for (uint16_t i = be; i < en; i++) {
strip.setPixelColor(i, c);
strip.show();
delay(wait);
}
}
// Fill the dots one after the other with a color
void colorWipe(uint32_t c, uint8_t wait) {
for (uint16_t i = 0; i < strip.numPixels(); i++) {
strip.setPixelColor(i, c);
strip.show();
delay(wait);
}
}
void rainbow(uint8_t wait) {
uint16_t i, j;
for (j = 0; j < 256; j++) {
for (i = 0; i < strip.numPixels(); i++) {
strip.setPixelColor(i, Wheel((i + j) & 255));
}
strip.show();
delay(wait);
}
}
// Slightly different, this makes the rainbow equally distributed throughout
void rainbowCycle(uint8_t wait) {
uint16_t i, j;
for (j = 0; j < 256 * 5; j++) { // 5 cycles of all colors on wheel
for (i = 0; i < strip.numPixels(); i++) {
strip.setPixelColor(i, Wheel(((i * 256 / strip.numPixels()) + j) & 255));
}
strip.show();
delay(wait);
}
}
void theaterChase(uint32_t c, uint8_t wait) {
for (int j = 0; j < 10; j++) { //do 10 cycles of chasing
for (int q = 0; q < 3; q++) {
for (int i = 0; i < strip.numPixels(); i = i + 3) {
strip.setPixelColor(i + q, c); //turn every third pixel on
}
strip.show();
delay(wait);
for (int i = 0; i < strip.numPixels(); i = i + 3) {
strip.setPixelColor(i + q, 0); //turn every third pixel off
}
}
}
}
//Theatre-style crawling lights with rainbow effect
void theaterChaseRainbow(uint8_t wait) {
for (int j = 0; j < 256; j++) { // cycle all 256 colors in the wheel
for (int q = 0; q < 3; q++) {
for (int i = 0; i < strip.numPixels(); i = i + 3) {
strip.setPixelColor(i + q, Wheel( (i + j) % 255)); //turn every third pixel on
}
strip.show();
delay(wait);
for (int i = 0; i < strip.numPixels(); i = i + 3) {
strip.setPixelColor(i + q, 0); //turn every third pixel off
}
}
}
}
// Input a value 0 to 255 to get a color value.
// The colours are a transition r – g – b – back to r.
uint32_t Wheel(byte WheelPos) {
WheelPos = 255 – WheelPos;
if (WheelPos < 85) {
return strip.Color(255 – WheelPos * 3, 0, WheelPos * 3);
}
if (WheelPos < 170) {
WheelPos -= 85;
return strip.Color(0, WheelPos * 3, 255 – WheelPos * 3);
}
WheelPos -= 170;
return strip.Color(WheelPos * 3, 255 – WheelPos * 3, 0);
}
Step 12: Lightning Cloud Appearance Design and Hardware Installation
1. Use cutter knife to cut holes for the installed loudspeaker, human pyroelectric infrared sensor and rope hole for the steering arm. Also cut the holes for the installed switch, charger port and pilot light.
Step 13:
2. Install the control switch and rechargeable batteries onto the plastic bottle; make them firm with hot glue.
Step 14:

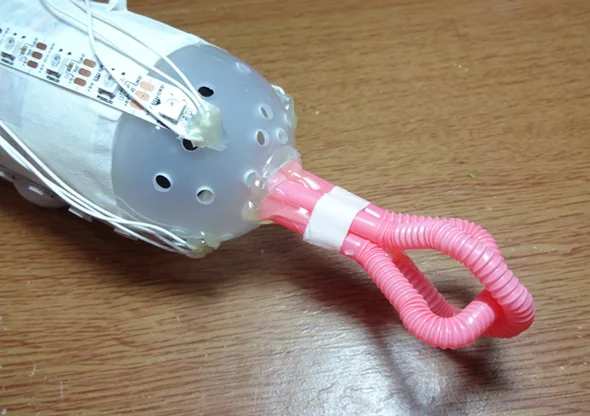
3. Install the steering arm onto the rope hole with hot glue, then insert the human pyroelectric infrared sensor, DFPlayer Mini module, and relay in order and stabilize them with hot glue. Take all the sensor leads out from the bottleneck.
Step 15:
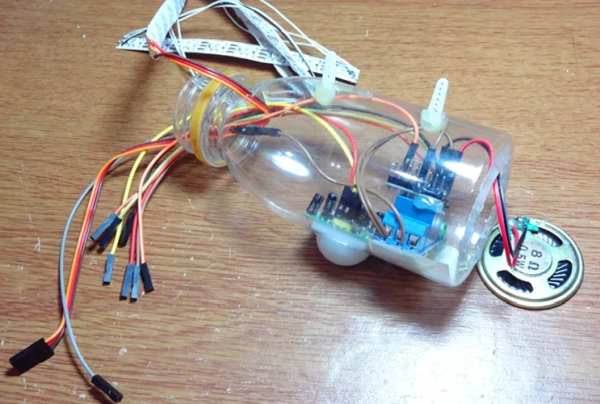
4. Insert the leads of the human pyroelectric infrared sensor, relay, LED strip and DFPlayer Mini module into the sensor shield. Put the Arduino and sensor shield into the bottle.
Step 16:
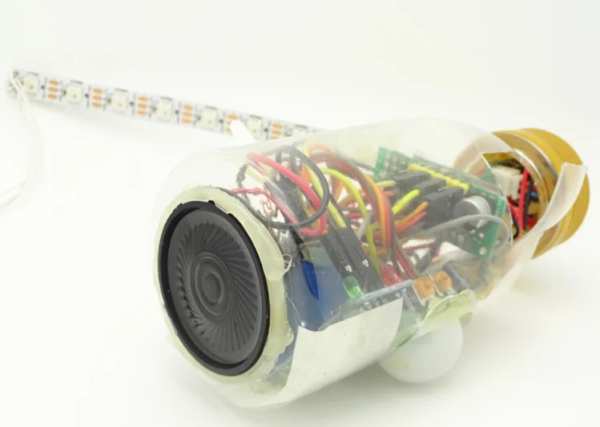
5. Enclose the installed trumpet with hot glue. Put small amount of cotton into the bottle. This can serve as the sound-absorbing cotton.
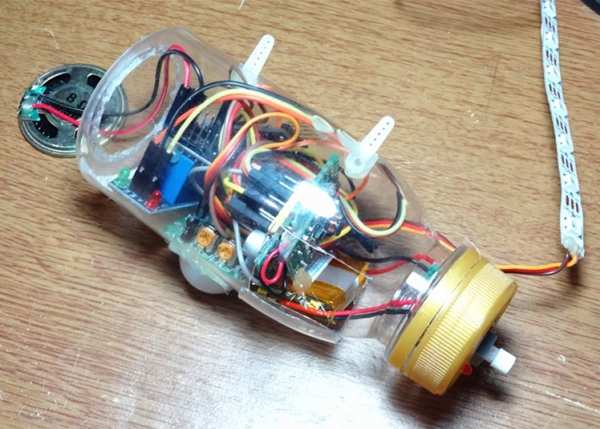
Step 17:
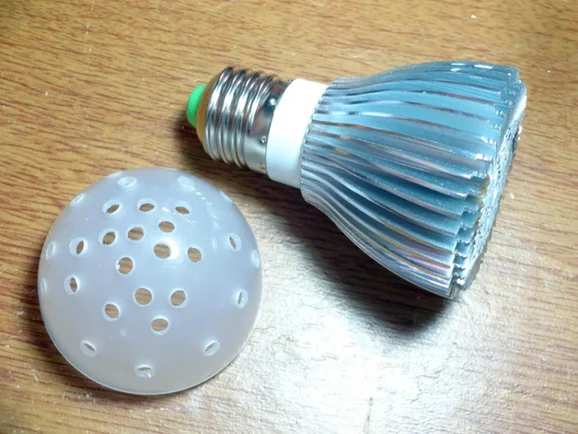
6. Dismantle a lampshade, use electric drill to make holes and install the lampshade at the bottom of the bottle. Stick it with hot glue. The uses of the lampshade are many. One is to serve as hair cell (sensory receptor) of the trumpet; second is to support the lightning cloud and shape the cotton.
Step 18:
7. To prevent bottle deformation under hot temperature when sticking the cotton, wrap the bottle with masking tape; stick each LED strip horizontally onto the four directions of the bottle.
Step 19:
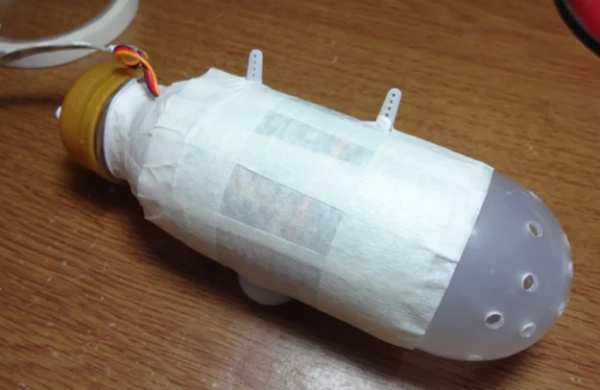
8. Cut two straws to make tail bracket of the lightning cloud, wrap the bracket with masking tape to avoid hot temperature, stabilize the bracket and masking tape with hot glue.
Step 20:
9. Stained the bottle’s surface with balls of cotton using hot glue. Stain more cotton at the top of the bottle, otherwise too much cotton at the bottom will come off because of gravity. Do not tear cotton into small pieces. Mould cotton shape after full adhesion.
Step 21:

Up until this stage, the lightning cloud is nearly finished. For this time, I only made a Mini version as practice, before planning to make a big one. Heart-tormenting? Wait, if you want to download special effect thunder music, you can visit the following website. Code uploads needs to use Adafruit_NeoPixel.h library file. Well~that’s it!
Step 22:

Source: How to Make a Rechargeable Mini Lightning Cloud
- What is the main function of the relay in this project?
The relay detects when a human approaches via the PIR sensor and powers the DFPlayer Mini to play thunder sounds. - How are the WS2812 LED strips connected?
Eight WS2812 LEDs are cut into four sections, welded together with leads, and the strip data pin is plugged into D6 on the sensor shield. - How is audio triggered to repeat the first song on the DFPlayer Mini?
Long press the switch to short ADKEY 1 to ground, enabling the DFPlayer Mini to repeat the first song when powered by the relay. - Where are the sensor and LED connections on the Arduino?
The PIR sensor plugs into D9, the WS2812 LED strip into D6, and the relay into D13 on the sensor shield wired to the Arduino Pro Mini. - What power modules are used and how are they arranged?
A 3.7V and a 5V voltage step up boost module are welded in parallel on the switch board and their outputs welded to the sensor shield. - What library is required to upload the Arduino code?
The Adafruit_NeoPixel.h library file is needed for the LED effects in the uploaded code. - How is the cloud appearance achieved?
The bottle is covered with balls of cotton glued onto the surface, with LED strips stuck horizontally under the cotton and a lampshade installed to support shape. - Where is the DFPlayer Mini audio stored?
Thunder sound files are stored on the inserted 16G memory disk (microSD card) used by the DFPlayer Mini. - How are components secured inside the bottle?
Components like the switch, battery, steering arm, sensors, DFPlayer Mini and relay are fixed inside the bottle using hot glue and masking tape where needed.