
Summary of How to build your very own Time Fountain using Arduino
A time fountain uses a stroboscopic effect to make moving water appear frozen by flashing light multiple times per second. This project builds a DIY time fountain with a water pump and Arduino-controlled bright LEDs, using MOSFETs to switch the 12V LED arrays. The author iterates from a failed Plan A to a working Plan B with 24 white LEDs arranged as four parallel arrays of six series LEDs, PVC tubing, and potentiometers to adjust timing and pump behavior.
Parts used in the Time Fountain:
- 24 White Ultra bright LEDs (15000mcd) (2.5v / 20mA)
- Submersible 12 volt water pump (e.g., pantry/boat pump)
- Bucket or plastic container (author used an IKEA plastic flower pot)
- Clear PVC tubing
- Arduino board
- 2 N-Channel MOSFETs rated for at least 2A
- 2 Potentiometers
- 12 volt power supply capable of at least 2A
- Resistors (recommended for LED arrays)
- Perfboard (eyes style)
- Arduino prototype shield (optional)
- Silicone (for watertighting)
- Electrical tape
- Shrink tubing
- Soldering iron and solder
- Glue (superglue and hot glue)
- Wires
- Patience
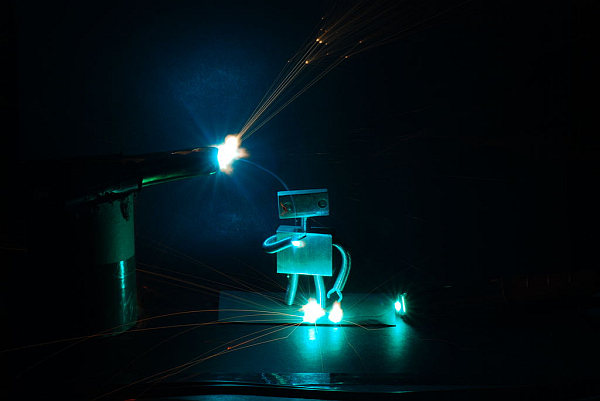
We have all seen the sweet videos on the tube! You know the magical water fountains that seems to “freeze” the water droplets in mid air, or even make them go backwards!
I’ve been fascinated by these “magical” thingamabobs for quite some while now, and a couple of days ago I decided to make my very own.
Follow me through fire and flames (no, not really, but through failure and success) and I’ll show you how to make one with a reasonable tight budget and with some scavenged parts!
Step 1: The Science behind it
A time fountain is actually an interesting built if you are interested in physics and how your senses work. The whole idea is to “freeze” rapid movement in time with the help of a stroboscopic effect. This is widely used for several purposes ranging from industrial manufacturing to automotive repairs etc..
Sometimes, somethings just happen too fast for us mere humans to see or detect. Take for example a completely dark room, and in that room you have a person standing. The person might be running around, doing all sorts of stuff, but you won’t see it, because it’s too damn dark! Now imagine that you flash the room with your camera. For a very brief moment, you will se the other person in the room, and then it will be total darkness again…
The thing we trying to do here, is simply flashing the fast motion, but instead of just one flash, we will flash it continually with several flashes per second, and so, we will appear to “freeze” the motion so that our incredible slow eyes and brain can see….
Interesting? Well, lets begin then…
Step 2: What will I need??
To make this project you will need a few things of course. Here’s a little list of what I used (feel free to experiment)
-Required-
– 24 White Ultra bright LEDs (15000mcd) (2,5v / 20ma )
– A submergible 12 volts water pump (mine is a pentry pump used in boats)
– A bucket of some sorts (I used an IKEA flower pot made of plastic)
– Tubes (I used clear PVC tubing)
– An Arduino board
– 2 N-Channel MOSFETS that are rated for at least 2A (I scavenged some from old power supplies)
– 2 Potentiometers (ratings don’t really matter)
– A 12volt power supply that can deliver at least 2A (the pump you know..)
-Good to have-
– Resistors (to put before the LED arrays, it shouldn’t really matter but good to have anyhow)
– Perfboard (I used the “eyes” style)
– An Arduino prototype shield (good if you want it easy)
– Silicone (for make screwholes etc watertight)
– Electrical Tape (almost better than duct tape)
– Shrink-tubing (This makes things look better, and protects things from water)
-“Obvious, but easy to forget, things”-
– Soldering iron
– Solder
– Glue (both superglue and hot glue is good to have)
– Beer (And in my case, a non-alcoholic one. It makes for better soldering than regular beer)
– Wires (a small bucketload)
– Patience (as we will see in the upcoming steps)
Soooooo. Are you ready to begin? Then put your tin-foil thinking hat on, and move on!
Step 3: Building stuff (Plan A)
There are two main “sections” of this build. The LED array and the water dripper. We shall begin with the LED section!
For this build I used (as mentioned) very bright white LEDs. All other time fountains that I’ve seen around the interwebz uses UV LEDs and fluorescent dye for the water. This of course would be the absolute best to do, and to have. But since I don’t have a local supplier of either UV LEDs or dye, I decided to try if it worked with just very bright light…
The first version that I built used a thin plastic strip across the bucket, that was supposed to hold both the LED arrays and the water dripper thingy (see images). This turned out to be a complete, well a bucket of… Well you know… the plastic was way too soft to hold everything up, and the thing was leaning more than a very famous tower in Italy. And furthermore there was way too few LEDs to make it reasonably bright. There were also a minor design error with the water dripper. It just did not work… Well! On to plan B.
Step 4: Building stuff (Plan B)
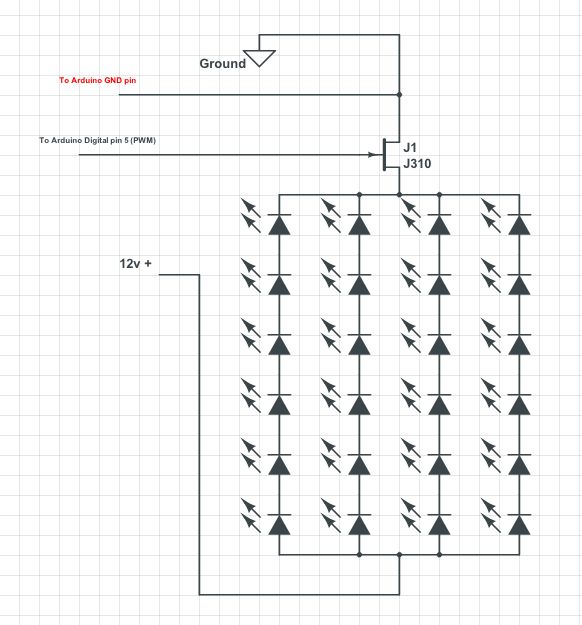
The LED’s that I use for PLAN B is connected in 4 arrays in parallell with 6 leds in series in each array (see schematic), this is quite reasonable for the 12v power supply that I’m using (you should probably use some kind of resistor anyway, but since the LEDs are controlled with PWM (more on this later) it isn’t really needed)
I use 2 perfboard bits with 2 LED arrays mounted on each. So there is a total of 24 extremely bright LEDs. That should be enough!
Since the LED arrays is driven by 12v, we need some kind of way to control them with the arduino (one does not simply connect 24 LEDs to the arduino). This is where those magical MOSFET unit comes in handy.
I will explain what a MOSFET is very very simply and quick (extremely easy)… Imagine that you have a garden hose, and in one end you have the water coming in, and in the other end you have your water spewing out. To stop the waterflow you would have to either plug the end of the hose with something (wich will result in a black eye when the cork flies out and hit you in the eye) OR install a valve! Now with the valve, you can easily shut down the waterflow, or control the flow of it.. Imagine your MOSFET as kind of valve. But instead of water, we’ll use electricity, and instead of turing the valve, we use the arduino to control the throughput of electricity.
More on MOSFETs http://en.wikipedia.org/wiki/MOSFET
– A submergible 12 volts water pump (mine is a pentry pump used in boats)
– A bucket of some sorts (I used an IKEA flower pot made of plastic)
– Tubes (I used clear PVC tubing)
– An Arduino board
– 2 N-Channel MOSFETS that are rated for at least 2A (I scavenged some from old power supplies)
– 2 Potentiometers (ratings don’t really matter)
For more detail: How to build your very own Time Fountain using Arduino
- What is a time fountain?
A device that uses a stroboscopic effect to make moving water appear frozen by flashing light multiple times per second. - Can I use bright white LEDs instead of UV LEDs and fluorescent dye?
Yes; the author used very bright white LEDs because UV LEDs and dye were not available locally. - How are the LEDs arranged in this build?
24 LEDs arranged as four parallel arrays with six LEDs in series in each array. - Why are MOSFETs used in the circuit?
MOSFETs act as switches/valves to allow the Arduino to control 12V LED arrays without directly driving them from Arduino pins. - What power supply is required?
A 12 volt power supply capable of delivering at least 2A. - Did the author use resistors with the LED arrays?
Resistors are recommended but the author omitted them because the LEDs are PWM controlled; they still suggest having resistors as good to have. - What caused the failure of Plan A?
Thin plastic support was too soft, the assembly leaned, there were too few LEDs, and the water dripper design failed. - What components control timing or intensity?
Two potentiometers are included and the Arduino uses PWM to control the LEDs.