Project MACKRA was started after I saw the many problems with pre-built robotic platforms e.g. size, programability, mobility, need for batteries,PRICE, and most being dedicated to a single microcontroller.
the goals of the MACKRA project were to do the following:
1.create a cheap, and easy to manufacture chassis
2.draw all power from only a 5 volt source
3.no motor controllers would be required
4.only a small number of parts would have to actually be made
5.portable
6.easy to trouble shoot
7.all components would have to be able to be locally scourced e.g. radio shack, lowes, and local rc hobbie shops.
8.reliable
9.have the online community be able to readily accept it like the serb and arduino
the possible applications:
1. learning concepts of real time programming
2. learning about automation
3. used in a classroom setting as a alternative to LEGO robotics platform
4. learning about opencv and xna to provide stimuli to a system
5. learning about locomotion and coordination of simple movements to preform complex manuevers
6. demonstrate to students that this level of work can actually be accomplished without being a genius
7. developing navigation algorithms
8. demonstrating to students how many little systems can work together to achieve a task simply rather than one complex sluggish �system
9. open creative possibilitys to students, as the platform can be made for around 80 bucks, and has plenty of room to grow.
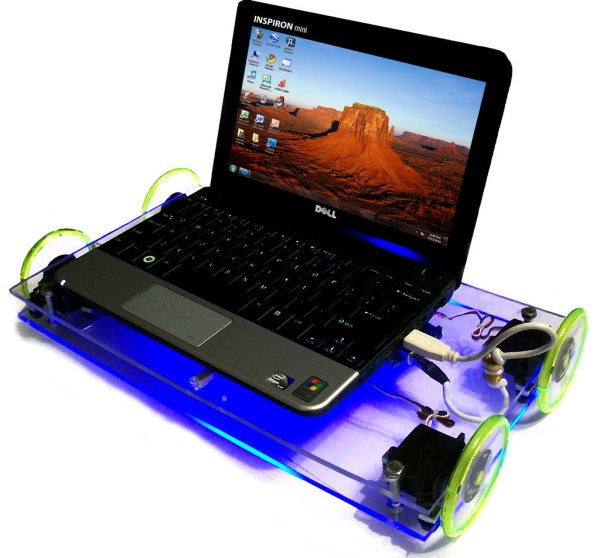
Step 1: Manufacturing: the base plate.
due to size differences in computers, the demands of the user, and materials available each MACKRA robot is different in size, but the same in functionality,
for mine i used a 1/8th thick peice of plexiglass cut to 150% scale to the perimeter of my netbook
then i took a servo and on each corner traced its outline and used a square nut to mark were each bolt would have to have its hole drilled so the nut would rest securely against the side of the servo, effectively sandwiching each servo in place
then i drilled 4 holes, one on each corner to run the bolts that will hold the top plate on
Step 2: Manufacturing: top plate.
this part is fairly simple, all you do is cut a peice of plexiglass to the same size as the base plate, and if you’de like you can cut a hole out in the center to make it easy to get to the electronics
also you should drill the four holes for the bolts to go through on each corner in the same place as you did on the base plate
finnally drill a hole for where you would like the usb plug to come out
Step 3: Manufacturing: the electronics
Step 4: Manufacturing: the electronics part 2
now you must modify all your servos for unlimited rotation, scince their are already guides out their to show how to do this, im not going to go over the process.
after you have done that , you must now iether buy some wheels off the internet or make them yourself by using a large hole saw to cut the wheel out of some of the scraps of the 1/8in plexiglass,and use some plastic tubing slit down one side as a tire for the wheel, then you must take a servo horn and super glue it into the dead center of the wheel, i highly recommend that you just buy the servo wheels off of the internet.
For more detail: How-to build MACKRA a serb variant using Arduino