Summary of Hack Your Hasbro R2D2 With an IOIO Microcontroller
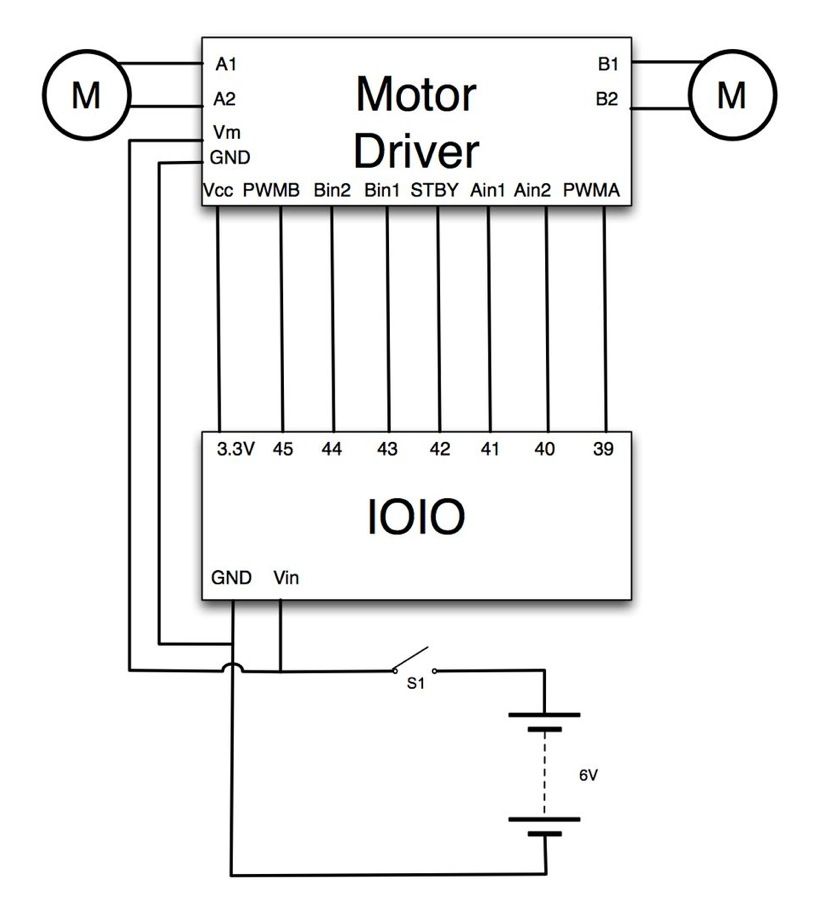
Summary: The author converted a Hasbro R2D2 toy into a smartphone-controlled robot using an IOIO microcontroller and Android device. They disassembled R2, added headers and a JST power connector to the IOIO, installed an 8xAA battery pack, and used a TB6612FNG motor driver to run the motors. The project leverages Android ADK and IOIO sample code to remotely control wheels and dome, aiming to expand into a broader open-source robotics platform.
Parts used in the myRobot (Hack Your Hasbro R2D2) Project:
- Android Controller Device (Samsung Nexus S used by author)
- Hasbro Interactive R2D2 Astromech Droid
- IOIO for Android Microcontroller, sku: DEV-10748
- Motor Driver 1A Dual TB6612FNG, sku: ROB-09457
- Barrel Jack to 2-pin JST Cable, sku: TOL-08734
- JST Right Angle Connector, sku: PRT-08612
- Break Away Female Headers, sku: PRT-00115
- 8 x AAA battery holder
- 9V to Barrel Jack Adapter, sku: PRT-09518
- Bluetooth USB Adapter
- Jumper Wires
- Electrical Tape
Since the release of Android’s Accessory Development Kit (ADK) last summer, Android devices can now natively act as a USB host to microcontrollers such as Arduino and IOIO boards. After I disassembled it and pulled out the stock PCBs, I played around with Arduino and was able to get the wheel motors and the dome moving. Being more of a tinkerer than a programmer, I didn’t have the expertise to build the necessary iOS or Android App to remote control the motors. The added complication of building sketches for the Arduino led me to the IOIO board for now, which allows direct control from the Android device via USB or bluetooth without having to program and reprogram the microcontroller when I add sensors and eventually the dome motor control.
I found Simon Monk’s new book, “Making Android Accessories with IOIO”, and decided to use his method and open-source sample code to tackle the first step of the process: remote controlling R2 from a smartphone!
This is the beginning of an effort to build myRobot, an open-source robotics control platform utilizing Android and eventually iOS devices as “heads”, to build telepresence robots out of almost anything! After R2 and other basic two-wheeled platforms are completed, Roomba support will be next, followed by Arduino support. Stay tuned!

Parts List:
Android Controller Device (I’m using a Samsung Nexus S)
Hasbro Interactive R2D2 Astromech Droid
IOIO for Android Microcontroller, sku: DEV-10748
Motor Driver 1A Dual TB6612FNG, sku: ROB-09457
Barrel Jack to 2-pin JST Cable, sku: TOL-08734
JST Right Angle Connector, sku: PRT-08612
Break Away Female Headers, sku: PRT-00115
8 x AAA battery holder
9V to Barrel Jack Adapter, sku: PRT-09518
Bluetooth USB Adapter – most generic ones should work
Jumper Wires
Electrical Tape
All of the parts except the Android phone and R2D2 itself can be purchased from Sparkfun, home of the IOIO, for less than $100 after shipping and taxes.
Tools:
Soldering Iron
Dremel
P1 Phillips screwdriver
Drill with 3/8″ bit
The emotional capacity to disassemble our beloved R2
Note:
Version 2 of the IOIO will likely be coming out over the next few months, which if it looks like the promo image, will hopefully negate the need to solder on the female headers and JST adapter.
Step 1: Disassemble R2!
I did unsolder the wires rather than cutting, leaving the wires from each leg motor intact, as well as all of the dome sensors for future use.
I’m one of those guys that always has either extra parts laying around or not enough screws because they rolled away, so I used the magnet from R2’s front casing to hold onto everything as I went.
Step 2: Prepare the IOIO and Motor Driver Boards
I went with the “Breakaway” and mark the length I want then use a Dremel to cut through the next header, filing down the edge flat with the end of the cutting wheel.
I tried using a PanaVise to hold the board, but it’s easier to just flip over the IOIO with the headers in position flat on your workspace. As for soldering, this was my first foray into soldering PCBs, and I was surprised how easy the pins were to solder in and how quickly it went, especially since I finally invested in a good soldering station, a Hakko FX-888 – highly recommended! I’d suggest reading up a bit if you’re a novice, I used MightyOhm.com’s “Soldering is Easy” comic book which is excellent.
Aside from the headers, to deliver more than 5V to the IOIO, you have to solder on a JST connector to the bottom, then make a JST–>9V cable to connect to the battery or use a JST–>Barrel connector cable with a Barrel connector –>9V cable.
Step 3: Prepare the Battery
There are 2 sets of 4 batteries in the stock R2, 4 x AA for running the controllers and 4 x D for driving the motors. The IOIO takes 5-15V and 4 rechargeable D cells would give me 4.8V, and I wanted to make sure that the voltage will be able to power an Android phone off of the IOIO USB port eventually, so I opted for an 8 x AA battery holder, for 9.6V that fits perfectly into the compartment.
I drilled a 3/8″ hole through to the back of the compartment and threaded the female barrel connector through.
With 5V-15V in through the JST connector, the IOIO delivers either 5V or 3.3V out through the pins and 5V out through USB to power a smartphone device. Although the IOIO can theoretically supply 1.5A at 5V, my brother-in-law fried an IOIO running fairly small motors directly off an IOIO, so I decided to splice into my battery output and run a direct 9.2V wire to the Motor Driver.
Note: The increased voltage overdrives R2’s motors a bit, so he’s faster, but it could eventually burn them out – more testing required.
For more detail: Hack Your Hasbro R2D2 With an IOIO Microcontroller
- What is the goal of this project?
To convert a Hasbro R2D2 toy into a customizable remote control sentry robot using an Android device and IOIO microcontroller. - Can an Android device control the IOIO directly?
Yes, Android devices can natively act as a USB host and control the IOIO directly via USB or bluetooth. - Do I need to program a microcontroller like Arduino to control R2?
No; using the IOIO allows direct control from the Android device without repeatedly reprogramming the microcontroller. - What power arrangement did the author use for the IOIO and phone?
The author installed an 8xAA battery pack providing about 9.6V and wired power into the IOIO through a JST connector so the IOIO can supply 5V out through USB. - How did the author power the motor driver?
The author spliced the battery output to run a direct ~9.2V feed to the TB6612FNG motor driver instead of powering motors from the IOIO. - What modifications are needed on the IOIO board before use?
You need to solder headers and a JST connector to the IOIO to provide higher input voltage and for convenient wiring. - Does increasing voltage affect R2s motors?
Yes, the author notes the increased voltage overdrives R2's motors making it faster and could eventually burn them out. - What tools are required for this hack?
Soldering iron, Dremel, P1 Phillips screwdriver, drill with 3/8 bit, and patience to disassemble R2. - Where can most parts be purchased?
Except for the Android phone and R2, the parts can be bought from Sparkfun for under $100 after shipping and taxes. - Is there sample code or guidance to build the Android control?
Yes, the author used Simon Monk's book and open-source IOIO sample code to implement remote control from Android.