Summary of Gravity Touch bluetooth glove using Arduino
This article details the construction of a "Gravity Touch Bluetooth Glove" designed to interact with AR/VR headsets like Google Glass and Oculus Rift. The device wirelessly transmits wrist orientation via an IMU sensor and fingertip pressure data using Force Sensitive Resistors (FSRs). It features a custom bracelet housing electronics connected via Bluetooth to Android devices or computers, supported by a Unity3D plugin for seamless VR game integration.
Parts used in the Gravity Touch bluetooth glove:
- Arduino micro
- FreeIMU 10 DOF board
- Bluetooth Mate Silver from Sparkfun
- 5x Force Sensitive Resistor
- 9V Battery and its Snap connector
- 3m of flexible soft electric wire
- 5x 10kΩ metal film resistor
- Soldering board
- PVC foam sheet 2mm thick
- Cardboard 1mm thick
- Velcro tapes
- Two sided tape 2mm thick
- Elastic band 10mm large
- Staples
Hey guys! I’d like to share with you the input device I created specifically to interact with AR glasses like the Google Glass, Meta, Moverio BT or with the VR headsets like Oculus Rift, Samsung Gear VR, vrAse, Durovis Dive. Those new products are amazing and they need new types of input devices. This instructable will describe how to build your own “Gravity Touch bluetooth glove” and I will also give you some tips to build your own Durovis Dive VR headset so that you will be able to enjoy full mobile VR. Because this glove will be of most use for VR game, I have created a Unity3D plugin for Android that handle the communication between your app and the glove. It means that you will be able to use your Gravity Touch glove to interact with your Unity3D VR game. The Arduino code and the Java class I wrote to handle the communication between the glove and the Android device will also be available so that you will be able to adapt them for your need.
The prototype of the glove described here will be providing the following data wirelessly:
- the orientation in space of the user’s wrist thanks to the FreeIMU board.
- the pressure applied on every user’s fingertip.
The glove communicate through bluetooth with either a smartphone Android or a computer (not reviewed here). Take a look at the video to have an overview of its functionalities and possible uses.
This instructable can also be useful for you if you want to create an Arduino system that must communicate through bluetooth with you Android phone/tablet, if you want to acquire touch input with your Arduino or if you want to use the FreeIMU device wirelessly.
Step 1: Glove: preparation
Electronic parts you will need:
- Arduino micro
- FreeIMU 10 DOF (3 x gyro + 3 x acc + 3 x magneto + 1 x pressure sensor)
- Bluetooth Mate Silver from sparkfun
- 5x Force Sensitive Resistor
- 9V Battery and its Snap connector
- 3m of flexible soft electric wire about 0.2mm² (-> diameter 0.5mm). I took 4 different colors.
- 5x 10kΩ metal film resistor (like this)
- A soldering board (like this)
Materials used to build the glove (link for illustration purpose only, you should be able to find all the stuff below in your hardware shop):
- PVC foam sheet 2mm thick (like this) to make the bracelet.
- 1mm thick cardboard, dim: 50 x 46 mm to have a solid base for the electronic parts.
- velcro tapes with velcro on one side and glue the other side (like this)
- two sided tape 2mm thick (like this)
- elastic band 10mm large (like this)
- staples
Tools:
- Soldering iron
- Scissors
- wire cutter
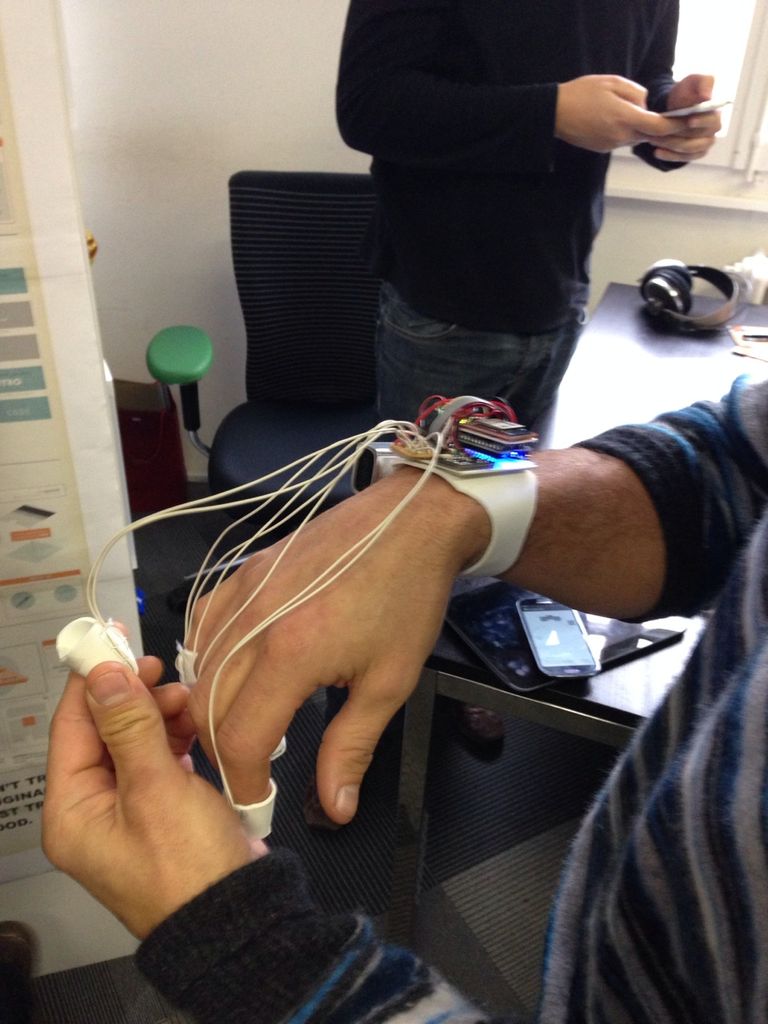
The glove will be composed by a bracelet with a cardboard platform that will serve as the base for the electronics part and the five fingertips touch sensors (or less if it fits better your need). On the top of the bracelet’s platform we will construct two layers of electronic parts. On the first layer, we will put the FreeIMU along with the 5 metal film 10kΩ resistors. The second layer will contain the Bluetooth module as well as the Arduino micro. The battery will be attached to the bracelet with a velcro tape.
Let’s start by crafting the bracelet.
Step 2: Making the base structure: the bracelet
The bracelet will be the base structure where we are going to put all the electronic components.
Take the PVC foam sheet and draw on it with a pencil the shape of the bracelet as illustrated on the schematic below (dimension in millimeter). Grab the scissors and cut the foam by following the line.
Once you have your bracelet ready, cut a rectangle 57 x 50mm in the cardboard, it will be used as the solid base for the electronic parts.
Now we are going to fix the cardboard on the bracelet. Cut two pieces 50mm length of the two sided thick tape and paste them on the cardboard (see schematic). Then fix the cardboard on the bracelet.
Cut then 45mm of the velcro tape and paste it on the bracelet as illustrated on the schematic above.
Step 3: Overview of the electrical schematic
Before starting to solder, let’s take a look at the electric schematic shown above. As you can see, the schematic is pretty simple.
Power: the Arduino is powered by the 9V battery through its Vin pin. We take advantage of the Arduino’s internal 5V converter to provide the 5V power to the FreeIMU and bluetooth boards by connecting there 5V pin to the 5V output pin of the Arduino. For more information about the min and max input voltage the Arduino can handle, please check the Arduino’s documentation.
Arduino – Bluetooth Mate communication: the bluetooth module from Sparkfun comunicate with the Arduino through its serial port (Tx/Rx). The Tx pin of the Arduino must be connected to the Rx pin of the Bleutooth module and the Rx pin of the Arduino must be connected to the Tx pin of the bluetooth module. If you want more information about how the Bluetooth Mate Silver module works, check its description on the Sparkfun website.
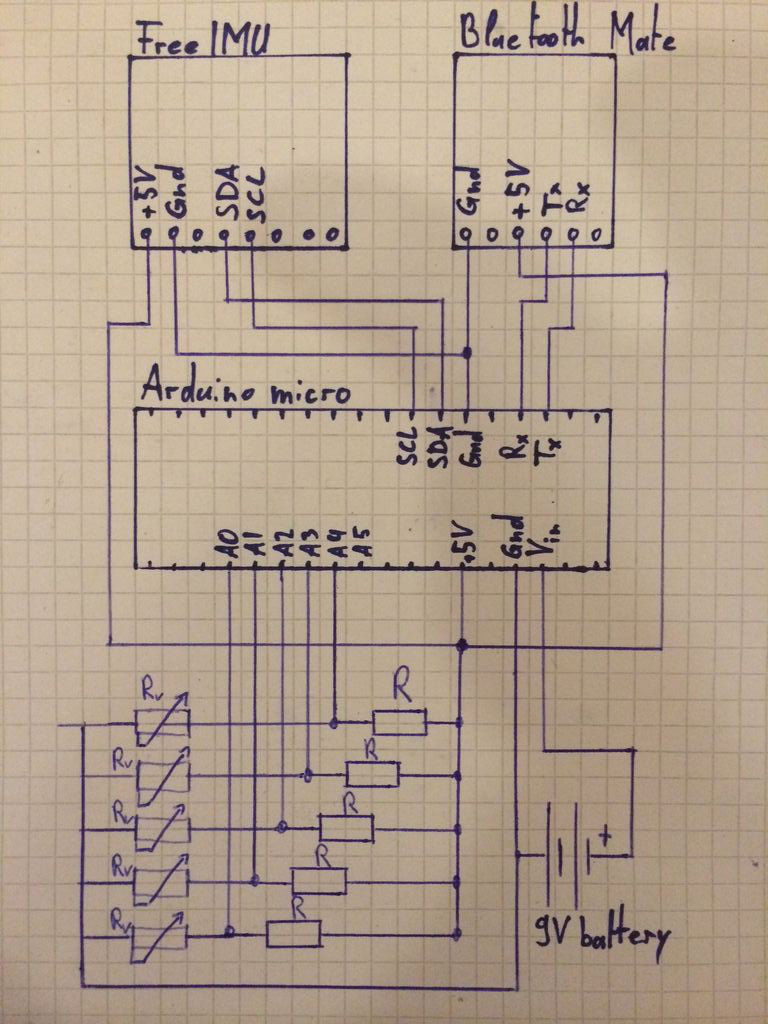
Arduino – FreeIMU communication: the FreeIMU v0.4 communicate with the Arduino with the I²C (TWI) protocol. The pin used are SDA and SCL. The SDA pin (pin 2) of the Arduino is connected to the SDA pin of the FreeIMU and the SCL pin (pin 3) of the Arduino is connected to the SCL pin of the FreeIMU. WARNING, the FreeIMU SDA and SCL ports work in 3.3V while the Arduino’s one would normally work in 5V but thanks to the pull up internal resistors of the Arduino micro, the communication is possible without extra adaptation.
Touch detection: the touch detection system is as simple as a voltage divider. I use the fact that the resistance value of the Force Sensitive Resistor decrease at the same time the pressure applied on it increase. This variation of resistance will induce a variation of voltage across the Rv and this is what we measure with the analog to digital converter of the Arduino (pin A0-A5). The resistance range of the Force Sensitive Resistor goes from 1MΩ (no pressure) to 2.5kΩ (full pressure applied). As the current driven across the five voltage divider is delivered by the 5V pin of the Arduino, I don’t want to drive more than 500uA for each voltage divider which means that R + Rv when Rv is minimum must be equals to 10kΩ. As Rv min = 2.5kΩ => R = 7.5kΩ. This explain the choice of a value of 10kΩ for R (the closest value would be 8.2kΩ, I took the closest value I had in my lab 😉 ). The voltage values across Rv recorded by the Arduino will go from 5V when no pressure is applied to 1V under full pressure.
For more detail: Gravity Touch bluetooth glove using Arduino
- What is the primary purpose of the Gravity Touch glove?
The glove is designed to interact with AR glasses and VR headsets by providing wireless wrist orientation and fingertip pressure data. - How does the glove communicate with external devices?
The glove communicates through Bluetooth with either an Android smartphone or a computer. - Which sensors are used to detect movement and touch?
The FreeIMU board detects space orientation while five Force Sensitive Resistors measure pressure on the fingertips. - Can this glove be used with Unity3D games?
Yes, a specific Unity3D plugin for Android handles communication between the app and the glove for VR gameplay. - What voltage levels do the Arduino and FreeIMU use for communication?
The Arduino operates at 5V while the FreeIMU ports work at 3.3V, but they communicate successfully without extra adaptation due to internal pull-up resistors. - How is the power supply managed for the electronic components?
A 9V battery powers the Arduino, which uses its internal converter to provide 5V power to the FreeIMU and Bluetooth boards. - What materials are recommended for building the glove's bracelet structure?
The bracelet is made from a 2mm thick PVC foam sheet with a 1mm thick cardboard base for the electronics. - How are the Force Sensitive Resistors wired to the Arduino?
They are wired as voltage dividers where the resistance decreases with applied pressure, measured by the Arduino analog pins A0-A5.