Summary of Get Connected! WiFi Registration Using AP Mode!
This article introduces the AnduinoWiFi library, which enables Arduino-based IoT devices to host their own WiFi access point for user-friendly WiFi registration. When the device boots, it creates a hotspot named "Anduino WiFi" and serves a registration webpage where users can input their WiFi credentials. This eliminates the need to flash devices with hardcoded credentials before demos. The library supports WiFi101-enabled Arduinos and includes an example sketch "connectToWiFi" that demonstrates this functionality step-by-step, allowing seamless connection to the user’s home WiFi network and internet access.
Parts used in the AnduinoWiFi Project:
- Arduino board with WiFi101 capability
- AnduinoWiFi library
- WiFi-enabled device (laptop or phone for registration)
Motivation
So I’ve just spent an “all nighter” working on this new IoT device that’s going to change the world. The sun comes up, and I’m off to demo the device and pitch to my friends for some seed capital and soul crushing criticism. I get to their house, turn the device on, it won’t connect… quickly I realize the device is still flashed with my home WiFi credentials. Time to quickly edit my code, reflash, and demo. But wait…there’s a better way!
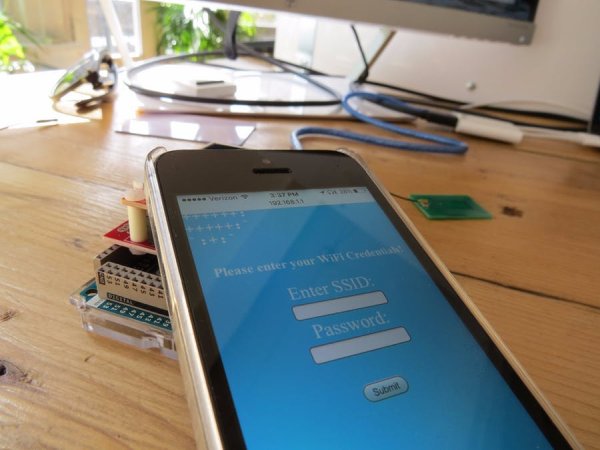
AnduinoWiFi ships with an example sketch, ‘connectToWiFi’. With just a few lines of code you can add device hosted WiFi registration to any of your WiFi enabled prototypes. When the device first boots up it broadcasts it’s own WiFi hotspot and serves a WiFi registration page at http://192.168.1.1/register. Once you enter the SSID and password anduino attempts to connect to the network you’ve just specified. Voilà internets!
Getting Started
In order to add end user facing WiFi registration to your arduino prototypes you’ll need to make sure you’ve cloned the anduinoWiFi library and loaded it into your Arduino IDE. As long as you’re using anduinoWiFi, or any WiFi101 enabled arduino, you should be able to immediately run the example sketch ‘connectToWiFi‘. This sketch runs the device registration process, hosts an access point named ‘Anduino WiFi’, and serves the registration page at http://192.168.1.1/register.
Open the serial terminal at 115200, join the ‘Anduino WiFi’ on your laptop or phone, enter your home WiFi SSID and password, and then follow along in the terminal. If all goes well you’ll see something similar to this returned in the serial terminal.
SSID: Anduino WiFi
Device IP Address: 192.168.1.1
signal strength (RSSI):-100 dBm
Registration server Running at http://192.168.1.1/register
- Registration mode is ready.
GET /register HTTP/1.1
Host: 192.168.1.1
Connection: keep-alive
Cache-Control: max-age=0
Upgrade-Insecure-Requests: 1
User-Agent: Mozilla/5.0 (Macin...
- We’ve received a request from your laptop or phone for the registration page!
POST /enterCredentials HTTP/1.1
Host: 192.168.1.1
Content-Type: application/x-www-form-urlencoded
Origin: http://192.168.1.1
Accept-Enco...
...
SSID=Andium&password=totallynotthepassword&eof=%23EOF
- Now we’ve received your submission with the SSID and password query args! Time to attempt to connect to the local WiFi…
Attempting to connect to SSID: Andium
With password: totallynotthepassword
Success! Connected to...
SSID: Andium
Device IP Address: 192.168.1.179
signal strength (RSSI):-50 dBm
WiFi connected
Success! We’re connected, lastly the ‘connectToWiFi‘ example sketch attempts to connect to a web server…
char testSite[] = "andium.com"; //we'll connect and GET / to test our WiFi connection
And GET/ the ‘/’ root directory. If your local WiFi has a internet and no proxy settings you should see the web server’s ‘200 OK’ HTTP response header and then a ton of html stream across the terminal. It worked!
How can I add a device hosted WiFi registration process to my sketch?
Well that’s a mouthful, I’m glad you’ve asked! In your sketch you’ll want to include the library at the top and create you’re own instance of the anduinoWiFi() class:
#include "AnduinoWiFi.h"
AnduinoWiFi newWifi = AnduinoWiFi();
Next, within your setup() routine:
newWifi.begin("Anduino WiFi");
Read more: Get Connected! WiFi Registration Using AP Mode!