Summary of Gas Detector
This article details building a WiFi-enabled Gas Detector using a NodeMCU and MQ2 sensor. The device monitors LPG, CO, and smoke levels, displaying data via a web UI with gauges and sending readings to ThingSpeak. It features color-coded LED warnings (yellow for half-threshold, red for critical) and an audible buzzer alarm. The project requires 3D printing a case and soldering components before uploading code to configure WiFi and operational thresholds.
Parts used in the Gas Detector:
- NodeMCU with ESP8266
- MQ2 gas detector break out
- 3mm LEDs (green, yellow, red)
- Piezzo speaker / buzzer
- 10 cables
- 3D printer
- Soldering station
- USB charger/adapter
- 2mm screws
Let’s create a simple Gas Detector connectable to WiFi. The gadget would offer:
- web UI including gauges for LPG, CO, Smoke
- simple data handler returning values in JSON
- capable of regularly sending data to ThingSpeak server and
- obviously triggering laud alarm if threshold of dangerous concentrations exceeded.
We would need following components:
- NodeMCU with ESP8266
- MQ2 gas detetor break out
- 3mm LEDs (green, yellow, red)
- Piezzo speaker / buzzer
- 10 cables
Supplies
To complete the whole product we would need a 3D printer and a soldering station.
Step 1: Connect All Together
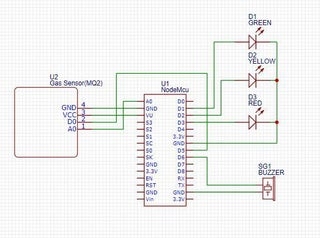
Let’s prepare our 3mm LEDs by soldering negative electrode together. (negative electrode is indicated by a small flat part of aside of each LED)
Then we will use a NodeMCU as a heart of the device and connect adjacent components based on the attached picture.
- MQ2 breakout to NodeMCU
- use VU (+5V) of NodeMCU connect to VCC of MQ2 breakout
- Node MCU GND connect to MQ2 breakout GND (btw all GNDs of NodeMCU are bridged, therefore it does not matter which one is used, but a closest one is just bellow the VU)
- connect A0 of NodeMCU to A0 of MQ2
- connect D5 of NodeMCU to D0 of MQ2
- LEDs to nodeMCU
- a positive (the longer) electrode of a green LED to D1 of NodeMCU
- a positive electrode of a yellow LED to D2
- a red LED to D3
- and the common negative electrode (previously soldered together) to a GND of NodeMCU
- Buzzer to NodeMCU
- connect a positive buzzer electrode (marked by ‘+’ sign on out Buzzer from its top side) to D6 of NodeMCU
- a remaining buzzer electrode to a GND of NodeMCU
Step 2: Make the Device Alive
Let’s upload a code sketch to our NodeMCU.
Thru Arduino IDE, we will open a code sketch from https://github.com/radimkeseg/Gas-Detector, compile and upload to NodeMCU by a USB cabel.
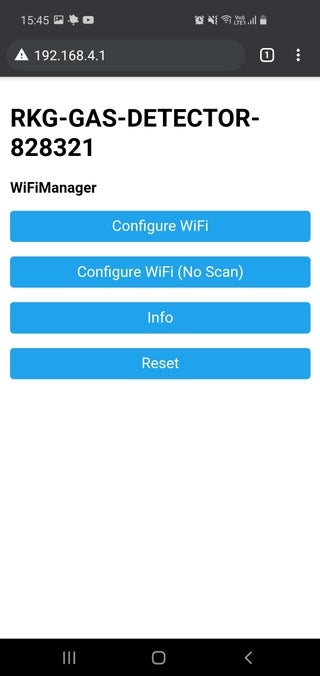
After successful upload the device starts as an Wifi Access Point and waits about a minute for configuration. If passed without configuring, it will work an ordinary Gas detector, but not sending any measured values out.
To configure the WiFi, let’s connect to the access point of our NodeMCU (in 60 sec from device has started) and find RKG-GAS-DETETOR… WiFi (obviously connect in without internet at this moment).
Configure your WiFi obviously by selecting a proper WiFi name, set password and save. Our device should restart within 3 secs. If not just click on RST button or unplug and plug power cable in back again. After reset the device connects to your WiFi.
Find the new device IP on your network address, either by reading the IP in console of Arduino, via router IP lease table or e.g. using Fing application from your mobile.
Once you connect to IP address of the device thru a browser e.g. http://192.168.1.ABC (which is a typical IP range for home networks), you would see the setting of:
- time zone and DST
- ThingsSpeak to collect the measured values
- also gauges with measured value
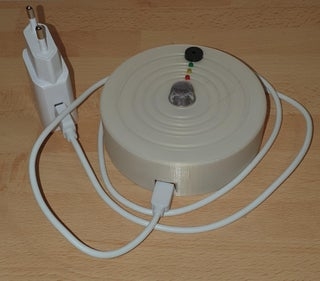
Step 3: Print a Case

To print a simple case, please find a 3D model file here https://github.com/radimkeseg/Gas-Detector/tree/ma… or attached by this paragraph.
Then the placing the components to the case is relatively intuitive:
- MQ2 break out to the center aperture (fix by 2mm screws)
- NodeMCU to the longer stands above (fix by 2mm screws)
- LEDs above NodeMCU to prepared apertures (should fit firmly, no fixing/gluing needed)
- buzzer to the remining top aperture (should fit firmly, no fixing needed)
Step 4: Finalization

The last step is to use an USB charger/adapter to let the device work standalone and place it to an area where you would like to measure LPG, CO, smoke levels.
The device triggers alarm if 70ppm of CO (or 70ppm LPG or 1000ppm smoke) is reached. A buzzer will produce an annoying noise and a red LED will start blinking.
If half of the threshold has been reached a yellow LED will indicate this status as a warning only.
Happy tinkering, basteling and creating 😉
Source: Gas Detector
- How do I connect the MQ2 breakout to the NodeMCU?
Connect VCC to VU (+5V), GND to GND, A0 to A0, and D0 of the MQ2 to D5 of the NodeMCU. - Can I use different colors for the LEDs?
The project specifies using green, yellow, and red 3mm LEDs connected to pins D1, D2, and D3 respectively. - Does the device send data to a cloud server?
Yes, it is capable of regularly sending measured values to the ThingSpeak server after configuration. - What triggers the loud alarm on the device?
The alarm triggers if concentrations reach 70ppm for CO or LPG, or 1000ppm for smoke. - How do I configure the WiFi settings?
Connect to the RKG-GAS-DETETOR access point within 60 seconds of startup to set your network name and password. - What indicates a warning status versus a critical one?
A yellow LED indicates half of the threshold has been reached as a warning, while a red blinking light indicates a critical level. - Where can I find the 3D model for the case?
The 3D model file is available at the GitHub repository link provided in the article under the Radim Kaseg project. - How do I access the web interface gauges?
Open a browser and enter the device IP address to view settings and gauges for time zone, DST, and ThingsSpeak configuration.