Summary of Fairly Simple Simon – the evolution of an Arduino game
Summary: This Instructable documents the evolution of Fairly Simple Simon, an Arduino-based Simon game starting from a zero-components LED13/serial version to a 4-LED, 4-button hardware build. It describes breadboard and stripboard (3rd world) builds, wiring checks, gameplay flow, and provides sketch files for testing wiring and the game firmware. The project is intended for beginners and emphasizes simple, low-cost construction and troubleshooting.
Parts used in the Fairly Simple Simon:
- 1 x Arduino
- 4 x LED (different colors)
- 4 x normally-connected push-button switches
- 4 x 150 Ohm resistors (for LEDs)
- 4 x 10K Ohm resistors (pull-up resistors for switches)
- Some wire
- Breadboard or stripboard (stripboard used in 3rd world version)
Important notice: Final (i.e. relevant) version is at the last step of this instructable.
If you want to build a Simon, that is the recommended version.
The rest of the steps show how this evolved from a bare-bones game for LED 13 and Serial (i.e. zero components) until my mail order came through 😉
Each version has a show-off video, of course (making the video is part of the fun for me).
The result is something a noob can build and enjoy playing. If you’re just starting, it can be your first project too.
Anyway – this was the first Fairly Simple Simon:
Here’s the “OMG, I’ve actually soldered something” story:
I’ve been following some Arduino instructables here, but I was never a hardware kinda guy. Last time I did anything that wasn’t software, Bruce Lee was still alive. There’s a reason for that: I’m as skillful as Steven Hawking when it comes to building stuff. Especially soldering. On top of all that, I live in Trat, Thailand. We don’t have Radio Shack here. We have a Mom and Pop’s electronics store where the wife speaks some English (and I speak some Thai). I also show them photos of stuff I need on my cellular. Not what you’d call an Arduino community.
When I was at Barcamp BKK, I bitched to the roboteer @bm_ about not being able to indulge in hardware, and he simply gave me a Freeduino and said “install the software, stick it into the USB, and you’re there”. He also gave me addresses of internet all-the Arduino-you-can-eat shops, and I’m still waiting for my breadboard (on account of xmas order-jams).
Simplest Simon: a zero-components Arduino game
So what do you do with a naked Arduino? The first ting I did was simplest simon: A binary version of Simon for pin 13 on-board LED and serial connection.
Got an Arduino lying there and you’re too lazy to connect stuff to it? Just upload it. Mighty good value-for-hassle ratio, I think 😉
Still – it didn’t let me feel like a maker at the time.If you play it via serial, then you need a computer. So you might as well play Tetris. I needed to make something really real.
Thus – Fairly Simple Simon was born.
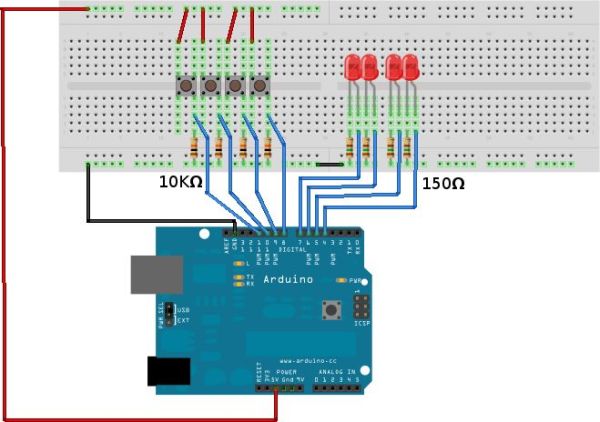
Step 1: Build the board (breadboard version)
Note: if you want to build something – build the latest version.
Stuff below is kept for historical reasons.
You’ll need:
1 x Arduino
4 x LED (different colors)
4 x normally-connected push-button switches
4 x 150 Ohm resistor (to regulate the LEDs)
4 x 10K Ohm resistor (pull-up resistors for the switches)
Some wire
If you have a breadboard (one day I’ll have one too), you can build this quite easily. See the Fritzing diagram below. It is a simple board with 4 leds and 4 normally-closed switches (each led goes via a 150 Ohm resistor, and each switch has a 10K Ohm pull-up resistor connecting between the output and ground).
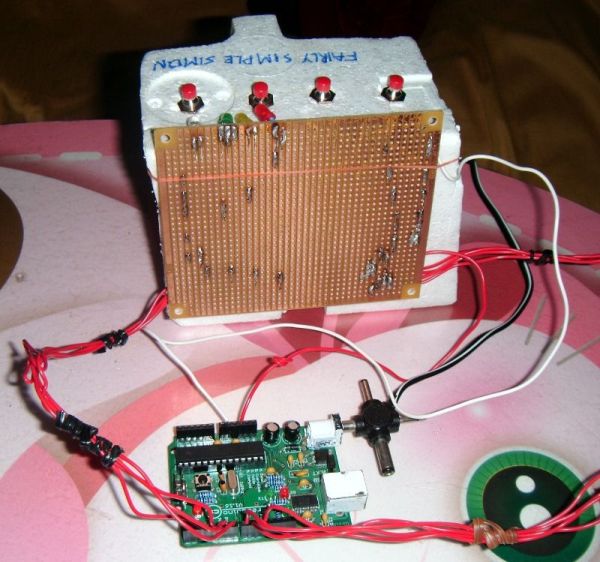
Step 2: Build the board (3rd world version)
Stuff below is kept for historical reasons.
If you’re fine with the breadboard version in the previous step, you can skip this one. That’s the way I did it. Some of it may be useful, other parts can probably serve as negative examples 🙂
When I went to Mom and Pop, and showed Mom a breadboard on my phone, she’s offered me a stripboard. I didn’t know there was a difference, so I assumed stripboards were solderless too. That’s how I’ve invented a technique of “stitching” components thru the board in a way that makes it [sorta] touch the conductive strip behind the board. This led to switches that had HIGH/MAYBE states etc. Soldering everything was easy – and simply fixed all the problems.
One good things that came out of this fiasco is that I wrote simon_check_wiring.pde to check whether LED and switch connections are OK. It’s also handy if you’re not sure which LED or switch wire is which (I know I could label them – but that’s for clerks). See comments inside the code.
The “chasis” is made of a piece of styrofoam from some package. It was easy to create the holes for the switches with a cutting knife (a hole with a standard cutting knife’s width as diameter is exactly right for this kind of switch). The thing had a tendency to topple over backwards because of the weight of the board, so I used a lighter and a battery to balance the thing.
I guess in western airports you can get arrested for carrying such things 🙂
 simon_check_wiring.pde
Step 3: Play the game
After reset, all LEDs flash several times, then they cycle a few times and you start playing a game at level 4.
Playing a game at level N:
- Simon picks a random sequence of N LED flashes.
- Simon waits for you to press any button when ready.
- Simon “says” the sequence. Memorize it.
- You should then repeat Simon’s sequence on the buttons.
- If you’re right, LEDs cycle several times, and you start a level N+1 game at step 1.
- If you push a wrong button, all buttons flash, and you go back to step 2.
Enjoy.
4 x LED (different colors)
4 x normally-connected push-button switches
For more detail: Fairly Simple Simon – the evolution of an Arduino game
- What is Fairly Simple Simon?
An Arduino-based Simon game evolved from a zero-components LED13/serial version to a 4-LED, 4-button hardware build. - What parts do I need to build the breadboard version?
1 Arduino, 4 LEDs, 4 normally-connected push-button switches, 4 150 Ohm resistors, 4 10K Ohm resistors, and some wire. - Can I build the project without a breadboard?
Yes, the author describes a stripboard 3rd world version using stripboard and soldering instead of a breadboard. - How are the LEDs and switches wired?
Each LED goes via a 150 Ohm resistor; each switch uses a 10K Ohm pull-up resistor between the output and ground. - Is there code to check wiring?
Yes, the author provides simon_check_wiring.pde to verify LED and switch connections. - How do you play the game?
Simon picks a random sequence of N LED flashes, you press a button to start, memorize the sequence as Simon shows it, then repeat it with the buttons. Correct repeats advance the level; a wrong button flashes all LEDs and you retry. - What happens after reset?
All LEDs flash several times, then cycle a few times and the game starts at level 4. - Where can I find the game firmware?
The fairly_simple_simon.pde sketch is provided in the project for upload to the Arduino.