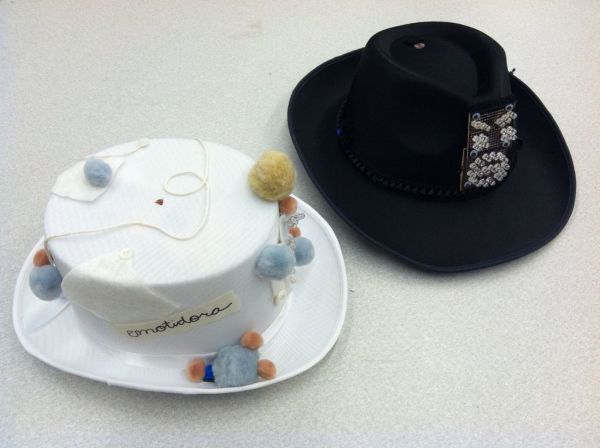
Summary of Emotidora: Hats with Emotions using Arduino
Emotidora is a wearable project using Arduino hats to display emotions via LED faces. Users select one of six expressions (ecstatic, happy, straight-face, sad, anger, surprise) using a potentiometer. The system also enables social interaction: proximity triggers infrared communication, while physical gestures like patting or hugging change the displayed emotion. Hugs utilize Hall-effect sensors and magnets to detect contact and shift the mood to a happier state, fostering natural self-expression and conversation between users.
Parts used in the Emotidora:
- 2 Arduinos
- 2 photoresistor sensors
- 2 1K ohm resistors
- 2 Hall effect sensors
- 4 magnets
- 2 100 ohm resistors
- 10 330 ohm resistors
- 66 LEDs (27 of one color, 6 of another)x2
- Solder
- Soldering iron
- Electrical wire
- Electrical tape
- Solderless proto-board
- Scissors
- 5V (up to 9V) battery
This project, Emotidora, will help a user express his/her emotions about events in day-to-day life. Weve all been in
situations where something very exciting or unfortunate has happened to us and we want to share it with other people. This
usually involves the expression of some emotion through visual cues, and when prompted by a peer, it can lead to expressing
the situation/emotion. Emotidora enables people to wear their emotions on their head. It allows people to share how they will
know how they feel and it can lead to more natural self-expression and conversation. Additionally, the person can change
their hats emotion at any time and can also transfer the emotion to another (feeling happy, but your friend is feeling sad?
transfer your emotion!)
Ideally, the hat will do the following:
1) When a person feels a certain way, he/she can display a corresponding emoticon on the hat by using a variable resistor,
a potentiometer, to switch the emotion on the hat given six options: ecstatic, happy, straight-face, sad, anger, and surprise.
2) Interaction with another person that is wearing a hat is possible if they come close enough that an infrared communication
is made between the hats (i.e., they will know that they are in proximity and will allow more interaction to take place).
a) Another user patting your hat’s roof in a caring way would be able to change the emotion on your hat by stepping
it up a level. Say you were feeling ’straight-faced’ and much of anything at the moment. A tap on the hat by
another Emotidora user will now more your emotion from ’straight-face’ to ’happy’ because you’ve been cared for.
b) The other interaction that is possible is through a hug, another caring gesture. Hall-Effect sensors (that detect
magnetic fields) are placed on opposite sides of each hat. Magnets are on either side of the sensor. When both
people hug and the hall-effect sensor on each comes in contact with the magnets on the other hat, your current
emoticon gets happier as well.
Step 1: What you Will Need
-2 Arduinos
-2 photoresistor sensors
-2 1K ohm resistors
-2 Hall effect sensors
-4 magnets
-2 100 ohm resistors
-10 330 ohm resistors
-66 LEDs (27 of one color, 6 of another)x2
-solder
-soldering iron
-electrical wire
-electrical tape
-solderless proto-board
-scissors
-5V (up to 9V) battery
Step 2: Constructing: The Emoticon Face
The first step to Emotidora is to create the emoticon face that will be displayed on the front face of the hat. The face can
be in any design you want, but ideally it should be able to incorporate all of the combinations of smiley faces that you want
in the hat.
The faces that we wanted to show are 6: ecstatic, happy, straight, sad, anger, suprise.
The figure 1 shows the way that we built our emoticon face and every face that is displayed on it.
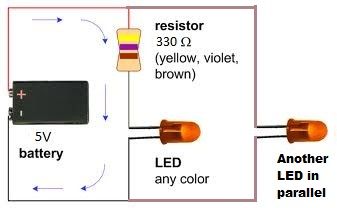
Take your 33 LEDs and your 5 330 Ohm resistors. And hook up all of the LEDs in parallel for each row of the smiley,
with the longer lead of each LED in line with the 330Ohm resistor as it connects to +5V, which in our case is output by the
pins of an arduino. Do as shown Figure 2, on a breadboard. Remember that the LED is a diode, and the longer end of the
LED should be connected to the resistor. This resistor is connected to our arduino pins (2-6) which output a 5V signal when
they are turned on. The shorter end of the LED must be connected to ground.
Now in order to switch between the smileys, we need to program the arduino to be able to take each different face as a
’FaceCase’, where it will turn on the row of LEDs based on which FaceCase that it is given. To do this, we can write a ’switch
case’ program in C for the arduino, with each case (each smiley) telling the arduino which pins to turn on (which LEDs to
light up). The table below shows which pins should be turned on for each smiley face.
-2 photoresistor sensors
-2 1K ohm resistors
-2 Hall effect sensors
-4 magnets
Fore more detail: Emotidora: Hats with Emotions using Arduino
- How does the user switch between different emotions?
The user switches emotions using a variable resistor or potentiometer to select from six options. - What happens when two users come close together?
Infrared communication is made between the hats to indicate proximity and allow for interaction. - Can a user change their hat's emotion remotely?
No, but another user can change it by patting the hat's roof or hugging them. - How does the hug feature work technically?
Hall-Effect sensors detect magnetic fields from magnets on the other person's hat to make the emoticon happier. - What are the six available emotion states?
The states are ecstatic, happy, straight-face, sad, anger, and surprise. - Which components are required to build the emoticon face?
You need 33 LEDs per hat and 5 330 Ohm resistors connected to Arduino pins. - Does the project use wireless technology for all interactions?
It uses infrared for proximity detection and direct contact with magnets for hugging. - What programming method is used to control the LED rows?
A switch case program in C is written for the Arduino to turn on specific pins for each face.