Summary of Dr Blinkenlights… (or how I learned to afford the BlinkM)
This article details a DIY project to build an affordable, open-source alternative to the BlinkM individually addressed RGB LED controller. The author guides readers through sourcing cheap components, configuring software tools like Eagle and Winavr, and programming an Attiny85 microcontroller using avrdude to replicate BlinkM functionality without the high cost of the original product.
Parts used in the Dr Blinkenlights Project:
- RGB LEDs
- Resistors
- Attiny45 or Attiny85 microcontroller
- 8 pin dip socket
- Header pins
- Copper clad circuit board
- Arduino board with ArduinoISP sketch
- Eagle PCB production program
- Winavr firmware programming tool
- BlinkM datasheet
- Attiny85 Datasheet
I love the idea of the BlinkM (individually addressed RGB leds controlled with 2 pins), but not so much the price (nearly 15 quid each!).
Luckily, the hardware is open source and somebody has brought out an alternative firmware (although if you know where to look, you can find the official firmware).

This is the story of my trials and successes while making a much more affordable unit. (There seemed to be more trials than successes)
I am in no way an expert on this sort of thing and I did a lot of research along the way. I will be linking to the different sources that I used and lessons that helped me along the way.
This was partially made possible by Jimthree and his fantastic Ghetto Pixels. http://www.instructables.com/id/Ghetto-Pixels-Building-an-open-source-BlinkM/ I wanted a more robust unit with the possibility of removing the attiny for other projects if required. Thanks Jimthree!
Before we get into it, here’s a little taster of what we’re going to be making today…
Step 1: First things first. Gather your weapons!
Before we get into the juicy stuff, we’re going to have to get our supplies together. These will be divided between software, hardware and documentation.
Hardware
You will need;
RGB leds. I get mine from Hong Kong and if you buy in enough amounts, they are pretty cheap. (MUCH CHEAPER THAN MAPLIN).
Resistors to suit the above leds. A good calculator for finding suitable resistors can be found here. http://led.linear1.org/1led.wiz
attiny45 or attiny85. The original BlinkM used the 45 and the latest version uses the 85, so both should work.
8 pin dip socket. This is not strictly necessary (it makes a higher profile board, but at least you can remove the chip to use in another project if you need).
Header pins. This will make your board removable from your circuit, but you could hard wire them into your circuit if you wish.
Copper clad circuit board. Pretty self explanatory.
A suitable programmer. Personally, I use my Arduino board along with the Arduinoisp sketch and a little shield that I knocked together in half an hour.
Software.
You will need;
Some sort of PCB production program. I use Eagle, but use what you know. http://www.cadsoftusa.com/download-eagle/
Something to calibrate your Attiny. When you get your factory fresh chips, they are clocked at 1Mhz. They need to be 8Mhz. I use my trusty Arduino as an ISP. You’ll therefore need the arduino software. http://arduino.cc/hu/Main/Software
You will also need to get your Arduino talking to your Attiny, so head here http://hlt.media.mit.edu/?p=1695 and have a bit of a read and download the required files.
Something to program your Attiny. As above, I use my Arduino as an ISP, but you can’t upload the firmware with the Arduino software, so We’re going to use Winavr. http://sourceforge.net/projects/winavr/files/
Firmware for your Attiny. This is in the form of some clever guys who made an open source firmware for the BlinkM. http://code.google.com/p/codalyze/wiki/CyzRgb This will need to be put in a specific folder in your computer (on my laptop it goes into C:\Users\Flip.) The easiest way to find where it goes, is to open a command prompt ( Open your start menu and type cmd then enter) and see what it says just before the cursor. That is where it needs to be.
Something to test your new toys out with. ThingM have Arduino sketches for testing and playing about with. There is also Communicator software available for controlling and uploading code to the lights. You will find these on the right hand pane of the page. http://thingm.com/products/blinkm
Documentation.
BlinkM datasheet. http://thingm.com/fileadmin/thingm/downloads/BlinkM_datasheet.pdf
Attiny85 Datasheet. http://www.atmel.com/Images/doc2586.pdf
Step 2: Get a cup of coffee on the go and your thinking cap on.
It doesn’t need to be coffee, but that’s my drug of choice!
As a side note, I love Hot Lava Java brewed in the fantastic Aeropress. I haven’t found a better way of brewing coffee. If you have no idea what I’m talking about, then check these links out…
http://www.taylorscoffee.co.uk/products/lifestyle-coffee/hot-lava-java.asp
http://www.aeropresscoffee.co.uk/
Now you have your beverage of choice, get all your software installed and come back when you’re done.
Done?
Good.
First of all, we need to get your Attiny85 clocked to 8Mhz.
Open up your Arduino software and upload the ArduinoISP sketch to your board (I like to run my sketches at 9600 Baud, so I tend to change this in the setup). Disconnect the board from your computer and attach the Attiny as per the instructions here. http://hlt.media.mit.edu/?p=1695
Plug your Arduino board in again and choose these settings.
Tools – Board – Attiny85 @ 8Mhz (internal oscillator; BOD disabled)
Tools – Programmer – Arduino as ISP
Tools – Serial Port – COMx (x being the com port that your arduino is connected.)
Then you need to choose
Tools – Burn Bootloader.
Please note… You are not burning a bootloader here. You are resetting the fuses in the Attiny to clock it at 8Mhz.
Next, we’re going to get the firmware onto your chip.
Step 3: Get that firmware on that chip!
To get the firmware onto your chip, we are going to need a programmer. Hopefully you still have the ArduinoISP sketch loaded on your Arduino.
Make sure your Attiny is still attached to your Arduino as in the last step and open a command prompt. (In your start menu type cmd).
Make sure your firmware is in the right place (You will see where, when you open a command prompt) and type:
avrdude
This will bring up a list of options explaining what everything does. It can be pretty daunting, but I’ll cover what commands I use.
This is what I type in cmd.
avrdude -c avrisp -p t85 -P com5 -b 9600 -U flash:w:cyz_rgb_slave_attiny85.hex:i
So. What does all that mean?
Avrdude… That is what starts the party off…
-c avrisp… This tells avrdude what programmer you are using. In this case, an Arduino shows up as avrisp
-p t85… This is the avrdude code for Attiny85.
-P com5… This is the com port your programmer is attached to. (Change the number to suit your programmer.)
-b 9600… This is the baud rate (As I mentioned earlier, I like to use 9600. You can use what is specified in the sketch loaded onto your Arduino.) .
-U flash:w:cyz_rgb_slave_attiny85.hex:i This tells avrdude you want to write (w) the firmware (cyz_rgb_slave_attiny85.hex) to flash memory (flash). The ‘i’ is at the end to tell avrdude what format it is writing in (I think).
Avrdude should now read your chip, write to your chip, then read your chip.
If all goes well, you should get avrdude done. Thank you.
That should be your chip programmed and ready to rock!
If you get a fail, try again. I found sometimes it didn’t work first time, but went through ok the second try.
A good place for a little tutorial on using avrdude can be found here. http://www.ladyada.net/learn/avr/avrdude.html
Step 4: Time to get creative.
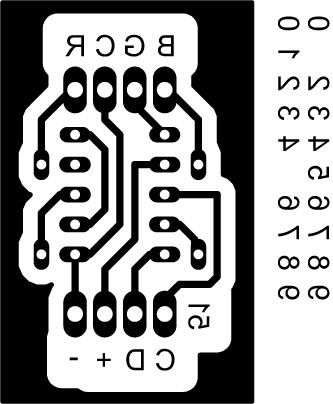
Open the datasheet for the BlinkM and find the schematic on page 45. Design your circuit in the schematic editor (Don’t make the mistake I made and make sure red goes to pin 2 and green to pin 3).
Open your board and start populating and routing.
I have added a few pics of the design I used, which you are free to use, but if you can improve, then feel free and share with the rest of us in the comments.
Once you have everything as you like it, you can start etching your boards. I won’t go into this part too deep. Here’s a few places to look for information on etching your own boards.
http://www.instructables.com/tag/?sort=none&limit%3Atype%3Aid=on&q=etch+pcb
For more detail: Dr Blinkenlights… (or how I learned to afford the BlinkM)
- How can I make a more affordable unit than the original BlinkM?
You can build one using open source hardware and alternative firmware with cheaper components like Attiny chips. - What microcontrollers work for this project?
The Attiny45 and Attiny85 both work, as the original used the 45 and the latest version uses the 85. - Does the Attiny chip need to be clocked differently?
Yes, factory fresh chips are clocked at 1Mhz and must be reset to run at 8Mhz. - What software is required to design the circuit board?
You need a PCB production program like Eagle, though you can use what you know. - Can I remove the microchip after building the board?
Yes, if you use an 8 pin dip socket, which allows you to remove the chip for other projects. - How do I upload the firmware to the Attiny chip?
You use avrdude via a command prompt with your Arduino acting as an ISP programmer. - Where can I find the specific firmware code?
The open source firmware is available from the CyzRgb project on Google Code. - What is the purpose of burning the bootloader step?
This step actually resets the fuses in the Attiny to clock it at 8Mhz rather than installing a bootloader. - Which datasheets should I reference for the schematic?
You should consult the BlinkM datasheet and the Attiny85 Datasheet. - Can I hard wire the header pins instead of using sockets?
Yes, you could hard wire them into your circuit if you wish, though headers make the board removable.