Summary of Door-Ajar Alert with Countdown Timer
This article details a DIY door-ajar alert system using a Digispark USB board and a TM1637 4-digit display. The project monitors door status via a reed switch; if the door remains open beyond 60 seconds, a piezobuzzer triggers an alarm while the display counts down. The system is powered by a 9V battery and housed in a plastic enclosure mounted on the door frame.
Parts used in the Door-Ajar Alert System:
- Digispark USB development board
- TM1637 4-digit display module
- Normally-closed (NC) reed switch
- Piezobuzzer
- Atmel Attiny85 microcontroller
- Arduino-compatible code (door_ajar.ino)
- DigitalTube library
- Rigid plastic box
- Magnet
- 9V alkaline battery pack
 Ever accidentally left your room door ajar for a long period of time and found your valuables missing? Here is an intelligent solution for you. The idea is fairly simple as it mainly requires a TM1637 4-digit display and a Digispark USB development board.

Digispark board
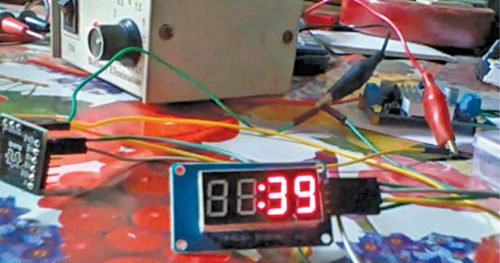
TM1637 is a popular clock display module with a TM1637 driver chip from Titan Micro Electronics. This 4-digit, 7-segment LED display module can be controlled using just a two-wire serial interface.
Digispark USB board, based on Atmel Attiny85 microcontroller, is similar to Arduino hardware platform. However, it is smaller with limited pins, and a bit less powerful than Arduino.
A normally-closed (NC) reed switch is used as the door sensor. When the door is closed, as per mechanical arrangement, switch contacts open to disable the alert system. When the door is opened, switch contacts close to enable the alert system. So a piezobuzzer starts beeping after some time. The alert system wired around Digispark Attiny85 module and clock display module shows live status of the countdown timer.
Arduino-compatible code (door_ajar.ino) is used for this project. The code displays the countdown timer and initiates an alarm after a set time of about 60 seconds. Here, DigitalTube library created by Frankie Chu (Website) is used to control the 4-digit display.
So, first download the library, extract contents of the zip file to arduino/libraries folder, and restart the Arduino IDE. Now you can see DigitalTube listed under Sketch/Include Library options in Arduino IDE. Next, copy door_ajar.ino code into the Arduino IDE (Arduino IDE 1.6.6+) to compile and program Digispark.
To program Digispark, first you need to install relevant drivers from the Arduino IDE by selecting Tools/Board/Boards Manager/Digistump AVR Boards options. For details go through the tutorials at this link.
After successful installation of the drivers, Digispark will feature in the Board list of Arduino IDE. Select the correct board as per the Digistump model you have. We selected Digispark(Default-16.5MHz) option. Click Sketch/Upload options from Arduino IDE. You will be prompted to connect Digispark board to the USB port of your PC. As soon as the board is plugged in, the code will be uploaded. Now, plug-out the board and make connections as per the circuit diagram.
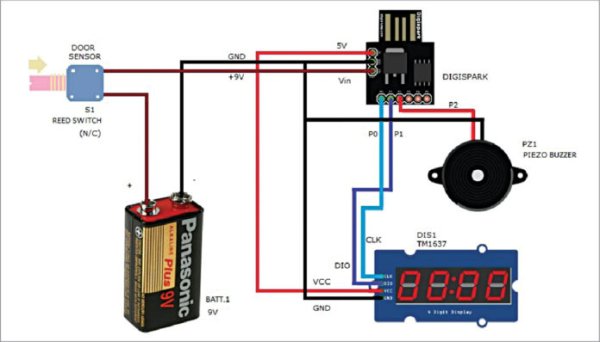
Circuit of door-ajar alert system
Download Source Folder
After construction, enclose the electronics (including the door sensor) in a small box made of rigid plastic and mount it on the door frame. Attach an appropriate-size magnet on the door such that when the door is closed, the magnet comes closest to the sensor (reed switch S1) and its contacts open. Use an appropriate 9V alkaline battery pack to power the system.
Read More Detail :Door-Ajar Alert with Countdown Timer
- What components are required for this project?
The project requires a Digispark USB board, a TM1637 4-digit display, a normally-closed reed switch, a piezobuzzer, and a 9V alkaline battery pack. - How does the door sensor function?
A normally-closed reed switch opens its contacts when the magnet is near the closed door, disabling the alert, and closes contacts when the door opens to enable the system. - Can I use Arduino hardware instead of Digispark?
The article states the Digispark board is based on the Atmel Attiny85 and is similar to Arduino but smaller with limited pins. - What happens after the timer reaches zero?
The alert system starts a piezobuzzer beeping after a set time of about 60 seconds. - Which library controls the 4-digit display?
The DigitalTube library created by Frankie Chu is used to control the 4-digit display. - How do I install the necessary drivers for Digispark?
You must select Tools/Board/Boards Manager/Digistump AVR Boards options in the Arduino IDE to install the relevant drivers. - Where should the electronics be mounted?
The electronics and door sensor should be enclosed in a small rigid plastic box and mounted on the door frame. - What power source is recommended for the system?
An appropriate 9V alkaline battery pack should be used to power the system.