Summary of DIY Digital Compass (for your car)
This article details a DIY digital compass project for cars, utilizing an Arduino Pro Mini, an HMC5883L magnetometer, and a Micro OLED screen. Powered by a car's cigarette lighter or batteries, the device displays direction permanently without needing navigation apps. The build includes an Easter Egg "zombie apocalypse mode" and requires soldering skills and specific tools like logic level converters for programming.
Parts used in the DIY Digital Compass:
- Arduino Pro Mini 328 - 3.3V/8MHz
- SparkFun Triple Axis Magnetometer Breakout - HMC5883L
- SparkFun Micro OLED Breakout
- Protoboard
- Power Source (modified 30-pin 5v car charger)
- Thin wire
- Headers
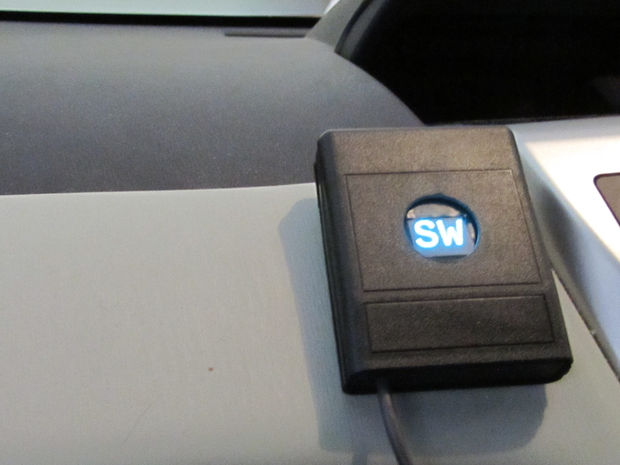
I’m astounded that some cars don’t have a digital compass always visible. You either have to launch the navigation app each time which may even disappear when you adjust the radio. In this project, you’ll create a digital compass that can be powered by by the cigarette lighter or another source (batteries make it handheld). You could buy one, but where’s the fun in that?
You’ll use an awesome OLED screen (with amazing viewing angles), a magnetomter, and Arduino (with a zombie apocalypse mode Easter Egg) to create this cool gadget. If you just want to see the code, I have it in a Gist: Compass.ino. I put it in a Gist so that other people can make edits and improvements to it.
Parts:
- Arduino Pro Mini 328 – 3.3V/8MHz I got the 3.3v version for simplicity of connecting it to the other 3.3v parts (Sparkfun).
- SparkFun Triple Axis Magnetometer Breakout – HMC5883L This compass breakout can be mounted in any orientation (Sparkfun).
- SparkFun Micro OLED Breakout This is the screen form the MicroView, but the Arduino + Screen is cheaper than the MicroView and its programmer (Sparkfun).
- Protoboard It doesn’t matter what you use, but this is what I got (Sparkfun).
- Power Source I just cut the end off a 30-pin 5v car charger that I had. It was useless and lying around. The Arduino can handle an input from 3.3v to 12v DC.
- Thin wire You’ll need this to make jumper connections on the perfboard. My was about 24 AUG. I used both stranded and solid wire for different parts.
- Headers This will make it easy to attach the components to the protoboard.
- Why no accelerometer? An accelerometer would allow for automatic adjustment of orientation and declination angle, but this is mostly intended to be a more permanent thing, and you can learn about how the declination angle works.
Tools:
- Wire cutters They must be capable of cutting the size wire that you have
- Metal file These are for making notches in the perfboard
- Sandpaper I used both 110 and 200 grit to clean the hole in the case.
- Another Arduino with USB You’ll use this to program the non-USB arduino. I used my Arduino Mega 2560.
- Logic Level Converters If your other Arduino with serial over USB is 5v, then you’ll need this to bring its serial voltage down to 3.3v for the Pro Mini (Sparkfun, Adafruit).
- Breadboard This for prototyping everything originally and testing it out.
- Soldering Iron and solder
- Solder wick and/or solder sucker I prefer the wick, but you’ll probably need one or the other.
- Breadboard
For More Details: DIY Digital Compass (for your car)
- How is the device powered?
The project can be powered by the cigarette lighter or another source like batteries for handheld use. - What components are required for the screen?
A SparkFun Micro OLED Breakout is used, which offers amazing viewing angles. - Can I program the Arduino directly via USB?
No, you need another Arduino with USB to program the non-USB Pro Mini. - Why is there no accelerometer in this design?
The project is intended as a permanent installation where users can learn about declination angle manually. - What voltage range does the Arduino handle?
The Arduino can handle an input from 3.3v to 12v DC. - Do I need logic level converters?
Yes, if your programming Arduino is 5v, you need converters to bring serial voltage down to 3.3v. - Where can I find the code for this project?
The code is available in a Gist named Compass.ino for others to edit and improve. - Is there a special feature in the software?
Yes, the Arduino includes a zombie apocalypse mode Easter Egg.