Summary of DIY Arduino Tutorial: How to Automate a Lamp for Ceremonial Inaugurations
Knowledge removes ignorance, just as light removes darkness. This DIY Arduino Lamp merges traditional oil-lamp aesthetics with digital control: LEDs embedded in a decorative lamp are wirelessly controlled from a smartphone via an HC-05 Bluetooth module and an Arduino Uno. A custom MIT App Inventor app or a Bluetooth terminal can send commands to switch LEDs on and off, powering them through the Arduino and a power source. The project uses simple materials and wiring to replicate ceremonial lamp lighting in a modern, controllable format.
Parts used in the DIY Arduino Lamp:
- HC-05 Bluetooth module
- LEDs
- Connecting wires
- Plastic bowl
- PVC pipes
- Wood (for making the base)
- Power bank or power source
- Arduino Uno
- Flowers (for decoration)
- Adhesive
- MIT App Inventor
“Knowledge removes ignorance, just as light removes darkness”, as it is wisely said. In India, the ancient tradition of lighting oil lamps has a special significance. Almost all auspicious ceremonies are commenced by lighting a lamp. Hence came the idea to merge our traditional culture with the digital world using this DIY Arduino Lamp. We did this by lighting a series of LEDs wirelessly on an oil lamp by using a smartphone app. By doing so, we believe that we are upholding our tradition as well as trying to do something fun and innovative.

Below are detailed steps of how we controlled a series of LEDs using an Arduino through Bluetooth via a smartphone app. We hope you will be able to spice up your events or ceremonies by using this DIY Arduino Lamp!
Bill of Materials
- HC-05 Bluetooth module
- LEDs
- Connecting wires
- Plastic bowl
- PVC pipes
- Wood (for making the base. you can use any other alternatives too)
- Power bank or power source
- Arduino Uno
- Flowers (for decoration purpose)
- Adhesive
- MIT app inventor
How Does it Work?
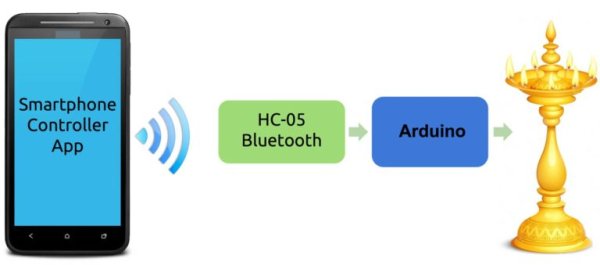
The way this DIY Arduino Lamp works is pretty simple. A series of LEDs arranged on the lamp lights up when a command/button is pressed in the smartphone application. The Arduino powers the LEDs when the corresponding Bluetooth command is received via the HC-05 Bluetooth module. If you are new to using the HC-05 Bluetooth module, you can check out this Bluetooth Basics tutorial from Mayoogh Girish to get started.
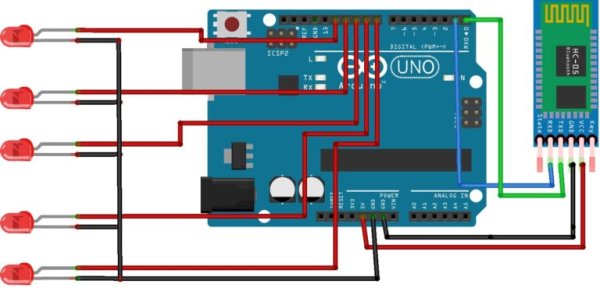
Connecting the Arduino, Bluetooth Module, and LEDs
Follow the connection diagram below to connect everything:
Creating the Smartphone App
The first step to making your smartphone application is learning how to make an app through the MIT app inventor. You can download the app we made here: Download Application.
An easier way to control the DIY Arduino Lamp is to download the bluetooth terminal app from the play store. Both of them work the same way, the only difference is that by making our own app, we could change its appearance.
I used buttons to turn the LEDs on and off , while in the terminal you will have to type “1” and press send to the LED on and “0” to turn it off. You can see the difference in the picture below.
Read More: How to Automate a Lamp for Ceremonial Inaugurations
- How does the DIY Arduino Lamp light up when commanded?
The Arduino powers the LEDs when it receives a corresponding Bluetooth command via the HC-05 module from the smartphone app. - Can I use a Bluetooth terminal app instead of the custom app?
Yes, you can use a Bluetooth terminal app; it requires typing 1 to turn an LED on and 0 to turn it off. - What app was used to create the custom smartphone application?
The custom app was made using MIT App Inventor. - What components are required to build the lamp?
The project uses HC-05 Bluetooth module, LEDs, connecting wires, plastic bowl, PVC pipes, wood base, power bank or power source, Arduino Uno, flowers, adhesive, and MIT App Inventor. - How are the LEDs arranged in the lamp?
A series of LEDs are arranged on the lamp and light up when the corresponding command is sent from the app. - Do I need prior knowledge to use the HC-05 Bluetooth module?
The article suggests checking a Bluetooth Basics tutorial for beginners to get started with the HC-05 module. - What is the difference between the custom app and the terminal?
The custom app allows a changed appearance and uses buttons to control LEDs, while the terminal requires typing commands like 1 and 0. - Is a specific power source required?
The article mentions using a power bank or other power source to power the Arduino and LEDs.