
Summary of Displaying Arduino data
This article describes a project to display real-time weather data on an Arduino-driven LCD screen, eliminating the need to check databases manually. The system uses an Arduino Uno to read formatted temperature data from a computer via serial port and displays it on a 16x2 text LCD. A Python script runs on the computer to fetch data from a database and send it to the Arduino for visualization.
Parts used in the Arduino Temperature Display:
- Arduino Uno (or Duemilanove)
- SparkFun LCD-00709 (White on black, 16 x 2 display)
- Hitachi HD44780 controller based LCD
- Computer with database access
- Serial connection cable
I’ve had an Arduino-based weather station since June 2009, but one problem with it has been that there hasn’t been any easy way to display the data in real time without going to the database (or the raw import files) to see what the latest observations were. I wrote a quick web page for this (home display), and this is convenient if I want to see what the temperatures are around the house when I’m not at home. But sitting in the living room, it’d be nice to know what the temperatures are just by looking.
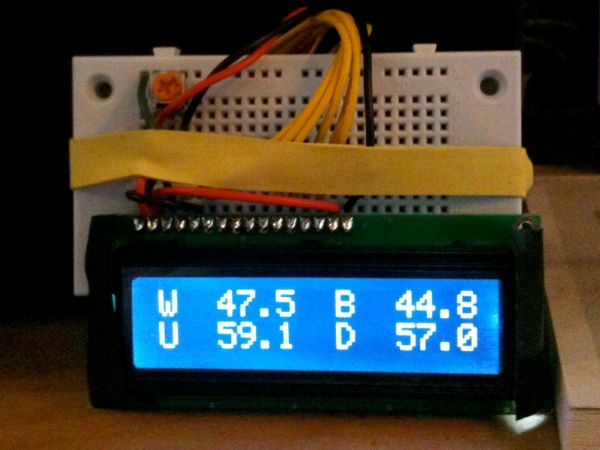 The choices for displays aren’t all that great. Arduino can drive the classic seven segment LED displays (like old calculators, for those who remember what a calculator is), which are big and bright, but it requires a lot of pins, and even more power to light enough of them to display the amount of data I need (at least four temperatures, and possibly other sensor values like pressure or light). There are graphical LCD panels, which you control pixel by pixel but are expensive and aren’t all that large. And then there are text LCD displays that use the Hitachi HD44780 controller (or one based on it). These are more like old terminal screens where you can write to each character position on the screen. Common sizes are 16 characters across x 2 rows and 20 x 4 displays.
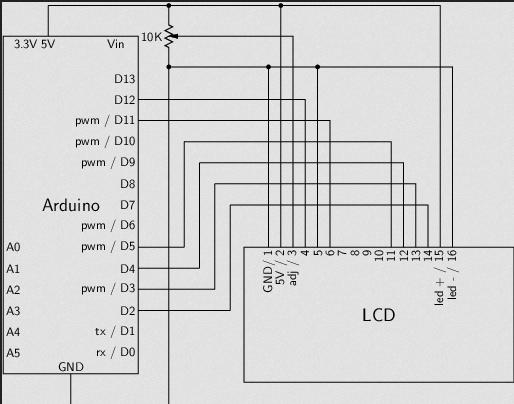
I chose a white on black, 16 x 2 display (SparkFun LCD-00709). It requires 5 volts to power the display and the LED backlight, and uses six of the digital pins on the Arduino board. The Arduino Uno (and earlier Duemilanove) have fourteen digital pins (two of which are the serial TX/RX pins), so one could hook up two of these displays to a single Arduino. The hookup for a single display, and the code I’m using follows. The Arduino Cookbook was invaluable for getting the everything working.
The Arduino code reads four comma-delimited numbers from the serial port. They’re formatted as integer values representing the temperature in Fahrenheit multiplied by ten (50.2°F = 502). If the value is negative, the minus sign appears at the end of the number (-40.0°F = 400-). Here’s the Arduino code that displays the incoming data to the LCD.
 To make this work, I need a program on the computer the Arduino is plugged into that will read the weather data from the database and dump it to the serial port that the display Arduino is plugged into. Here’s that code:
Each minute, it reads the temperatures from a database view that consolidates the latest readings from the weather sensors (arduino_view), formats them in the manner the Arduino display code expects, and sends them to the serial port for display. It works really well, and looks good. I wish the display itself were larger, however.
For more detail: Displaying Arduino data
- Why was this project created?
To allow users to see real-time temperatures around the house without accessing a database or raw import files. - What type of display was chosen for the project?
A white on black, 16 x 2 text LCD display using the Hitachi HD44780 controller. - How many digital pins does the display require?
The display uses six of the digital pins on the Arduino board. - Can two displays be connected to one Arduino?
Yes, since the Arduino Uno has fourteen digital pins, one could hook up two of these displays to a single Arduino. - How is the temperature data formatted before sending to the Arduino?
Data is sent as comma-delimited integer values representing Fahrenheit multiplied by ten, with negative signs placed at the end of the number. - What role does the computer program play in this setup?
The program reads temperatures from a database view, formats them correctly, and dumps them to the serial port every minute. - What resource helped the author get everything working?
The Arduino Cookbook was invaluable for getting the code and hardware working together. - What voltage is required to power the display?
The display requires 5 volts to power both the display itself and the LED backlight.
