Summary of Display Your Photo on OLED Display
This article guides users through an Arduino project to display custom photos on a 0.96-inch SSD1306 OLED screen. The process involves converting images into monochrome bitmaps using software tools like LCD Image Converter, generating C arrays, and uploading code to the Arduino. It covers hardware wiring via I2C, library installation (Adafruit GFX and SSD1306), and specific coding adjustments for different display resolutions and addresses.
Parts used in the Photo on OLED:
- Arduino Uno board
- SSD1306 OLED Display (I2C enabled)
- Adafruit_SSD1306 library
- Adafruit_GFX library
- LCD Image Converter tool
- Image editing software (e.g., Paint)
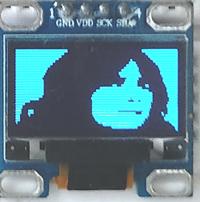
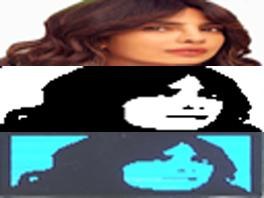
The tiny 0.96 inches OLED display is the most popular among the Arduino fraternity for displaying data like room temperature, humidity, and text messages. Have you ever thought of displaying your own photo on the display! Yes, it’s possible. In this Arduino-based project, we learn to display any photo on this small display. The above photo you are seeing is of my favorite Indian actress Priyanka Chopra, if you have seen her in movies you would be able to recognize her. Anyway! Let us start the fun.
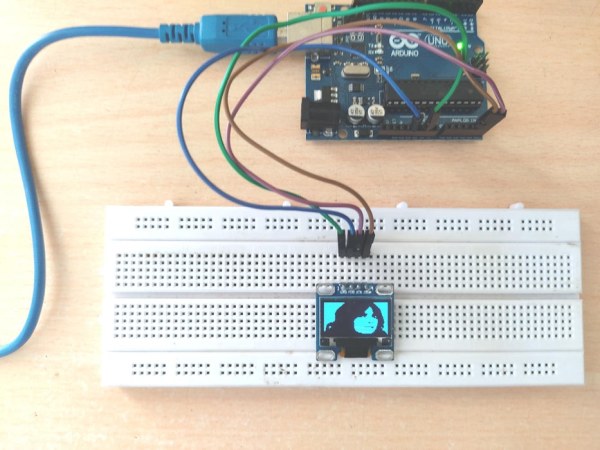
Step 1: Make Connections
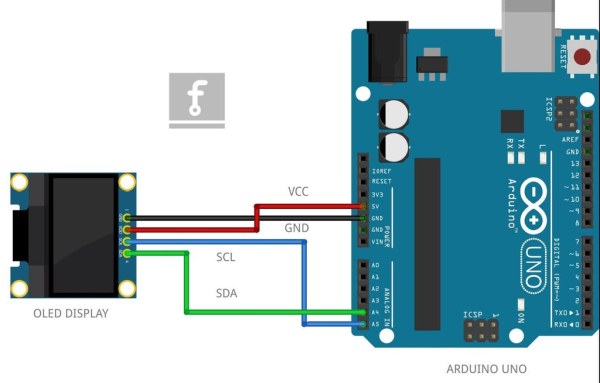
The SSD1306 OLED Display communicates over I2C or SPI protocol. The one I have used for this project is I2C enabled so make connections with Arduino as shown in the image. Connect SCL of the display to A5 pin of the Arduino, SDA to A4 pin, GND to ground, and Vcc to +5V pin.
Step 2: Install Libraries
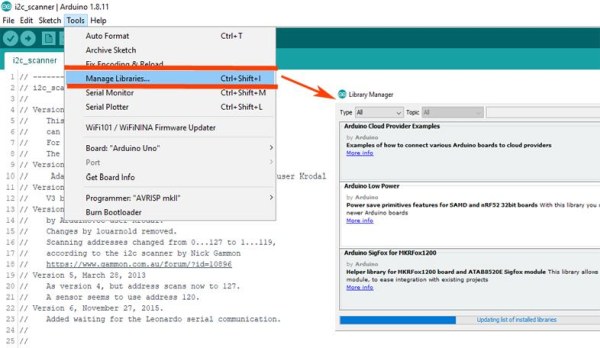
Now you need to install some libraries. One is adrafruit_SSD1306.h and the other is adafruit_GFX.h. Open your Arduino IDE and go to Sketch>Include Library>Manage Libraries. We install both libraries one by one in the next step.
Note: While installation process of these libraries if you come across a message prompt asking to install the “Adafruit BusIO”, then press the “Install all” button to install also all the missing dependencies.
Step 3: SSD1306 Library
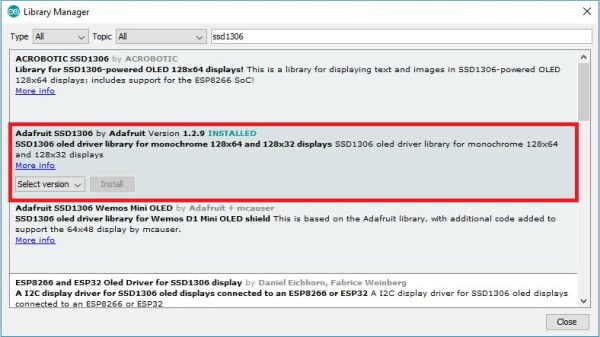
Type “SSD1306” in the search box and install the SSD1306 library from Adafruit. This installs the library for both the I2C and SPI protocol versions of the OLED display. As you can see in the image it will show “Installed” after successful installation.
Step 4: GFX Library
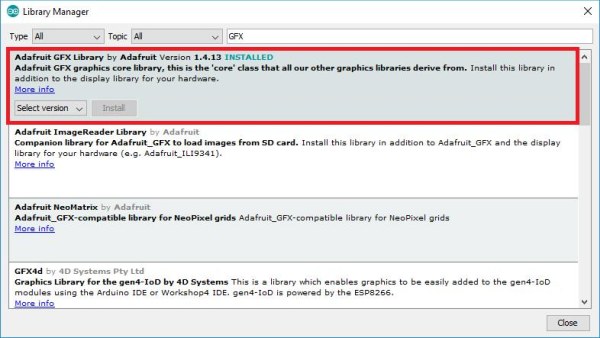
Now after successfully installing the SSD1306 library type “GFX” in the search box and install this graphics library as well.
Now all the necessary libraries have been installed restart your Arduino IDE and move ahead to the next step.
Step 5: Convert to Bitmap Image
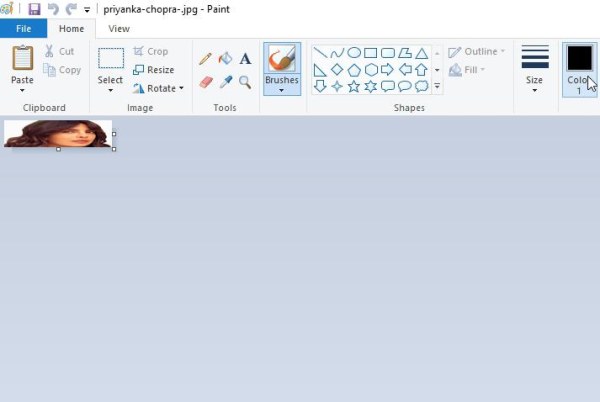
It is expected you would have decided which image you want to display on the OLED display. In my case, I have displayed my favorite actress image. You need to convert your image into monochrome bitmap format. Open your image in any image editor like “Paint” if you are a Windows user. Resize it to 128×64 or 128×32 to match your display resolution whichever you have.
Now go to File>Save as>BMP Picture, select Monochrome Bitmap from Save as type menu, and you are done with this step.
Step 6: LCD Image Converter
You have entered the game-changer step of the project. Here we convert our bitmap monochrome image to C Language Array. For this, we use lcd image converter tool. You can download from this link LCD Image Converter
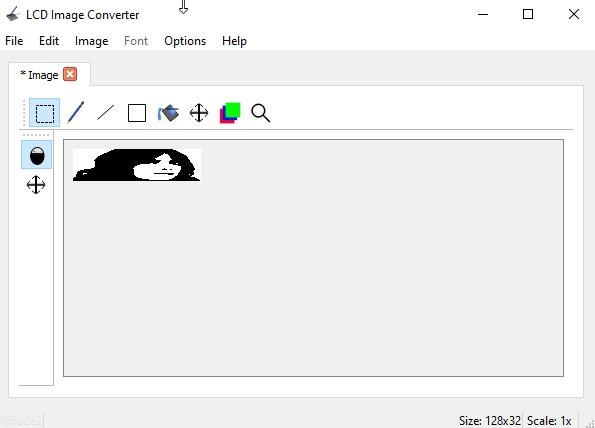
Run the program press the “New Image” give it a name. Go to Image>Import and select the bitmap image you have created in the previous step.
Step 7: Convert Image to Data Array
It’s time to do some settings and convert our bitmap image into a C language data array, hope you would be acquainted with Arrays.
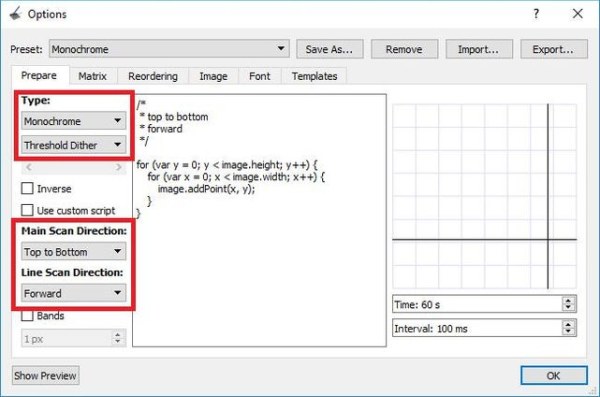
First, go to Options>Conversion, and in the Prepare tab select the following:
Preset: Monochrome
Type: Monochrome, Threshold Diether
Main Scan Direction: Top to Bottom
Line Scan Direction: Forward
Second, go to the Image tab and select the following options:
Check: Split to rows
Block size: 8-bit
Byte-Order: Little-Endian
Click OK.
Now in the main menu, go to File>Convert, give the file a name, and a new file with .C extension will be created.
Step 8: Array in the C File
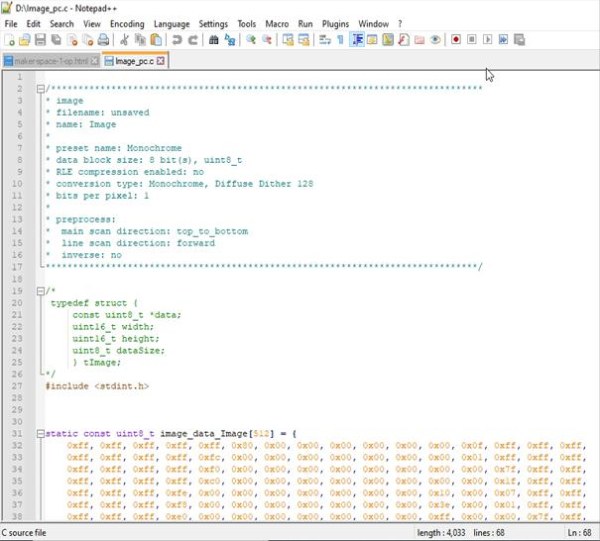
Open the .C extension file you have created in the previous step with any text editor like notepad. Here we have magic numbers of data in the form of an array.
Here is the raw code of my C file.
/*******************************************************************************
* image
* filename: unsaved
* name: Image
*
* preset name: Monochrome
* data block size: 8 bit(s), uint8_t
* RLE compression enabled: no
* conversion type: Monochrome, Diffuse Dither 128
* bits per pixel: 1
*
* preprocess:
*  main scan direction: top_to_bottom
*  line scan direction: forward
*  inverse: no
*******************************************************************************/

/*
 typedef struct {
     const uint8_t *data;
     uint16_t width;
     uint16_t height;
     uint8_t dataSize;
     } tImage;
*/
#include <stdint.h>


static const uint8_t image_data_Image[512] = {
    0xff, 0xff, 0xff, 0xff, 0xff, 0x80, 0x00, 0x00, 0x00, 0x00, 0x00, 0x00, 0x0f, 0xff, 0xff, 0xff,
    0xff, 0xff, 0xff, 0xff, 0xfc, 0x00, 0x00, 0x00, 0x00, 0x00, 0x00, 0x00, 0x01, 0xff, 0xff, 0xff,
    0xff, 0xff, 0xff, 0xff, 0xf0, 0x00, 0x00, 0x00, 0x00, 0x00, 0x00, 0x00, 0x00, 0x7f, 0xff, 0xff,
    0xff, 0xff, 0xff, 0xff, 0xc0, 0x00, 0x00, 0x00, 0x00, 0x00, 0x00, 0x00, 0x00, 0x1f, 0xff, 0xff,
    0xff, 0xff, 0xff, 0xfe, 0x00, 0x00, 0x00, 0x00, 0x00, 0x00, 0x00, 0x10, 0x00, 0x07, 0xff, 0xff,
    0xff, 0xff, 0xff, 0xf8, 0x00, 0x00, 0x00, 0x00, 0x00, 0x00, 0x00, 0x3e, 0x00, 0x01, 0xff, 0xff,
    0xff, 0xff, 0xff, 0xe0, 0x00, 0x00, 0x00, 0x00, 0x00, 0x00, 0x00, 0xff, 0x00, 0x00, 0x7f, 0xff,
    0xff, 0xff, 0xff, 0x80, 0x00, 0x00, 0x00, 0x00, 0x00, 0x00, 0x03, 0xff, 0x80, 0x00, 0x3f, 0xff,
    0xff, 0xff, 0xff, 0x00, 0x00, 0x00, 0x00, 0x00, 0x00, 0x00, 0x0f, 0xff, 0x80, 0x00, 0x1f, 0xff,
    0xff, 0xff, 0xfe, 0x00, 0x00, 0x00, 0x00, 0x00, 0x00, 0x00, 0x3f, 0xff, 0xc0, 0x00, 0x1f, 0xff,
    0xff, 0xff, 0xfc, 0x00, 0x00, 0x00, 0x00, 0x00, 0x00, 0x00, 0x1f, 0xff, 0xe0, 0x00, 0x0f, 0xff,
    0xff, 0xff, 0xf8, 0x00, 0x00, 0x00, 0x00, 0x00, 0x00, 0x00, 0x00, 0xff, 0x80, 0x00, 0x07, 0xff,
    0xff, 0xff, 0xfc, 0x00, 0x00, 0x00, 0x00, 0x00, 0x00, 0x00, 0x01, 0xff, 0x00, 0x00, 0x07, 0xff,
    0xff, 0xff, 0xfc, 0x00, 0x00, 0x00, 0x00, 0x00, 0x00, 0x00, 0x03, 0xff, 0x00, 0x00, 0x03, 0xff,
    0xff, 0xff, 0xfc, 0x00, 0x00, 0x00, 0x00, 0x00, 0x00, 0x07, 0x0f, 0xff, 0x01, 0x80, 0x01, 0xff,
    0xff, 0xff, 0xfc, 0x00, 0x00, 0x00, 0x00, 0x00, 0x1f, 0xff, 0xff, 0xff, 0xf0, 0x00, 0x00, 0xff,
    0xff, 0xff, 0xfc, 0x00, 0x00, 0x00, 0x00, 0x00, 0xff, 0xff, 0xff, 0xff, 0xff, 0x80, 0x00, 0xff,
    0xff, 0xff, 0xfc, 0x00, 0x00, 0x00, 0x00, 0x03, 0xff, 0xff, 0xff, 0xff, 0xff, 0xf0, 0x00, 0x7f,
    0xff, 0xff, 0xf8, 0x00, 0x00, 0x00, 0x00, 0x07, 0xff, 0xff, 0xff, 0xff, 0xff, 0xf0, 0x00, 0x7f,
    0xff, 0xff, 0xc0, 0x00, 0x00, 0x00, 0x00, 0x0f, 0xff, 0xff, 0xff, 0xef, 0xff, 0xf0, 0x00, 0x3f,
    0xff, 0xe0, 0x00, 0x00, 0x00, 0x00, 0x00, 0x07, 0xff, 0xff, 0xff, 0x83, 0x9f, 0xf0, 0x00, 0x3f,
    0xfe, 0x00, 0x00, 0x00, 0x00, 0x00, 0x00, 0x07, 0xff, 0xff, 0xff, 0xff, 0xff, 0xe0, 0x00, 0x7f,
    0xf8, 0x00, 0x00, 0x00, 0x00, 0x00, 0x00, 0x07, 0xff, 0xff, 0xff, 0xff, 0xff, 0xe0, 0x00, 0xff,
    0xf0, 0x00, 0x00, 0x00, 0x00, 0x00, 0x00, 0x07, 0xff, 0xff, 0xff, 0xff, 0xff, 0xc0, 0x00, 0x7f,
    0xf0, 0x3c, 0x00, 0x00, 0x00, 0x00, 0x00, 0x07, 0xff, 0xff, 0x80, 0x00, 0x07, 0x80, 0x00, 0x7f,
    0xe0, 0x20, 0x00, 0x00, 0x00, 0x00, 0x00, 0x07, 0xff, 0xff, 0xff, 0xfe, 0x0f, 0x80, 0x08, 0x7f,
    0xe0, 0x00, 0x00, 0x00, 0x00, 0x00, 0x00, 0x03, 0xff, 0xff, 0xff, 0xff, 0xff, 0x00, 0x01, 0xff,
    0xe0, 0x00, 0x00, 0x00, 0x00, 0x00, 0x00, 0x01, 0xff, 0xff, 0xff, 0xff, 0xfc, 0x00, 0x03, 0xff,
    0x80, 0x00, 0x00, 0x00, 0x00, 0x00, 0x00, 0x00, 0x7f, 0xff, 0xff, 0xff, 0xf8, 0x00, 0x00, 0x3f,
    0x00, 0x00, 0x00, 0x00, 0x00, 0x00, 0x00, 0x00, 0x07, 0xff, 0xff, 0xff, 0xe0, 0x00, 0x00, 0x0f,
    0x00, 0x00, 0x00, 0x00, 0x00, 0x00, 0x00, 0x00, 0x00, 0x0f, 0xff, 0xff, 0x00, 0x00, 0x00, 0x03,
    0x00, 0x00, 0x00, 0x00, 0x00, 0x00, 0x00, 0x00, 0x00, 0x00, 0x00, 0x00, 0x00, 0x00, 0x00, 0x01
};
const tImage Image = { image_data_Image, 128, 32,
    8 };
Step 9: Programming
Copy your C file array data, image_data_Image, and replace it with the data array, image_data_Saraarray , of my image below in the code,
Upload the code on your Arduino Uno board you should get your image on OLED display if everything falls right.
/*********
  Developer: Rajeev Mehndiratta
  Date: 25/07/2021
  Hardware: Arduino Uno
  Project Name: Photo on OLED
*********/

#include <Wire.h>
#include <Adafruit_GFX.h>
#include <Adafruit_SSD1306.h>

#define SCREEN_WIDTH 128
#define SCREEN_HEIGHT 32

Adafruit_SSD1306 display(SCREEN_WIDTH, SCREEN_HEIGHT, &Wire, -1);

static const unsigned char PROGMEM image_data_Saraarray[] = {
     0xff, 0xff, 0xff, 0xff, 0xff, 0x80, 0x00, 0x00, 0x00, 0x00, 0x00, 0x00, 0x0f, 0xff, 0xff, 0xff,
    0xff, 0xff, 0xff, 0xff, 0xfc, 0x00, 0x00, 0x00, 0x00, 0x00, 0x00, 0x00, 0x01, 0xff, 0xff, 0xff,
    0xff, 0xff, 0xff, 0xff, 0xf0, 0x00, 0x00, 0x00, 0x00, 0x00, 0x00, 0x00, 0x00, 0x7f, 0xff, 0xff,
    0xff, 0xff, 0xff, 0xff, 0xc0, 0x00, 0x00, 0x00, 0x00, 0x00, 0x00, 0x00, 0x00, 0x1f, 0xff, 0xff,
    0xff, 0xff, 0xff, 0xfe, 0x00, 0x00, 0x00, 0x00, 0x00, 0x00, 0x00, 0x10, 0x00, 0x07, 0xff, 0xff,
    0xff, 0xff, 0xff, 0xf8, 0x00, 0x00, 0x00, 0x00, 0x00, 0x00, 0x00, 0x3e, 0x00, 0x01, 0xff, 0xff,
    0xff, 0xff, 0xff, 0xe0, 0x00, 0x00, 0x00, 0x00, 0x00, 0x00, 0x00, 0xff, 0x00, 0x00, 0x7f, 0xff,
    0xff, 0xff, 0xff, 0x80, 0x00, 0x00, 0x00, 0x00, 0x00, 0x00, 0x03, 0xff, 0x80, 0x00, 0x3f, 0xff,
    0xff, 0xff, 0xff, 0x00, 0x00, 0x00, 0x00, 0x00, 0x00, 0x00, 0x0f, 0xff, 0x80, 0x00, 0x1f, 0xff,
    0xff, 0xff, 0xfe, 0x00, 0x00, 0x00, 0x00, 0x00, 0x00, 0x00, 0x3f, 0xff, 0xc0, 0x00, 0x1f, 0xff,
    0xff, 0xff, 0xfc, 0x00, 0x00, 0x00, 0x00, 0x00, 0x00, 0x00, 0x1f, 0xff, 0xe0, 0x00, 0x0f, 0xff,
    0xff, 0xff, 0xf8, 0x00, 0x00, 0x00, 0x00, 0x00, 0x00, 0x00, 0x00, 0xff, 0x80, 0x00, 0x07, 0xff,
    0xff, 0xff, 0xfc, 0x00, 0x00, 0x00, 0x00, 0x00, 0x00, 0x00, 0x01, 0xff, 0x00, 0x00, 0x07, 0xff,
    0xff, 0xff, 0xfc, 0x00, 0x00, 0x00, 0x00, 0x00, 0x00, 0x00, 0x03, 0xff, 0x00, 0x00, 0x03, 0xff,
    0xff, 0xff, 0xfc, 0x00, 0x00, 0x00, 0x00, 0x00, 0x00, 0x07, 0x0f, 0xff, 0x01, 0x80, 0x01, 0xff,
    0xff, 0xff, 0xfc, 0x00, 0x00, 0x00, 0x00, 0x00, 0x1f, 0xff, 0xff, 0xff, 0xf0, 0x00, 0x00, 0xff,
    0xff, 0xff, 0xfc, 0x00, 0x00, 0x00, 0x00, 0x00, 0xff, 0xff, 0xff, 0xff, 0xff, 0x80, 0x00, 0xff,
    0xff, 0xff, 0xfc, 0x00, 0x00, 0x00, 0x00, 0x03, 0xff, 0xff, 0xff, 0xff, 0xff, 0xf0, 0x00, 0x7f,
    0xff, 0xff, 0xf8, 0x00, 0x00, 0x00, 0x00, 0x07, 0xff, 0xff, 0xff, 0xff, 0xff, 0xf0, 0x00, 0x7f,
    0xff, 0xff, 0xc0, 0x00, 0x00, 0x00, 0x00, 0x0f, 0xff, 0xff, 0xff, 0xef, 0xff, 0xf0, 0x00, 0x3f,
    0xff, 0xe0, 0x00, 0x00, 0x00, 0x00, 0x00, 0x07, 0xff, 0xff, 0xff, 0x83, 0x9f, 0xf0, 0x00, 0x3f,
    0xfe, 0x00, 0x00, 0x00, 0x00, 0x00, 0x00, 0x07, 0xff, 0xff, 0xff, 0xff, 0xff, 0xe0, 0x00, 0x7f,
    0xf8, 0x00, 0x00, 0x00, 0x00, 0x00, 0x00, 0x07, 0xff, 0xff, 0xff, 0xff, 0xff, 0xe0, 0x00, 0xff,
    0xf0, 0x00, 0x00, 0x00, 0x00, 0x00, 0x00, 0x07, 0xff, 0xff, 0xff, 0xff, 0xff, 0xc0, 0x00, 0x7f,
    0xf0, 0x3c, 0x00, 0x00, 0x00, 0x00, 0x00, 0x07, 0xff, 0xff, 0x80, 0x00, 0x07, 0x80, 0x00, 0x7f,
    0xe0, 0x20, 0x00, 0x00, 0x00, 0x00, 0x00, 0x07, 0xff, 0xff, 0xff, 0xfe, 0x0f, 0x80, 0x08, 0x7f,
    0xe0, 0x00, 0x00, 0x00, 0x00, 0x00, 0x00, 0x03, 0xff, 0xff, 0xff, 0xff, 0xff, 0x00, 0x01, 0xff,
    0xe0, 0x00, 0x00, 0x00, 0x00, 0x00, 0x00, 0x01, 0xff, 0xff, 0xff, 0xff, 0xfc, 0x00, 0x03, 0xff,
    0x80, 0x00, 0x00, 0x00, 0x00, 0x00, 0x00, 0x00, 0x7f, 0xff, 0xff, 0xff, 0xf8, 0x00, 0x00, 0x3f,
    0x00, 0x00, 0x00, 0x00, 0x00, 0x00, 0x00, 0x00, 0x07, 0xff, 0xff, 0xff, 0xe0, 0x00, 0x00, 0x0f,
    0x00, 0x00, 0x00, 0x00, 0x00, 0x00, 0x00, 0x00, 0x00, 0x0f, 0xff, 0xff, 0x00, 0x00, 0x00, 0x03,
    0x00, 0x00, 0x00, 0x00, 0x00, 0x00, 0x00, 0x00, 0x00, 0x00, 0x00, 0x00, 0x00, 0x00, 0x00, 0x01

};

void setup() {
  Serial.begin(115200);

  if(!display.begin(SSD1306_SWITCHCAPVCC, 0x3C)) {
    Serial.println(F("SSD1306 allocation failed"));
    for(;;);
  }
  delay(2000); // Pause for 2 seconds

  // Clear the buffer.
  display.clearDisplay();

  // Draw bitmap on the screen
  display.drawBitmap(0, 0, image_data_Saraarray, 128, 32, 1);
  display.display();
}

void loop() {

}<br>
Step 10: Points to Be Noted
- This OLED display comes in two resolutions one is 128×64 and 128×32 other. Keep in mind this while processing your image for different conversions explained above.
- If you have a 128×64 display don’t forget to change SCREEN_HEIGHT to 64. I used 128×32 so 32 is there in the code.
- The I2C address of the display of 128×32 is 0x3C and 0x3D of 128×64, don’t forget to change it in the code otherwise display would not even turn on.
- Kindly follow me, if you have any doubts, queries don’t forget to drop them in the comment box below.
Source: Display Your Photo on OLED Display
- How do I connect the OLED display to the Arduino?
Connect SCL to A5, SDA to A4, GND to ground, and Vcc to +5V. - Which libraries are required for this project?
You need to install the Adafruit_SSD1306.h and adafruit_GFX.h libraries. - What resolution should the image be resized to?
Resize the image to 128x64 or 128x32 depending on your display model. - Can I use any image format for the display?
No, you must convert the image to a Monochrome Bitmap format. - How do I convert the bitmap to a C array?
Use the LCD Image Converter tool with settings like Monochrome preset and Split to rows checked. - What is the I2C address for a 128x32 display?
The I2C address for a 128x32 display is 0x3C. - Does the code change if I use a 128x64 display?
Yes, you must change SCREEN_HEIGHT to 64 and the I2C address to 0x3D. - What happens if the SSD1306 allocation fails?
The program will print an error message and stop execution indefinitely.