We have developed into Pedosa Innovation, a tech start-up founded by the developer of Pedosa Glass. We have continued to develop wearable technology, in addition to cloud infrastructure and STEM education programmes for kids in Hong Kong. Learn more at www.pedosa.org, or contact us at [email protected].
UPDATE: I released the version 2 of Pedosa Glass which has a 3D-printed case and a more compact size, and I had an exhibit at Maker Faire Hong Kong 28-29 Nov!
I am Jordan Fung, a 13-year-old student from Hong Kong. I have been developing Android and iOS apps, and I’ve developed 6 apps (available on the Google Play store and iTunes App Store). In addition, I have also been doing Arduino programming and prototyping.
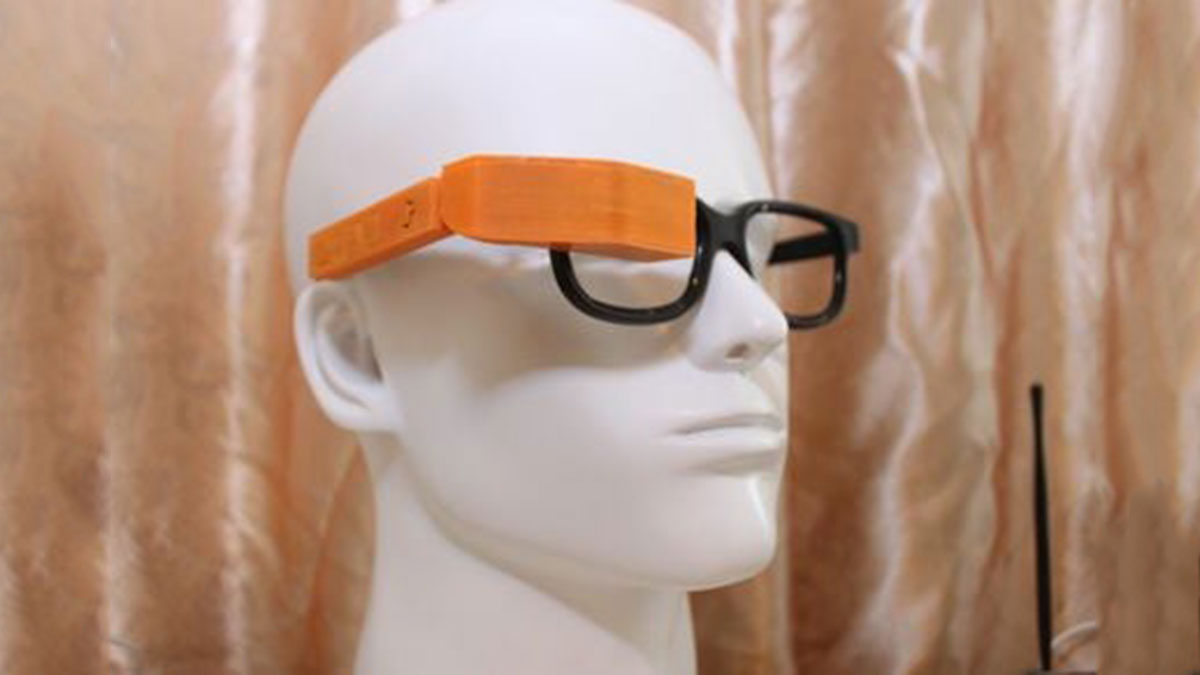
In this Instructable, I am going to introduce you to my latest project, the coolest project I’ve ever made – an Arduino-Based Smart Glasses – the Pedosa Glass!
I will also show show you how you can replicate one yourself!
Vote in the Wearables Contest if you enjoyed my project!
Check out the video introduction on Youtube:
Step 1: What’s Inside?
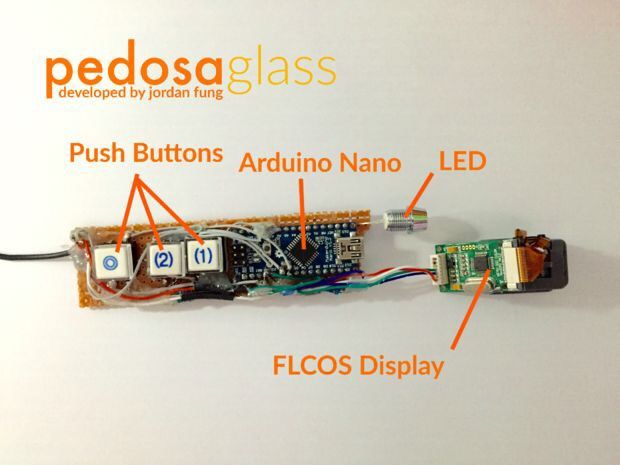
The Pedosa Glass is powered by a single Arduino Nano running an “operating system” developed by me.
There is a tiny FLCOS display in the front. The AV signal from the Arduino will be displayed on it. It is equipped with 3 push buttons, in which 2 of them are control buttons and one of them be the home button, also equipped with a super-bright white LED for use as a flashlight.
Step 2: What Can It Do? – the “Operating System”

(The images are shot by placing my iPhone’s camera in front of the display:)
The AV signal from the Arduino is a 120×96 BNW video, but still, it is readable.
The first thing you’ll see when you boot up is the scrolling logo intro. Then, you will go straight into the main menu of the Pedosa Glass where you will be able to select between the Apps Drawer menu and the About Page.
Apps Menu: Currently, there are only two apps to choose from: the Timer and the Flashlight. They are both fully functional. I am working very hard to add more apps to the Pedosa Glass.
About Page: The information of the Pedosa Glass will be shown here.
Step 3: How to Replicate One Yourself?
Are you ready to make one yourself? Let’s get started!
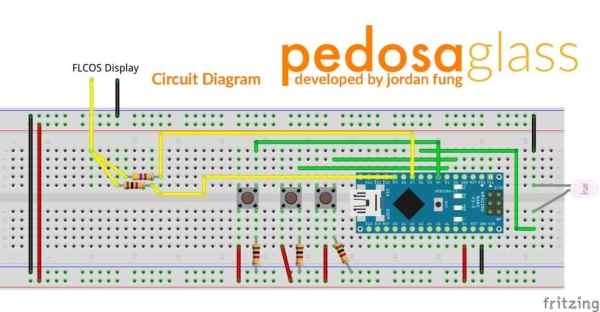
You’ll need the following:
- An Arduino
- An FLCOS display with AV input
- Push buttons X 3
- 10K Ohm Resistor X 3
- 1K Ohm Resistor
- 470K Resistor
- Super-bright white LED
UPDATE: Thanks to @BrentN5, this is a link to the FLCOS Display:
http://www.banggood.com/FPV-Night-Vision-Goggles-Viewfinder-Monitor-Micro-Display-p-912901.html
Softwares:
- Arduino IDE
- TVOut Library (https://code.google.com/p/arduino-tvout/)
Then, you’ll have to assemble the parts according to the circuit diagram above.
Download the Arduino project files in the attachments below and upload it on to your Arduino and you’re good to go.
The software is not very complete in the current stage, I am working very hard to add more features to it. Feel free to give suggestions in the comments section below!
Read more: [DEPRECATED] Arduino-Based Smart Glasses by a 13-year-old – Jordan Fung’s Pedosa Glass