
Summary of Crimson Fox: Raising Awareness to Take a Break While Working
This article describes the "Crimson Fox," an interactive shape-shifting artefact designed to remind users to take breaks. The fox mimics breathing motions, panicking with heavy breathing if the user works too long without a break. Petting the fox calms it, signaling the need for a pause. Users can indicate brief or long breaks by varying pet duration, then resume work with a short pet. The project utilizes laser-cut materials and electronics like an Arduino Pro Micro and stepper motor to achieve these movements and touch sensing capabilities.
Parts used in the Crimson Fox:
- (Fake) Leather
- Plywood
- Cardboard
- Aluminium foil
- Glue
- Needles and thread
- Arduino pro micro
- Micro USB to USB cable
- Stepper motor
- Motor driver
- 2 small breadboards
- 2 LED's of different colour
- Wires
- One 10MΩ resistor and two resistors of ~100Ω
- 9 volts battery
- 9 volts clip
For a course we followed at KTH in Sweden, we were assigned to create an artefact which could change shape. We made a fox shape artefact, supposed to remind you to take a break from work or studying. The general concept it that the fox will display breathing like motions. When you are starting to work you pet the fox, indicating you are going to start with your work. At a certain point, when you are working for too long in a straight session, the fox starts to panic and breaths more heavily. When this happens you need to pet it in order to make it calm again. This will make you aware to take a break, which can be a short one like getting coffee or a long one like going for lunch, that’s up to you.
If there would be a moment you decide to take a very brief break and want to continue to work after that, you pet the fox very briefly, indicating to the fox you that are continuing working. If you want to take a longer break, you pet it for a longer time. After that, when you want to start working again, you pet the fox shortly again.
Step 1: Step 1: Materials
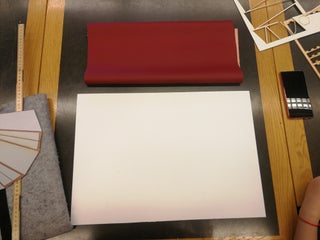
Materials
- (Fake) Leather*
- Plywood
- Cardboard
- Aluminium foil
- Glue
- Needles and thread
Electronics
- Arduino pro micro
- micro usb to usb cable
- Stepper motor
- Motor driver
- 2 small breadboards
- 2 LED’s of different colour
- Wires
- One 10MΩ resistor and two resistors of ~100Ω
- 9 volts battery
- 9 volts clip
* When using fake leather, make sure it does not contain any PVC. The leather will be laser cut, and PVC contains Chloride, which is toxic. When the fake leather does contain PVC or any other traces of Chloride, you can still trace and cut the lines with a scissor
Step 2: Step 2: Cut All the Materials
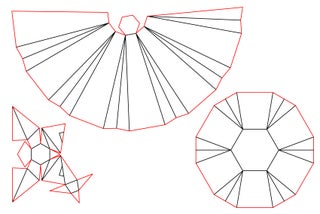
Use the lasercutter to cut all the materials according to the templates. In the files all the red lines needs to be cut and all the black lines need to be engraved. Use the right settings according to the lasercutter you are using, especially with the leather we advise to first do a test run to determine if the depth of the engraved parts are sufficient
When you do not have a lasercutter available, it is still possible to print the templates on paper and to cut/saw everything by hand, but it will take substantially longer.
Step 3: Step 3: Glue the Cardboard on the Leather
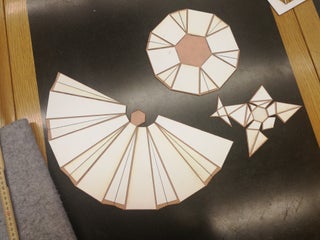
The cardboard serves as a support material for the leather so it does bent at the places we want. There is a matching shape of cardboard for each surface of the leather except for the hexagons. Glue them on the leather according to their shape. There should be about 3mm space between the cardboards on the edges that fold outward and almost no space between the ones that fold inward.
At the same time, slightly cut a little in the leather with a utility knife on the places it should fold inwards. This will make the leather fold more easy. Make sure you are not cutting completely through it!
Step 4: Step 4: Glue the Aluminium Foil to the Sides
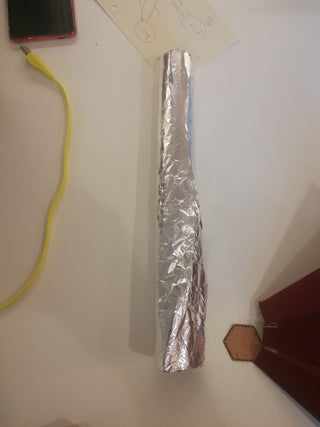
In order to create a touch sensor so we can read whether someone is touching and petting the fox, we will glue 4 layers of aluminium foil to the sides to create a capacitive sensor. First sew the big side together and then glue the foil to the cardboard. Make sure to leave some room at the parts were it folds inside so the foil will not break. Attach a wire somewhere which can go to your arduino.
Step 5: Step 5: Make the Circuit and Upload the Code

Step 6: Step 6: Glue the Lower Part Together and Attach the Wires
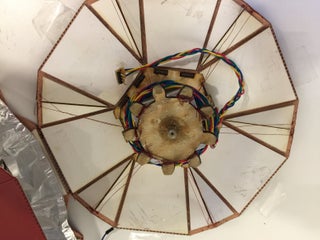
Glue the gear on the stepper motor and the lower part of the plywood structure together and glue the stepper motor on top of that. After that you take your needle and threat and start at each corner in which the fox should fold inwards. Wind the wire around two times around the pin of the stepper motor itself with a little bit of tension to it before attaching it to the gear. Also, make sure to wind it counter clockwise.
Source: Crimson Fox: Raising Awareness to Take a Break While Working
- What is the main purpose of the Crimson Fox artefact?
The fox reminds you to take a break from work or studying by displaying breathing motions. - How does the fox indicate that a break is needed?
The fox starts to panic and breathes more heavily when you have been working for too long in a straight session. - Can I use scissors instead of a lasercutter for the leather?
Yes, but only if the fake leather contains PVC or traces of Chloride, as cutting PVC with a lasercutter releases toxic gas. - How do I create the touch sensor for the fox?
You glue four layers of aluminium foil to the sides to create a capacitive sensor that reads touch. - What happens if I want to take a very brief break?
You pet the fox very briefly to indicate you will continue working shortly after the short break. - How do I signal a longer break to the fox?
You pet the fox for a longer time to indicate you are taking a longer break. - What material serves as support for the leather?
Cardboard serves as a support material so the leather does not bend where it should remain rigid. - Which direction should the wire be wound around the stepper motor pin?
The wire must be wound counter clockwise around the pin of the stepper motor.
