Summary of The Creepy Doll using Arduino
Summary: A hackathon leftover doll was modified to be creepier by replacing eyes with two red LEDs controlled by an ATtiny85 and powered by a single CR2032. A vibration/tilt sensor triggers a fading LED effect programmed via the Arduino IDE. The project is prototyped on an Arduino, then the sketch is uploaded to the ATtiny85 and installed on stripboard inside the doll.
Parts used in the Creepy Doll:
- a doll <li an Arduino (Diecimila, Uno, Leonardo or Yún are ok)
- AtTiny85
- 8 Pin DIP Socket
- two 3mm red LEDs
- a stripboard
- a tilt sensor
- CR2032 battery holder
- CR2032 battery
- sharp cutter (tool)
- hot glue gun (tool)
- soldering iron and solder (tool)
- needle and thread (to sew it back) (tool)
- optional - a Dremel to drill the eyes (tool)
Here at Mikamai, we often organise events and hackathons. After the last hackathon, someone left an old doll, and it was kinda creepy… so why not make it even creepier?
I decided to put two red LEDs instead of the eyes, and a vibration sensor to turn on the LEDs when you shake the doll. Everything is powered by an AtTiny85 and a single CR2032 battery.

Step 1: Materials and tools
Materials:
- a doll
- an Arduino (Diecimila, Uno, Leonardo or Yún are ok)
- AtTiny85
- 8 Pin DIP Socket
- two 3mm red LEDs
- a stripboard
- a tilt sensor
- CR2032 battery holder
- CR2032 battery
Tools:
- A sharp cutter
- Hot glue gun
- A soldering iron and solder
- Needle and thread, to sew it back
- optional – a Dremel to drill the eyes
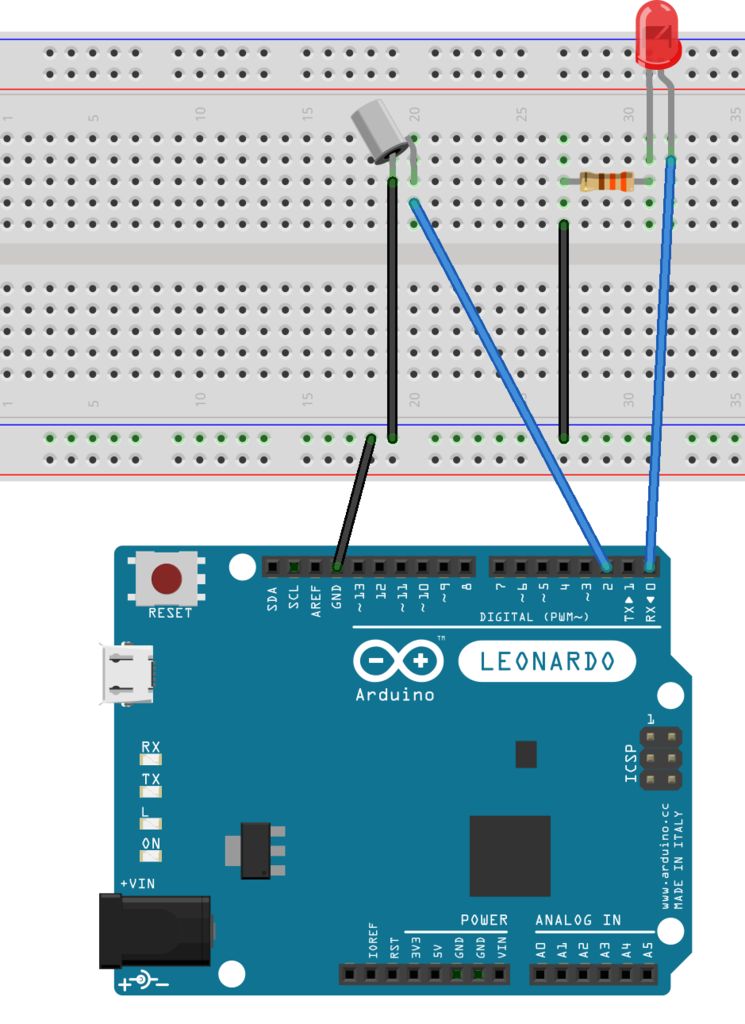
Step 2: Prototyping and testing the circuit
Using the AtTiny 85 is a great choice for those who are familiar with Arduino, because you have the possibility to use the Arduino IDE to program it. This means that you can prototype the circuit with Arduino before deploying it to the AtTiny.
So I wrote this code, and I built a simple testing circuit with Arduino.
<p>#import <Arduino.h><br></p><p>int led = 0; // LEDs pin
int button = 2; // Tilt sensor pin
int brightness = 0;    // how bright the LED is
int fadeAmount = 5;    // how many points to fade the LED by
int storedVal = 0;     // used to save the tilt sensor state</p><p>void setup() {
  pinMode(button, INPUT_PULLUP); // initialize the button pin a pullup input, so I don't have to use an external pullup resistor.
  pinMode(led, OUTPUT); // initialize the digital pin as an output.
}</p><p>void loop() {</p><p>  int sensorVal = digitalRead(2); // Read the sensor state</p><p>  if (sensorVal != storedVal) { //if the sensor value has changed, blink the eyes
    storedVal = sensorVal; // store the sensor state
    fadeEyes(); // call the eyes led fade function
  } else {
    digitalWrite(led, LOW); // otherwise, turn the led off
  }</p><p>  delay(10); // a small delay for debouncing the sensor
}</p><p>void fadeEyes() {</p><p>  for (int i = 0; i < 768; i++) { //cycle 3 times

    analogWrite(led, brightness); // set the brightness of led pin:
    if (brightness == 255) { // at maximum brightness, wait 5 seconds
      delay(5000);
    }
    // change the brightness for next time through the loop:
    brightness = brightness + fadeAmount;</p><p>    // reverse the direction of the fading at the ends of the fade:
    if (brightness == 0 || brightness == 255) {
      fadeAmount = -fadeAmount;
    }</p><p>    // wait for 30 milliseconds to see the dimming effect
    delay(100);</p><p>  }</p><p>  digitalWrite(led, LOW);
}</p>
The code is pretty simple: it waits for a changement in the tilt sensor state, and when it happens, it starts a little loop fading the leds brightness
When the code works on Arduino, you are ready to deploy it on your AtTiny85
Step 3: Moving to AtTiny85
Programming an AtTiny with an Arduno can be tricky, but fear not! I made a very simple tutorial on how to do that with the latest Arduino IDE and Arduino Uno/diecimila or Arduino Leonardo/Yun. Just follow these steps, and you can easily use this sketch on the AtTiny85
Step 4: Testing the AtTiny85 based circuit
Now we can move the programmed AtTiny on a new breadboard, following this scheme
There is no resistor on the LED because I’m using a 3.3V coin battery. The circuit should start working as soon as you plug the battry: when the tilt sensor is shook, the LED fades 🙂
For more detail: The Creepy Doll using Arduino
- Can I prototype the circuit with Arduino before using the AtTiny85?
Yes, the article explains prototyping on an Arduino and then deploying the working sketch to the AtTiny85 using the Arduino IDE. - What triggers the LEDs to turn on in the doll?
The tilt/vibration sensor detects a shake and the code fades the LEDs when the sensor state changes. - Is a resistor required for the LEDs with a CR2032 battery?
No, the article states there is no resistor on the LED because a 3.3V coin battery is used. - Which battery powers the project?
The project is powered by a single CR2032 battery placed in a CR2032 battery holder. - How does the LED fading effect work in the code?
The code monitors the tilt sensor, and on change calls fadeEyes which adjusts brightness with analogWrite in a loop, reversing fade direction at 0 or 255 and including delays for effect. - Do I need special hardware to program the AtTiny85?
The article shows using an Arduino board (Uno/Diecimila or Leonardo/Yún) with the Arduino IDE to program the AtTiny85. - What tools are recommended for modifying the doll?
Tools listed include a sharp cutter, hot glue gun, soldering iron and solder, needle and thread, and optionally a Dremel to drill the eyes. - Can the project run as soon as the battery is connected?
Yes, the article says the circuit should start working as soon as you plug the battery: when the tilt sensor is shook, the LED fades.