A laser security alarm stands out as a highly effective system designed to detect any object or individual’s presence. Within a designated room, multiple laser beams are often employed. Reflective mirrors are commonly utilized to create a laser grid. When any object intersects these beams, triggering contact with the laser, the alarm system activates instantly.
Introduction
Certainly! Here’s a revised version of the text:
“In movies, we often witness sophisticated laser security setups, where triggering even a single laser beam sets off an alarm. Motivated by these portrayals, we’ve developed our own laser security alarm system. In this article, we’ll provide comprehensive details on how we constructed this system, including the coding procedures.
We’re eager to share the entire process of creating this system and the coding involved in its functionality.
We hope you’ll recognize the effort behind this project and kindly lend us your support by giving it your attention.
The term LASER stands for Light Amplification by Stimulated Emission of Radiation. This technology extends the path of light, significantly increasing its intensity compared to ordinary light, making it clearly visible. Additionally, we’ve implemented a lens to amplify the light’s magnitude in our setup.”
How to make laser security Alarm system
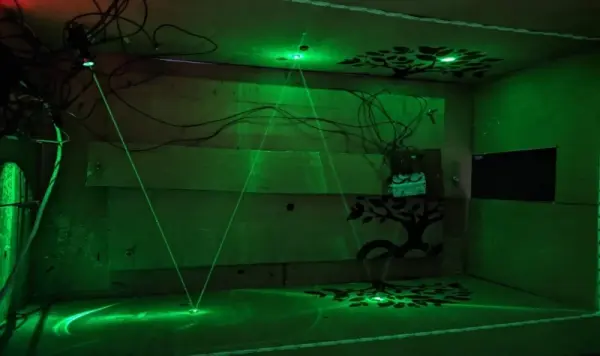
We’ve employed a reflection technique to construct the laser trap, employing a sequence of six mirrors arranged to reflect the laser progressively. Ultimately, the laser reaches a light detector sensor positioned at the end of this sequence.
The sensor used is known as an LDR sensor, short for Light Dependent Resistor. When light strikes the sensor, it triggers an output. We’ve strategically placed this sensor at the termination point where the laser arrives after bouncing off the mirrors.
To create this impressive DIY laser security system, we require specific components, which are detailed in the following list.
Required Components for laser security Alarm
Certainly! Here’s a rephrased version of the information provided:
“Laser Light Module: Laser light, generated by a device known as a laser, is highly directional and monochromatic, characterized by a single tone or frequency. The production of laser light occurs as excited atoms or molecules release photons that stimulate other particles to emit more photons, resulting in a concentrated beam.
Arduino Uno: The Arduino Uno represents a microcontroller development board capable of controlling various devices through programming. It serves as a prime example of an embedded system wherein electronic components are managed via coding.
LDR Sensor: An LDR (Light Dependent Resistor) sensor detects incident light directly, converting it into an electrical signal due to its photosensitive nature.
Small Mirrors: These are tiny reflective surfaces essential for efficiently redirecting the laser beams.
Wires: A collection of wires is necessary to successfully assemble this project, aiding in the connections.
Buzzer: An electronic device that converts electrical signals into audible sound. When the laser beam is disturbed, this buzzer emits sound as an alarm signal.
RGB Light: RGB represents Red, Green, and Blue, the fundamental colors in lighting. For this project, green light remains constant within the RGB setup. However, if the laser is touched or interrupted, the light changes to red as an alert signal.”
Circuit Daigram for DIY Laser security room
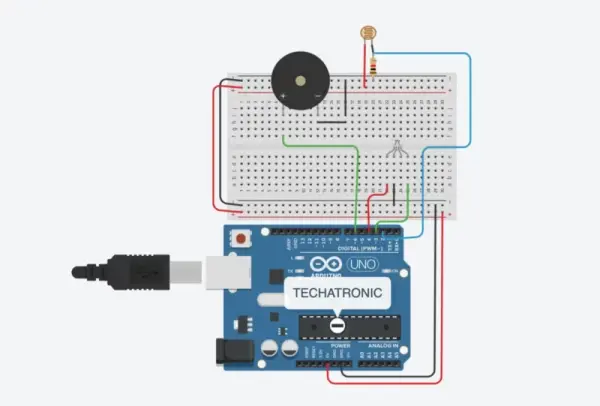
You can assemble the circuit based on the provided circuit diagram for this project. Once you’ve gathered the necessary components and followed the circuit diagram, we’ll proceed to create the code in the C/C++ language accordingly.
Arduino code for Laser security Alarm
void setup() {
// put your setup code here, to run once:
pinMode(2, INPUT_PULLUP);
pinMode(3, OUTPUT);
pinMode(4, OUTPUT);
pinMode(6, OUTPUT);
Serial.begin(9600);
}
void loop() {
// put your main code here, to run repeatedly:
int m = digitalRead(2);
Serial.println(m);
delay(100);
if(m==1)
{
//Serial.print(“LASER ON”);
digitalWrite(3, HIGH);
digitalWrite(4, LOW);
digitalWrite(6, LOW);
delay(500);
}
else
{
// Serial.print(“LASER OFF”);
digitalWrite(3, LOW);
digitalWrite(4, HIGH);
digitalWrite(6, HIGH);
delay(500);
}
}