Summary of Course on MIT App Inventor and Arduino
This article guides users on creating Android apps with MIT App Inventor to control Arduino projects via Bluetooth. It covers three specific tutorials: controlling an LED, building a speech recognition app for commands, and operating a servo motor or robot using sliders and buttons. The guide emphasizes that no prior coding experience is needed as the app is built by assembling blocks, though basic Arduino IDE knowledge is recommended. Internet connectivity is required for the speech-to-text feature.
Parts used in the MIT App Inventor and Arduino Projects:
- Bluetooth module HC-05 or HC-06
- Arduino board
- LED
- Android mobile or Android supported device
- Servo motor
- External power supply
- Two gear motors with wheels
- L293D motor driver (or similar)
- Battery
- Connecting wires
I have made many tutorials for creating apps using MIT app inventor and connected the app with arduino to make things work, I often get email stating something went missing when they follow my tutorial, Here’s a step by step tutorial on getting started with creating MIT app inventor and control things with arduino. To complete this tutorial you need a Bluetooth module HC-05 or HC-06 to connect with arduino and send or receive data to and from other Bluetooth device.
Lets Make our first app to control an LED
1.Getting Started with Arduino and Android
This video gives insight into MIT app inventor and what are the requirements need to get started with this video series, anyone watching this video can make their own app and control a LED connected to arduino without any prior experience, if they have components with that’s more enough to make this tutorial. Blinking an LED is the first thing we do when we getting started with electronics in this tutorial you will TURN ON and TURN OFF the LED, this is the Hello world example in this tutorial, you don’t need any prior coding experience to make this application work. To test the app that created during this tutorial, you need an Android mobile or android supported devices to test your app. creating an app with MIT app inventor is very simple, you won’t be doing any coding process during creating your app, you will be assembling blocks together to make your app. if you don’t have any prior experience with Arduino control, make sure you follow some basics like connecting Arduino to your computer and upload example code to Arduino from Arduino IDE, this would be more sufficient to follow this tutorial.
Step 1: 2. Android Arduino Speech Recognition App.
In this tutorial you will know how to create a speech recognition app that will convert your speech to text and send command to your arduino and do certain task that matches your command, you don’t have any control over the speech to text conversion process, it is entirely depend on the google speech to text conversion engine, we will be making use of the speech to conversion process in this app, when the process of getting converting the text is over we will be sending the converted command to Arduino. You also need internet connectivity to do this process because google speech to conversion engine depends on Internet connectivity to do this you cannot do this process offline, you need to be connected with internet when following and working this tutorial. once you complete this app you can use this for many applications including Home Automation, Controlling a Bluetooth robot, sending voice command to do a process there are many possibilities with this application. The same hardware what you have created previous tutorial is enough for this tutorial you don’t need to change your hardware connection to make this work. keep your hardware same connect this app to your arduino and start to send your command.
Step 2: 3. Servo Motor Control Using Arduino and Android
In this tutorial you will be creating an app for controlling a servo motor, you will be using slider in your app to move your servo from 0-180,You need a servo motor to be connected on arduino side, make sure you also connecting external powersupply so that your Arduino will not restart during this process,
#include  // TX RX software library for bluetooth
#include  // servo library
Servo myservo; // servo name
int bluetoothTx = 10; // bluetooth tx to 10 pin
int bluetoothRx = 11; // bluetooth rx to 11 pin
SoftwareSerial bluetooth(bluetoothTx, bluetoothRx);
void setup()
{
  myservo.attach(9); // attach servo signal wire to pin 9
  //Setup usb serial connection to computer
  Serial.begin(9600);
  //Setup Bluetooth serial connection to android
  bluetooth.begin(9600);
}

void loop()
{
  //Read from bluetooth and write to usb serial
  if(bluetooth.available()> 0 ) // receive number from bluetooth
  {
    int servopos = bluetooth.read(); // save the received number to servopos
    Serial.println(servopos); // serial print servopos current number received from bluetooth
    myservo.write(servopos); // roate the servo the angle received from the android app
Step 3: 4. Make a Android Arduino Robot
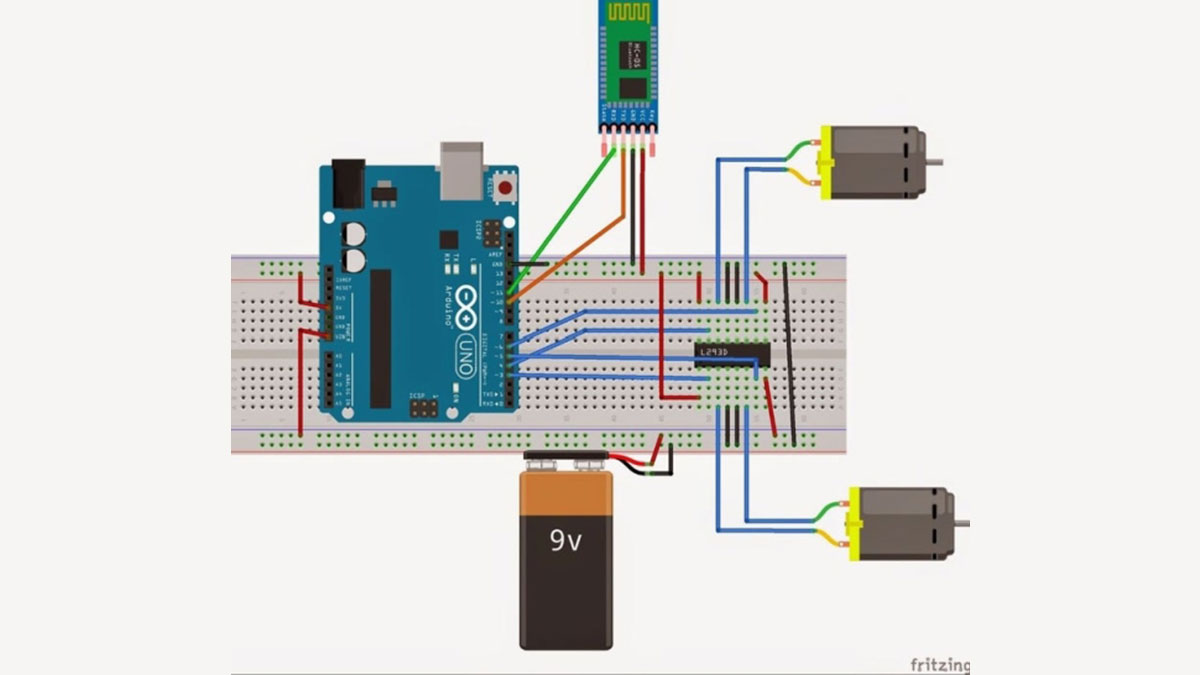
In this tutorial you will be learning on how to make an app for controlling an robot by android app, you will be using android phone as remote controller to control the robot.You need 2 gear motor with wheels A motor driver, you can use any of the motor driver you want, I used L293D motor driver for this project.You also need a battery and connecting wires, apart from that as usual a Bluetooth and Arduino board is needed to complete this tutorial.
Read more: Course on MIT App Inventor and Arduino
- What hardware is required to connect an Android app with Arduino?
You need a Bluetooth module HC-05 or HC-06 to connect with Arduino and send or receive data. - Can I create these apps without any prior coding experience?
Yes, you will be assembling blocks together to make your app without doing any coding process. - Does the speech recognition app work offline?
No, you cannot do this process offline because the Google speech to text conversion engine depends on Internet connectivity. - How do I prevent my Arduino from restarting when controlling a servo motor?
You need to connect an external power supply so that your Arduino will not restart during this process. - Which motor driver was used for the robot project in the tutorial?
The author used an L293D motor driver for the robot project. - What components are needed to control a robot with an Android phone?
You need 2 gear motors with wheels, a motor driver, a battery, connecting wires, a Bluetooth module, and an Arduino board. - How does the speech recognition app send commands to the Arduino?
The app converts speech to text using the Google engine and then sends the converted command to the Arduino. - What pins are used for the Bluetooth connection in the servo code?
The code uses pin 10 for bluetoothTx and pin 11 for bluetoothRx.