Summary of How To Communicate With An Alien Artifact or using arduino
This article details building a miniature "Close Encounters" mothership using an Altoids tin, featuring a PicAxe 08m microcontroller and a custom LED array. It covers soldering techniques, component selection for varied light angles, and drilling methods for sheet metal. The project creates seven illumination patterns to simulate alien communication signals.
Parts used in the Altoids Close Encounters Mothership:
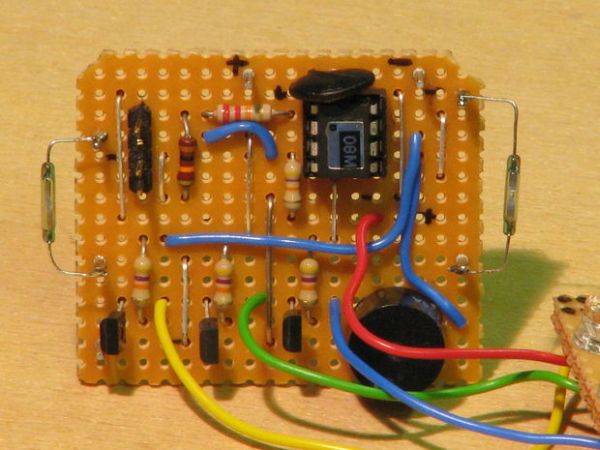
- PicAxe 08m microcontroller chip
- 12 wide-angle flat top LEDs (3 red, 3 blue, 3 green, 3 yellow)
- 6 x 180R resistors
- 3 x 220R resistors
- 3 x 330R resistors
- 18 x 15 hole copper strip veroboard
- Spot face cutter or 5mm drill bit
- Scraps of plain board and link wire
- Solder (60/40 tin/lead recommended)
- Altoids tin lid
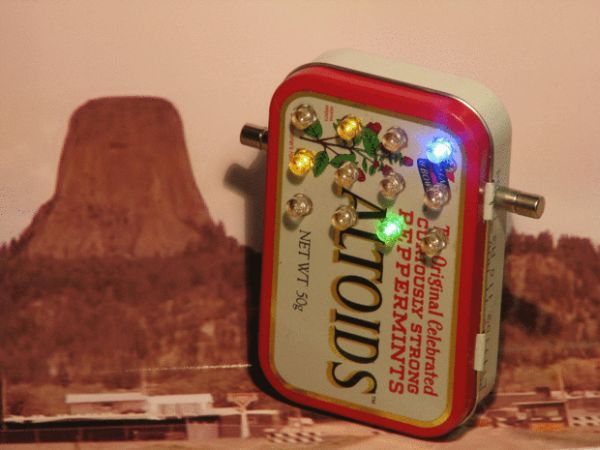
Close Encounters of the Curiously Minty Kind.
This Instructable will show you how to build an Altoids version of the ‘Close Encounters’ mothership, and how to interact with it. This may be vital training for that day when the Bright White Beam comes to suck you up into the unknown.
It will also introduce you to the PicAxe microcontroller chip and a method of drilling perfectly spaced holes in thin sheet metal. I have kept the building instructions fairly concise, but the photos show everything step by step.
Step 1: The LED Array
If you’re not familiar with soldering, there’s a great guide HERE. I would disagree with one point in it – Lead-free solder may be OK for health, but it’s rubbish for soldering. Get yourself a good, big reel of 60/40 tin/lead (while you can) and arrange efficient fume extraction.
Most LEDs are VERY bright over a very small viewing angle. Here I’ve used wide-angle flat top LEDs which give the same light but spread over a much wider range which will allow this to be appreciated from all angles. The video really doesn’t do justice to the brightness and clarity of the LEDs. They are bright even in daylight. Also the initial flashing is an artifact. The LEDs are pulsing smoothly.
The 12 LEDs are arranged as three banks of 4, which gives 7 possible patterns of illumination. It would have been good to have more but I wanted to keep this simple and specifically use the PicAxe 08m chip. The spreadsheet shows the way the LED colours and banks are arranged.
For the LED array you will need :-
-
- 3 x red LEDs, 3 x blue LEDs, 3 x green LEDs, 3 x yellow LEDs.
- 6 x 180R resistors (brown, grey, brown) for the red and yellow LEDs.
- 3 x 220R resistors (red, red, brown) for the blue LEDs.
- 3 x 330R resistors (orange, orange, brown) for the green LEDs.
- 18 x 15 hole copper strip veroboard.
- Spot face cutter ( or a 5mm drill bit or craft knife).
- Scraps of plain board and link wire.
Resistors can be 1/8 watt or 1/4 watt, 5%, 2% or 1%.
There are many factors influencing how bright a LED looks, so I chose these values empirically (i.e. what looked right) to balance the brightness, with a quick calculation to get around the right current. These are running at around 12mA
Cut 4 strips of single hole plain veroboard. These are to act as spacers to give clearance for the resistors when the array is mounted on the tin lid. I put ink dots on each so they didn’t get mixed up.
Insert the LEDs as shown with the colours in the right order and with the anodes (short leg – large electrode) at the top. The anodes will be all connected to the supply voltage. The cathodes will be joined in banks and switched to Gnd with transistors. Solder these in and crop the legs.
Cut the tracks using the spot face cutter and solder in the resistors.
The table below shows which LED goes where, which resistor goes with it and which output of the PicAxe it’s connected to (X,Y or Z).
Column 1 Column 2 Column 3 Column 4Red X 180 Yel Y 180 Grn Z 330 Blu Y 220Yel Y 180 Grn Z 330 Blu X 220 Red Z 180Blu Z 180 Red X 180 Grn Y 330 Yel X 180
You can then carefully solder in the two bare wire links which connect the common anodes and then connect the LED cathodes into banks with link wire (green, yellow, blue wires), and add flying leads which will go to the control board. You should also add a supply wire (red) to the anodes.
Carefully test the assembly by applying 5V to the red wire, and grounding each bank in turn. Each connection should light up a different 4 LEDs. If it works, you’ve completed the LED array board.
For more detail: How To Communicate With An Alien Artifact or
- What type of LEDs are best for this project?
Wide-angle flat top LEDs are used because they spread light over a wider range compared to standard bright LEDs. - Which solder is recommended for this build?
The author recommends 60/40 tin/lead solder rather than lead-free solder for better performance. - How are the 12 LEDs arranged?
The LEDs are arranged as three banks of four to create seven possible patterns of illumination. - What controls the flashing patterns?
A PicAxe 08m microcontroller chip is used to control the specific lighting sequences. - Why are spacers needed on the veroboard?
Cut strips of single hole plain veroboard act as spacers to give clearance for the resistors when mounted on the tin lid. - How do you verify the LED array works before final assembly?
You test the assembly by applying 5V to the red wire and grounding each bank to ensure different sets of four LEDs light up. - What is the purpose of the spot face cutter?
The tool is used to cut tracks on the veroboard and drill perfectly spaced holes in thin sheet metal. - At what current are the LEDs running?
The LEDs are running at around 12mA to balance brightness effectively.