Summary of Coding Robotics with Arduino: Programming Microcontrollers with Arduino
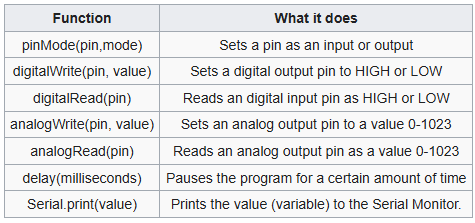
This guide teaches basics of sensors and Arduino-based microcontroller programming for a VEX robotics project, using the SparkFun RedBoard (Arduino UNO-compatible) as the robot brain. It explains RedBoard hardware (buttons, USB, LEDs, power pins, I/O pins), Arduino IDE features (verify, console, serial monitor, code sections), and core Arduino programming concepts (syntax, semicolons, comments, data types, operators, variables/constants, conditionals, loops, and common functions) to give users a solid hands-on start in building and coding responsive robots.
Parts used in the VEX robotics project:
- SparkFun RedBoard (Arduino UNO-compatible)
- USB cable (for power and programming)
- Microcontroller power source (battery for VIN if used)
- 3.3V sensors
- 5V sensors and components
- Wires/jumper cables for I/O connections
- Analog sensors (connect to A0–A5)
- Digital sensors/components (connect to digital pins 2–12)
- Computing device with Arduino IDE installed
It introduces the guide’s main goal: to teach the basics of sensors and coding in a VEX robotics project using Programming Microcontrollers with Arduino, giving users a solid starting point for hands-on robot building and programming.
Microcontrollers
This paragraph explains that a microcontroller is a low-cost, programmable computer with direct I/O access, used to read sensors and control actions. In this project, it serves as the VEX robot’s brain. The Arduino board is highlighted as an easy-to-use option with features like wireless support and varied processing power, helping users build responsive robotic systems.

The Arduino UNO-compatible RedBoard by SparkFun is identified as the microcontroller for the project. It clarifies the exact hardware users will use, helping them prepare for its role as the VEX robot’s brain in the lab activities.

Arduino Hardware

This section explains four important components of the RedBoard:
Reset Button
- Restarts the board’s program
- Essential for debugging and development
USB Connector
- Provides power to the board
- Transfers data to and from the computer for programming and serial monitoring
Pin 13 LED
- A built-in LED on the board
- Useful for simple code testing and feedback without needing an external circuit
Serial LEDs
- Show visual signals for data being transmitted or received (via pins 0, 1, or USB)
- Help diagnose communication issues

This paragraph explains the functions of the key power and ground pins on the RedBoard:
3.3V Pin
- Used to power low-voltage sensors
- Only for components that operate at 3.3 volts
5V Pin
- A common and versatile power source
- Used to power most circuits and components
GND (Ground) Pin
- Provides a 0V reference point for electrical circuits
- Essential for the proper functioning of all circuits
VIN (Voltage-In) Pin
- Used to power the board from an external source (like a battery)
- Used when powering the board without a USB connection

Here are the different types of I/O pins on the RedBoard and their functions:


- What microcontroller is used in the project?
The SparkFun RedBoard, which is Arduino UNO-compatible, is used as the microcontroller. - How does the USB connector function on the RedBoard?
The USB connector provides power to the board and transfers data for programming and serial monitoring. - Can I power low-voltage sensors from the RedBoard?
Yes, low-voltage sensors that operate at 3.3 volts can be powered from the 3.3V pin. - What is the role of the Arduino IDE in this project?
The Arduino IDE is used to write, compile, and upload code to the RedBoard and to debug and monitor programs via tools like the console and serial monitor. - How should lines of code end in Arduino programming?
Most lines of code must end with a semicolon; exceptions include conditional statements, loops, and function definitions. - What are the main code sections in an Arduino sketch?
The main sections are the Global section, Setup section, and Loop section. - Can the serial pins 0 and 1 be used in the lab?
The guide recommends not using serial pins 0 and 1 in this lab to keep the setup simple. - What is the purpose of comments starting with // in Arduino code?
Comments with // are ignored by the compiler and are used to label code, explain functionality, and improve readability. - How do loops help in the VEX robotics project?
Loops like while and for allow repeated execution of code, automating tasks and enabling complex behaviors based on conditions or fixed repetitions.